
Via Custom Admin Role
Connect Azure AD to Zluri using a custom admin role
If you wish to delegate Zluri’s Azure AD integration to a non-admin user or group, you can assign them a custom admin role. This method requires more manual configuration compared to the OAuth method, but gives greater control over the Zluri features you wish to use.
Prerequisites
- An account with Owner or User access administrator privileges (only required for creating a custom admin)
- Any Microsoft Entra ID subscription
- An account with Privileged Role Administrator or Global Administrator privileges (only required for assigning the custom admin role)
If you wish to use the Audit Log scope in Zluri, you'll need an Entra ID P1 or Entra ID P2 subscription
Create a custom admin role
-
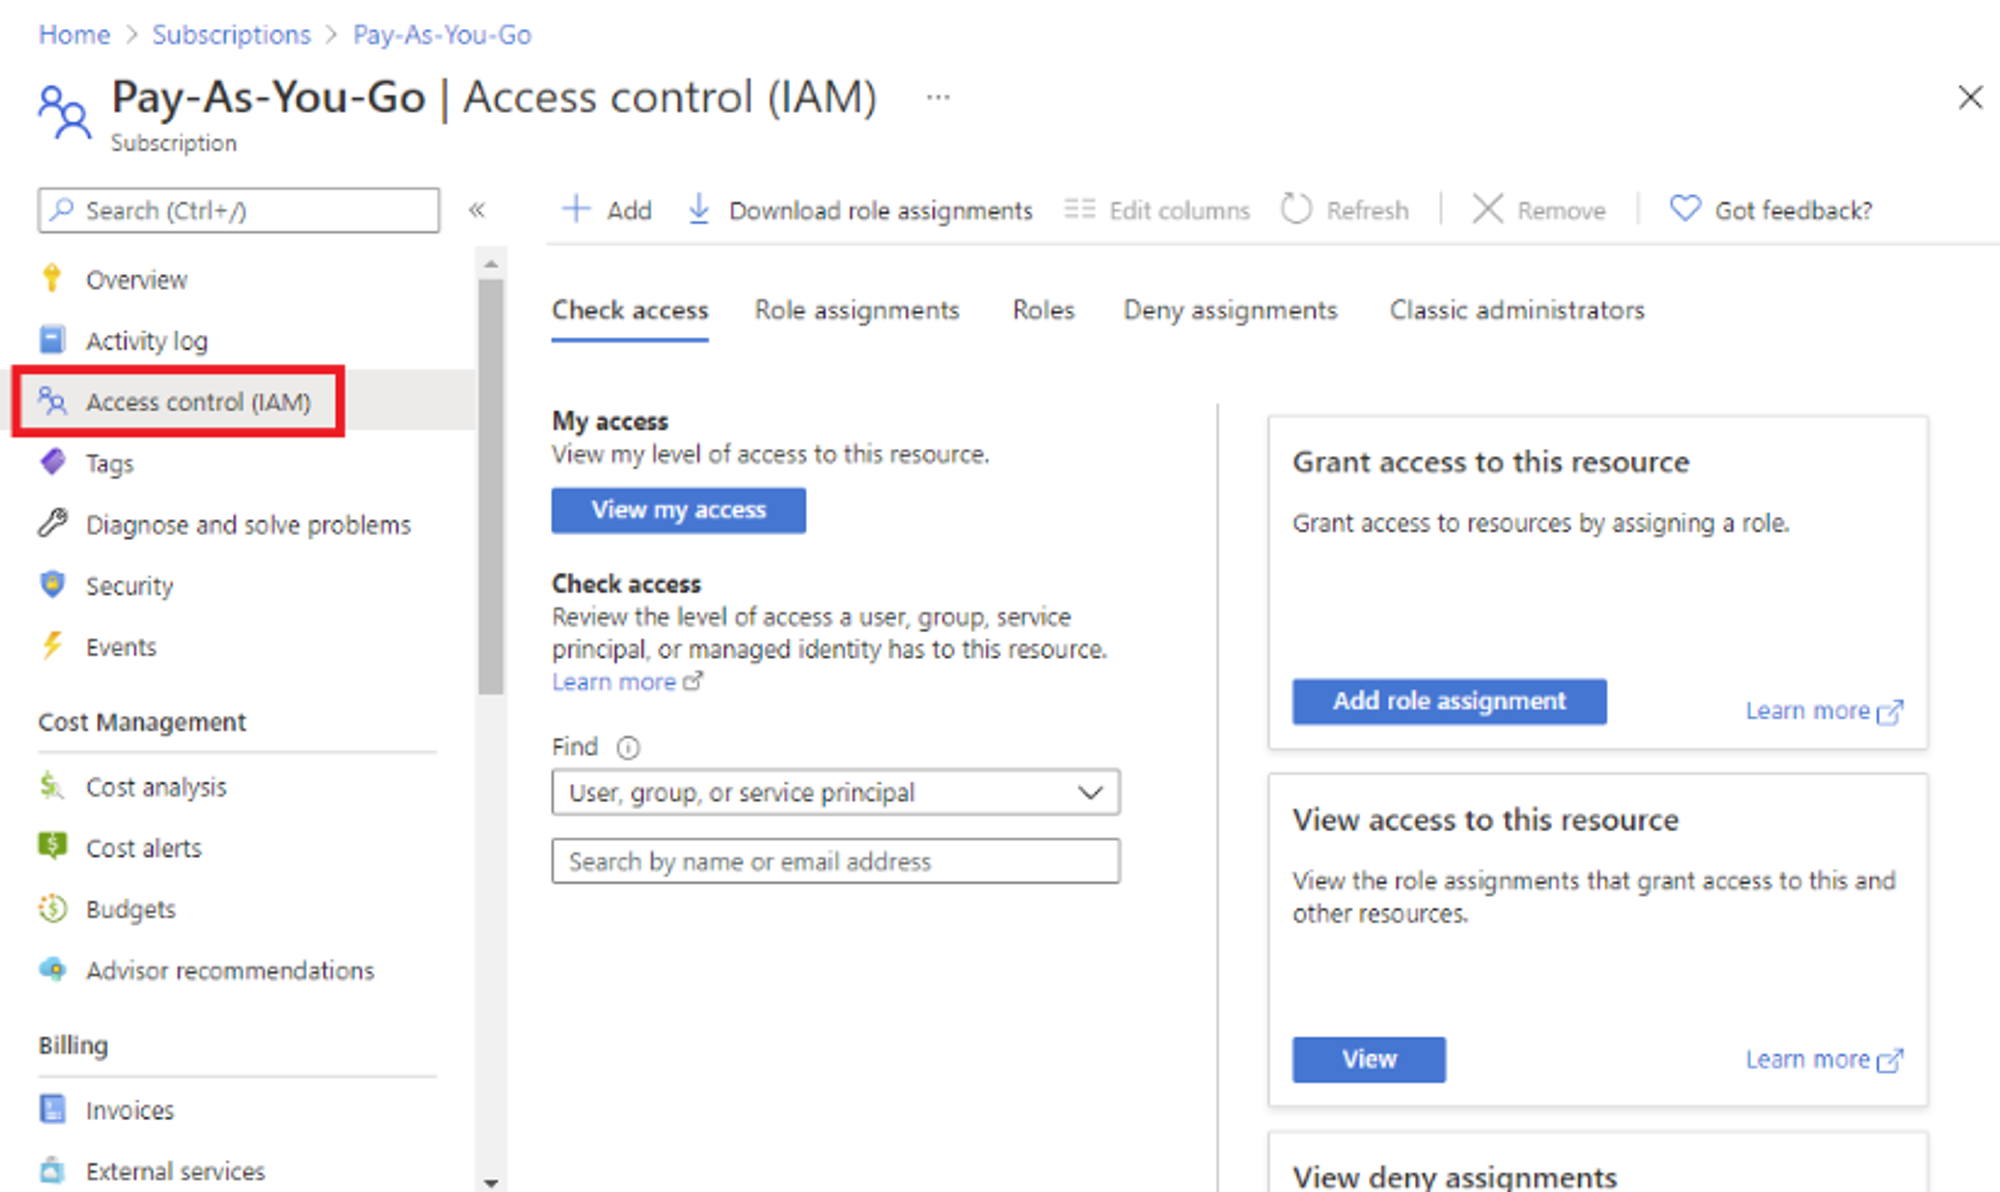
In the Azure Portal, open either Management Group, Subscription, or Resource Group (depending on your use case) where you want to assign the custom role, then open Access control (IAM).
-
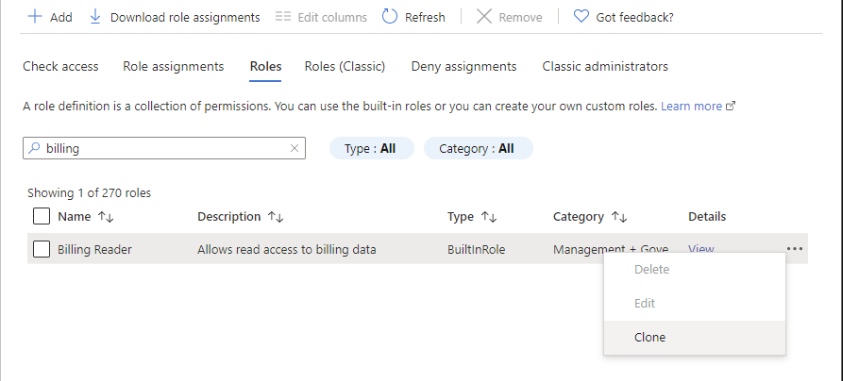
Click the Roles tab to see a list of all the built-in and custom roles.
-
Search for a role you want to clone. Click the 3-dot menu towards the right of the row and click Clone. This will open the custom roles editor.
-
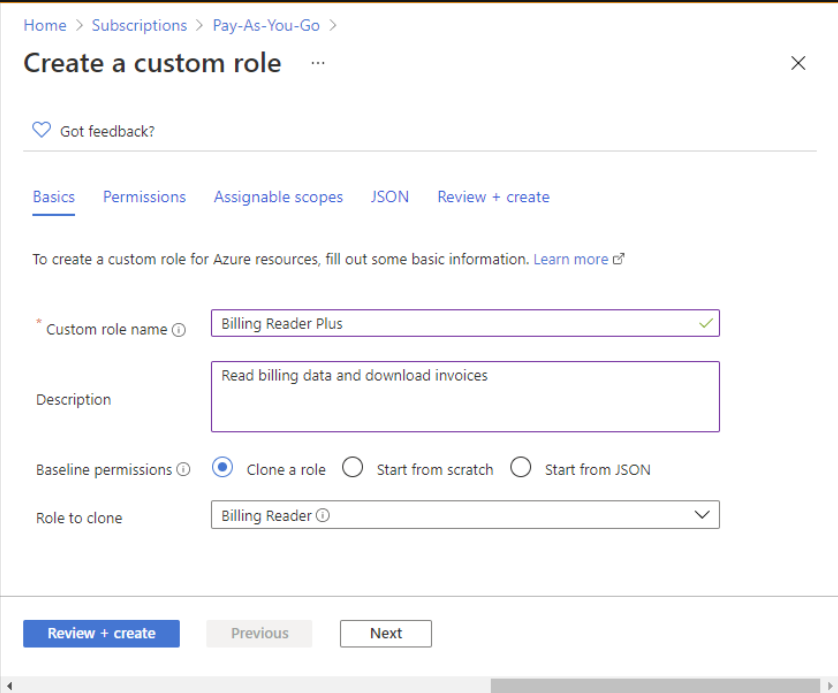
In the Basics tab, write a name and description. Set Baseline permissions to Clone a role.
Add the required permissions
The new role needs the following permissions in Azure to function:
Application.Read.AllAuditLog.Read.AllDirectory.Read.AllGroup.Read.AllGroupMember.Read.AllIdentityRiskEvent.Read.AllIdentityRiskyUser.Read.AllUser.Read.AllUserAuthenticationMethod.Read.All
-
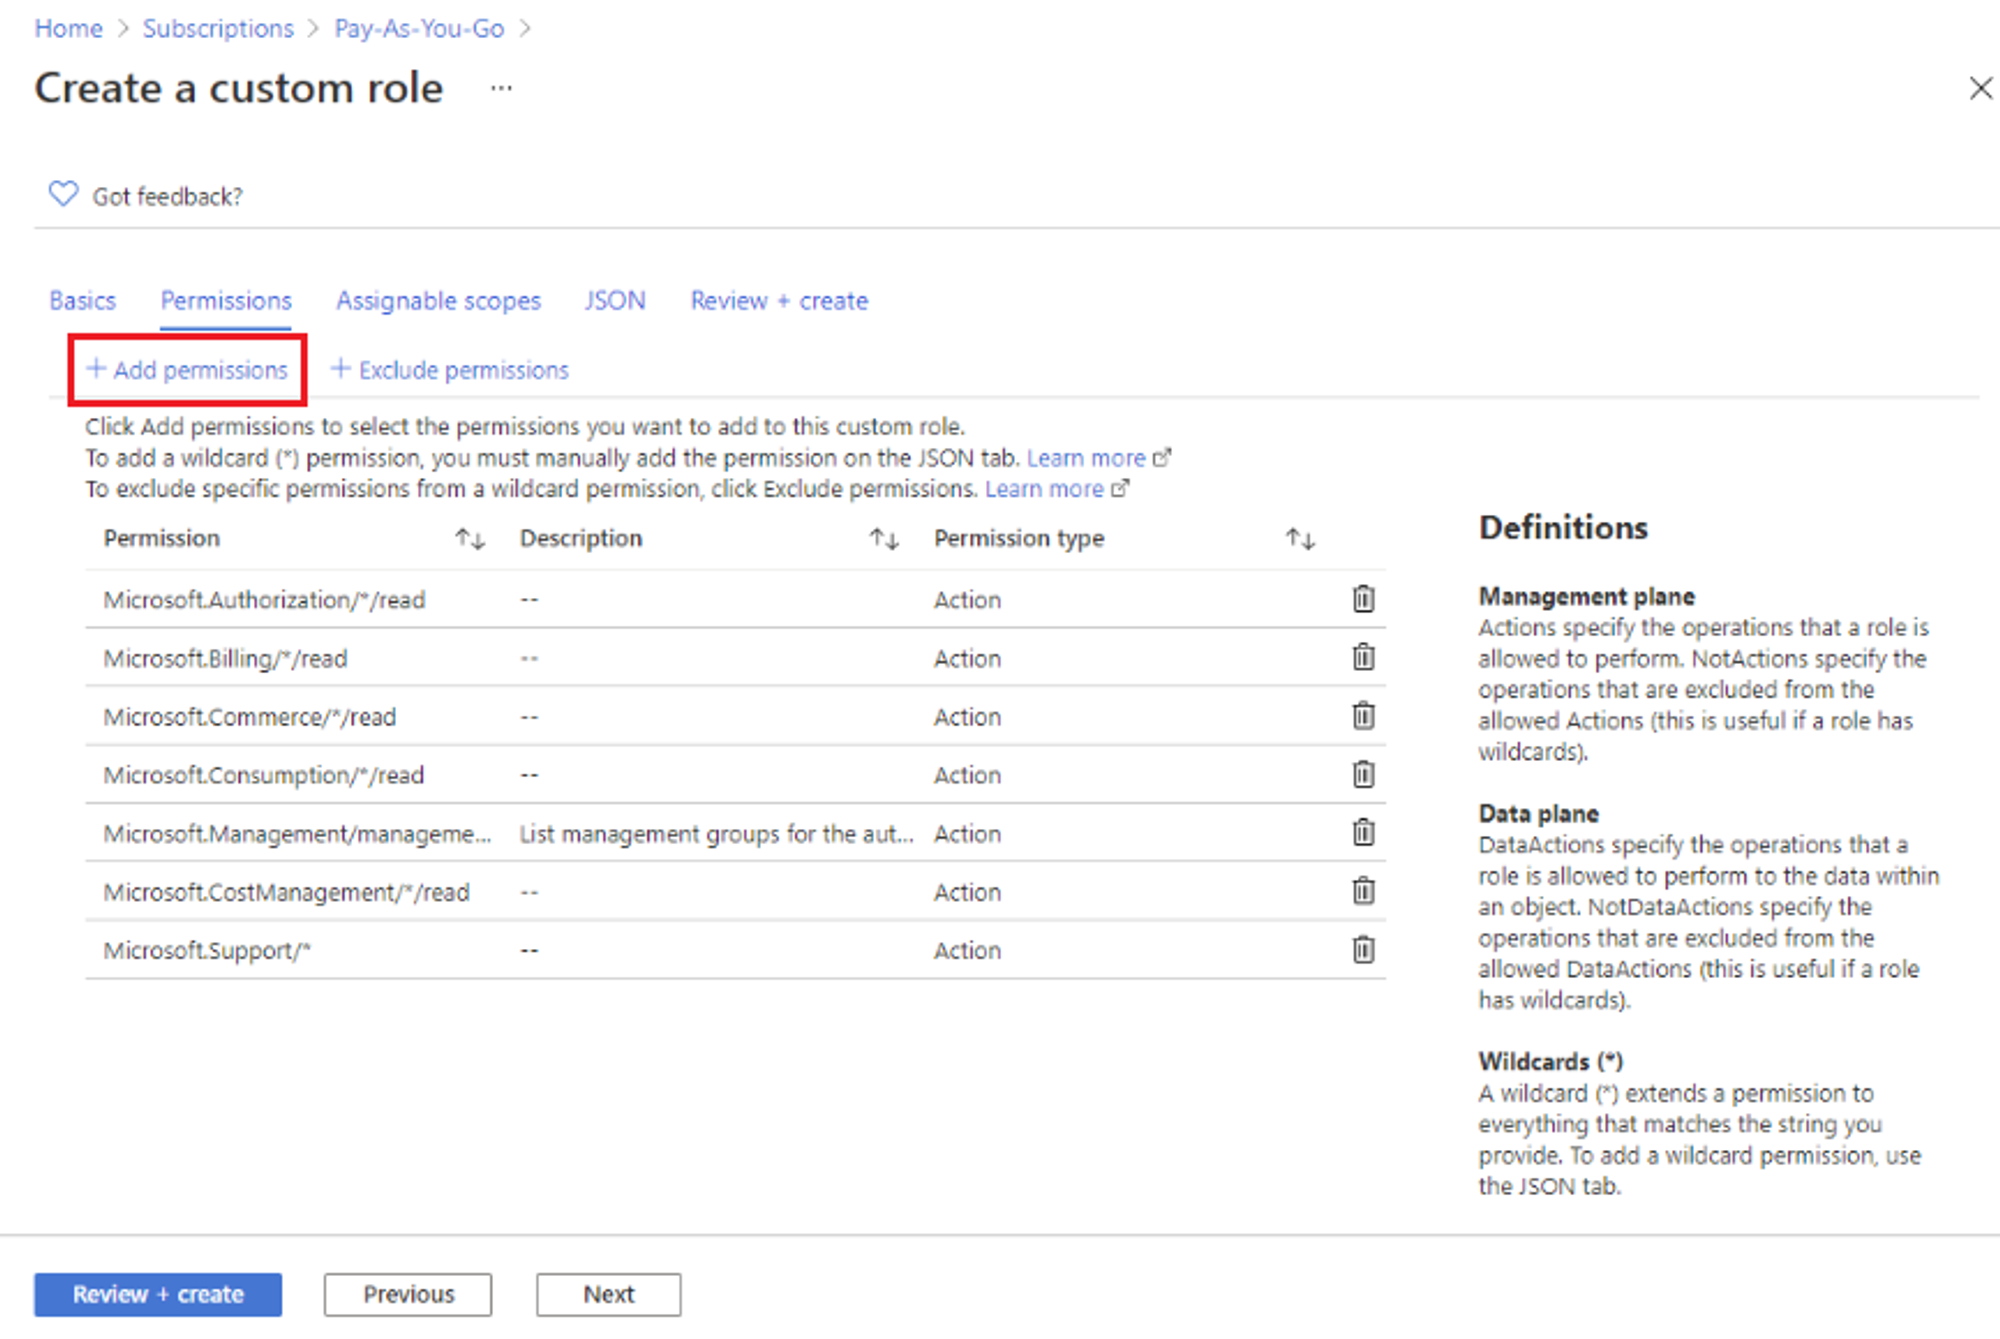
To do this, click the Permissions tab, then click ➕ Add permissions.
-
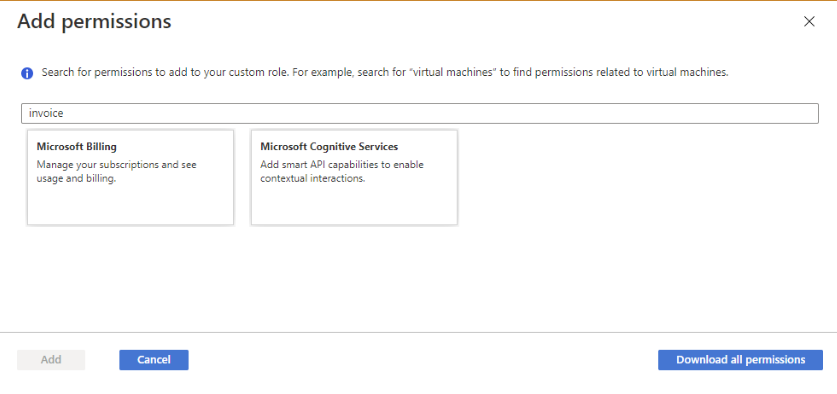
Search for one of the permissions mentioned above using the search bar. Then, click a resource provider card that has the permissions you want to add to your custom role, such as Microsoft Billing.
-
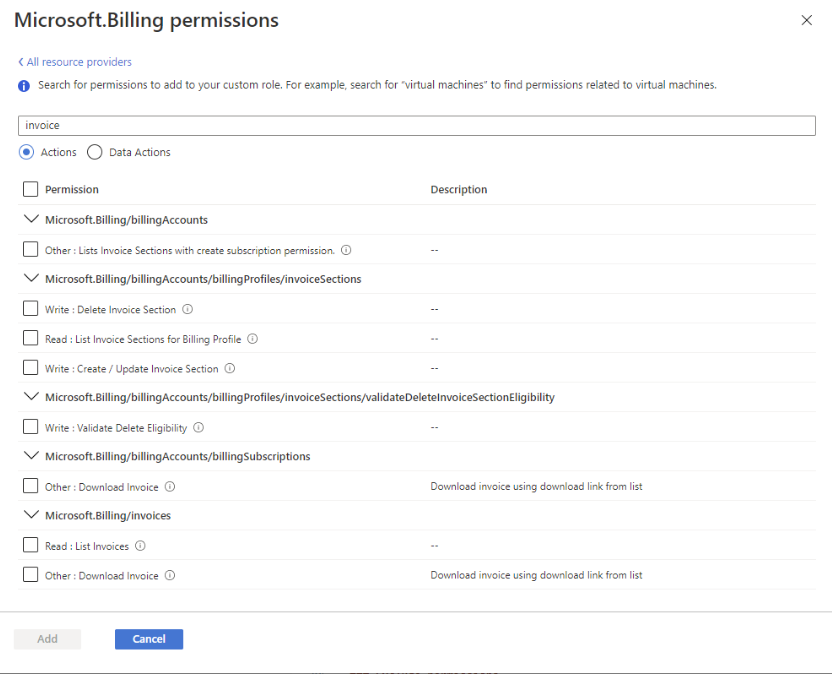
This will display a list of the management permissions for that resource provider. Click Add to append the permission to the role.
-
Repeat this for every permission mentioned above.
-
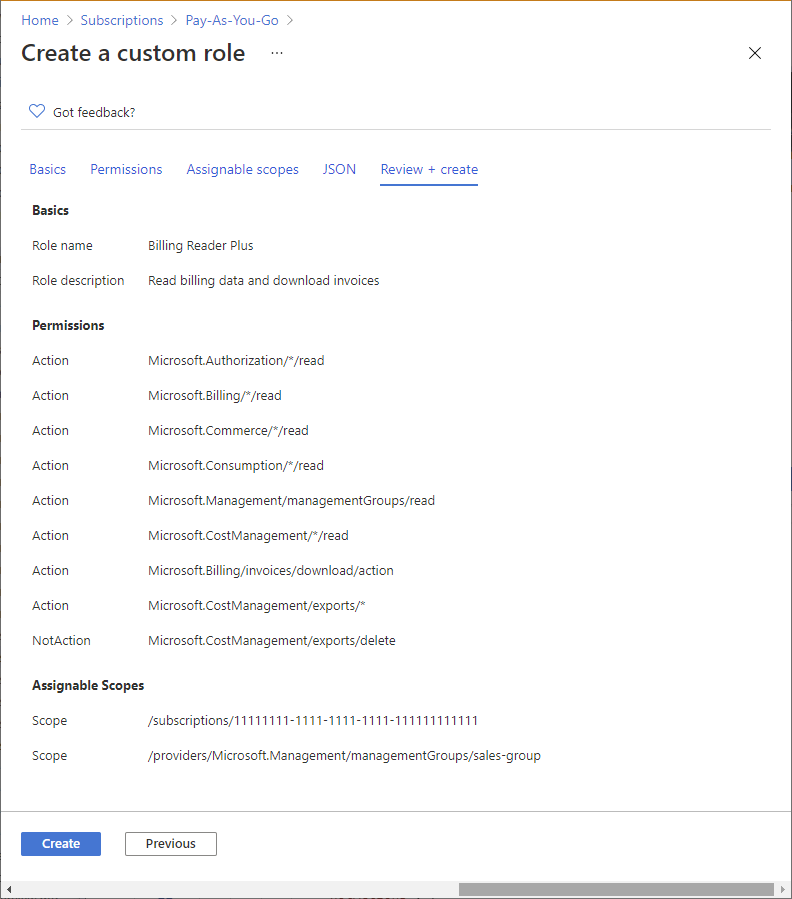
Go to the Review + create tab, review the permissions, then click Create.
Unhide user details in Azure AD
By default, user details are hidden for all Microsoft reports. You need to unhide them manually in the admin dashboard so that Zluri can access it:
-
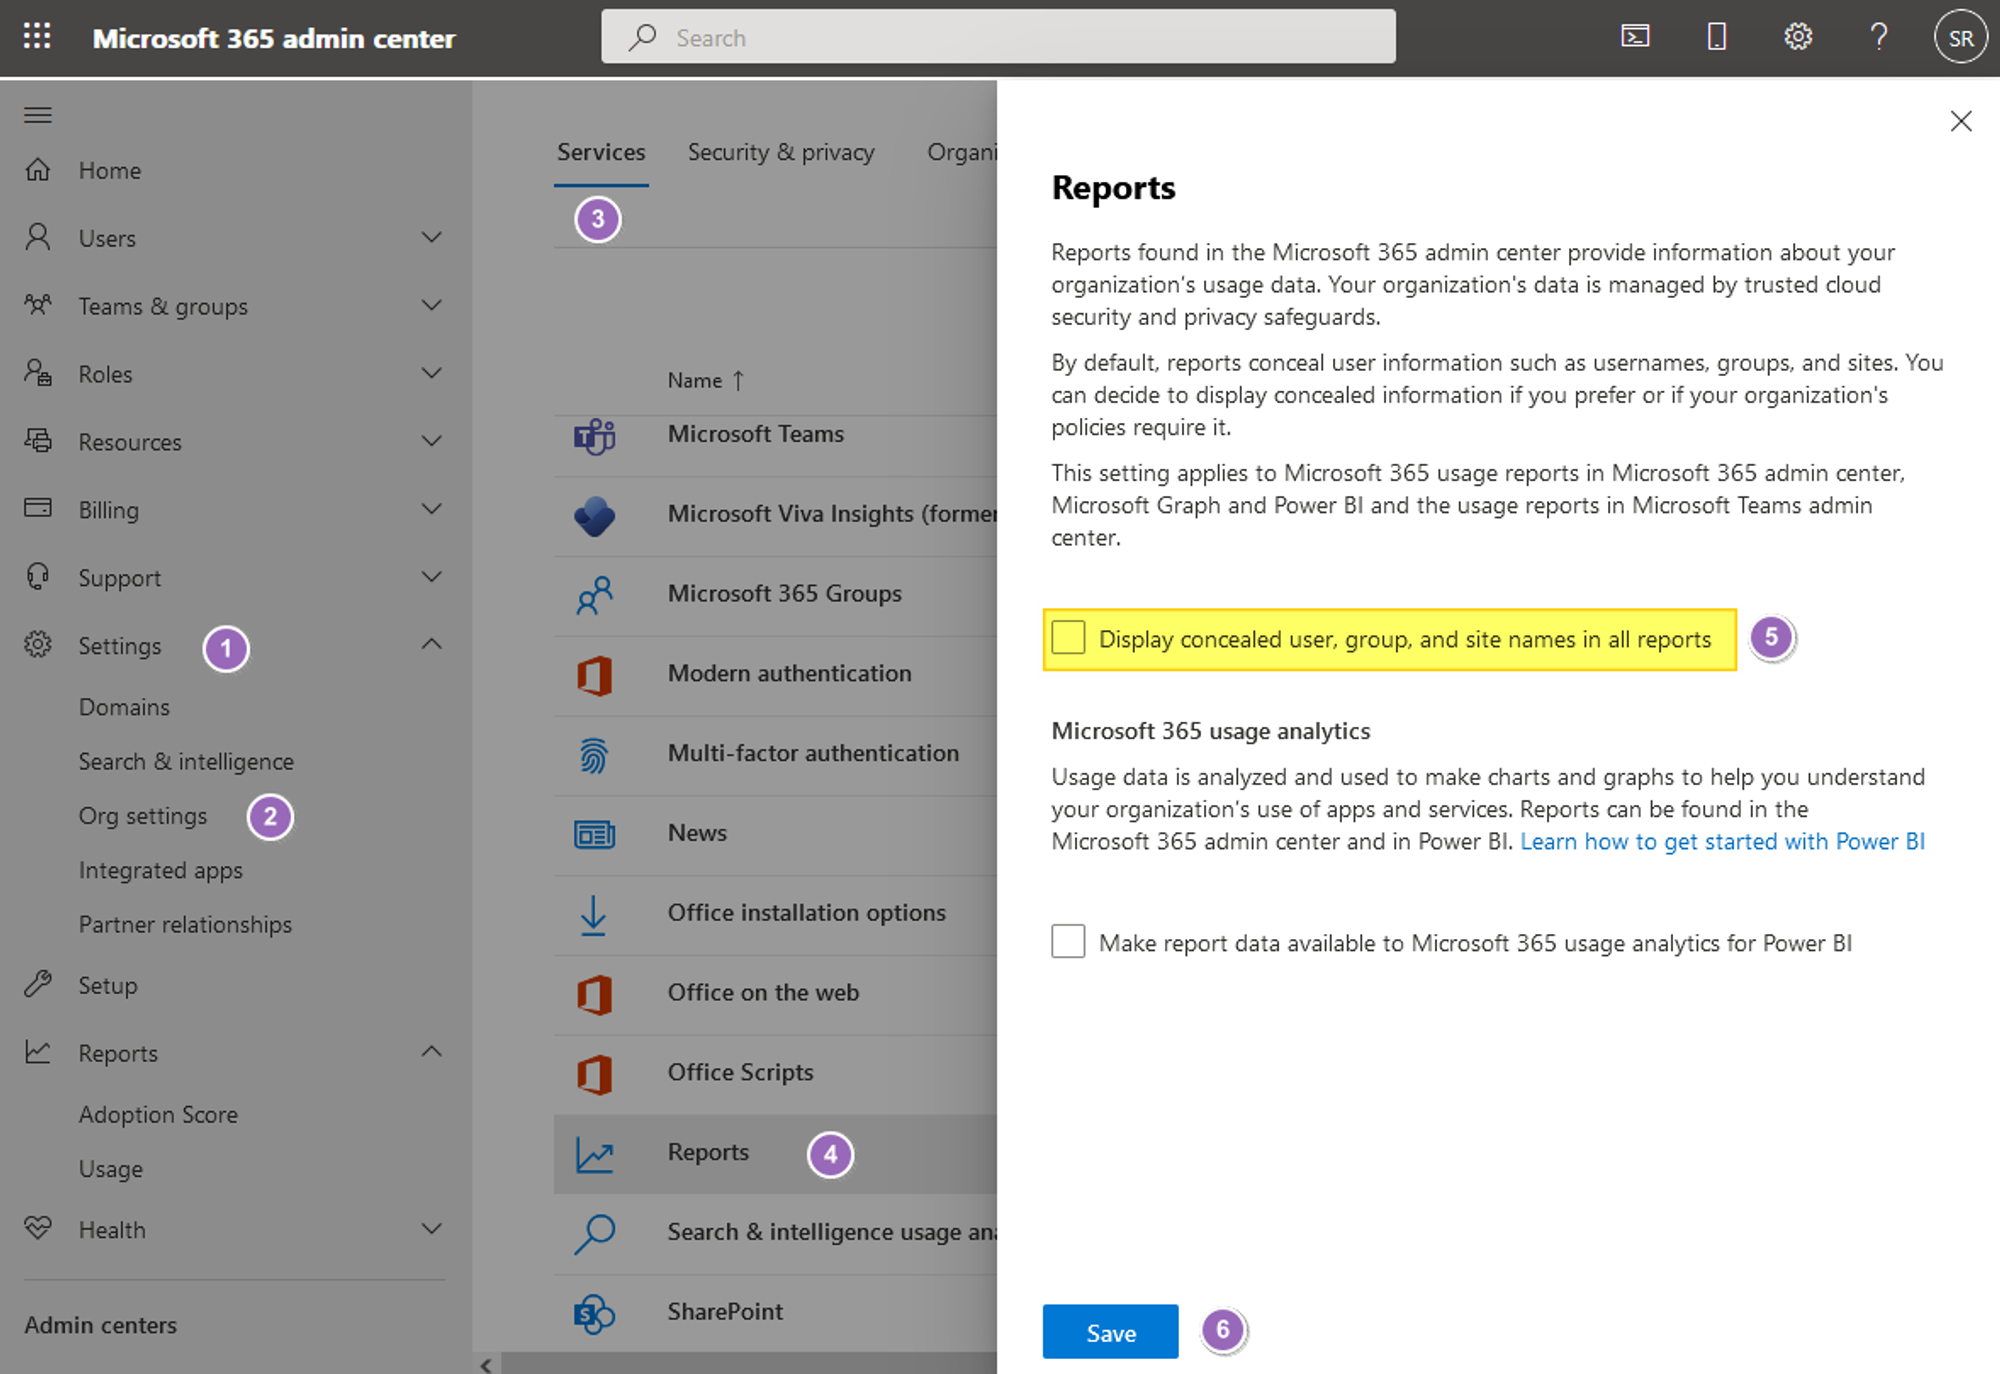
Visit Admin Center, and navigate to Settings → Org Settings → Services. Select Reports.
-
Uncheck the Display concealed user, group, and site names in all reports checkbox, then save your changes.
Assign the custom admin role
A custom role with no assignee grants nothing, so the connection fails or returns empty data until the role is assigned. Assign the role before you connect the Azure AD instance in Zluri. If you already connected and the sync returns no users or fails on permissions, assign the role, then re-sync.
Before you start:
- You must be signed in as a Privileged Role Administrator or Global Administrator. No other role can create a role assignment, and the Add assignments button stays greyed out.
- The custom role already exists and has its nine permissions.
- You know which identity will authenticate the Zluri connection.
Assign the role to the account that will authorize the Zluri connection, not to yourself, unless you are that account.
| Connection style | Assign the role to |
|---|---|
| An admin clicks through the Zluri OAuth consent screen | That admin's user account |
| A dedicated service or integration account | That service account |
| App registration (client credentials) | The app registration's service principal, by its app name |
Recommended: use a dedicated, non-personal service account. If you assign the role to an employee and they later leave, the Zluri sync breaks when their account is disabled.
-
In the Microsoft Entra admin center, go to Entra ID → Roles & admins → All roles, and type your role's name into the search box to filter the list.
Select the role name itself. Do not select the checkbox next to it. Selecting the checkbox selects the role for deletion; selecting the name opens it.
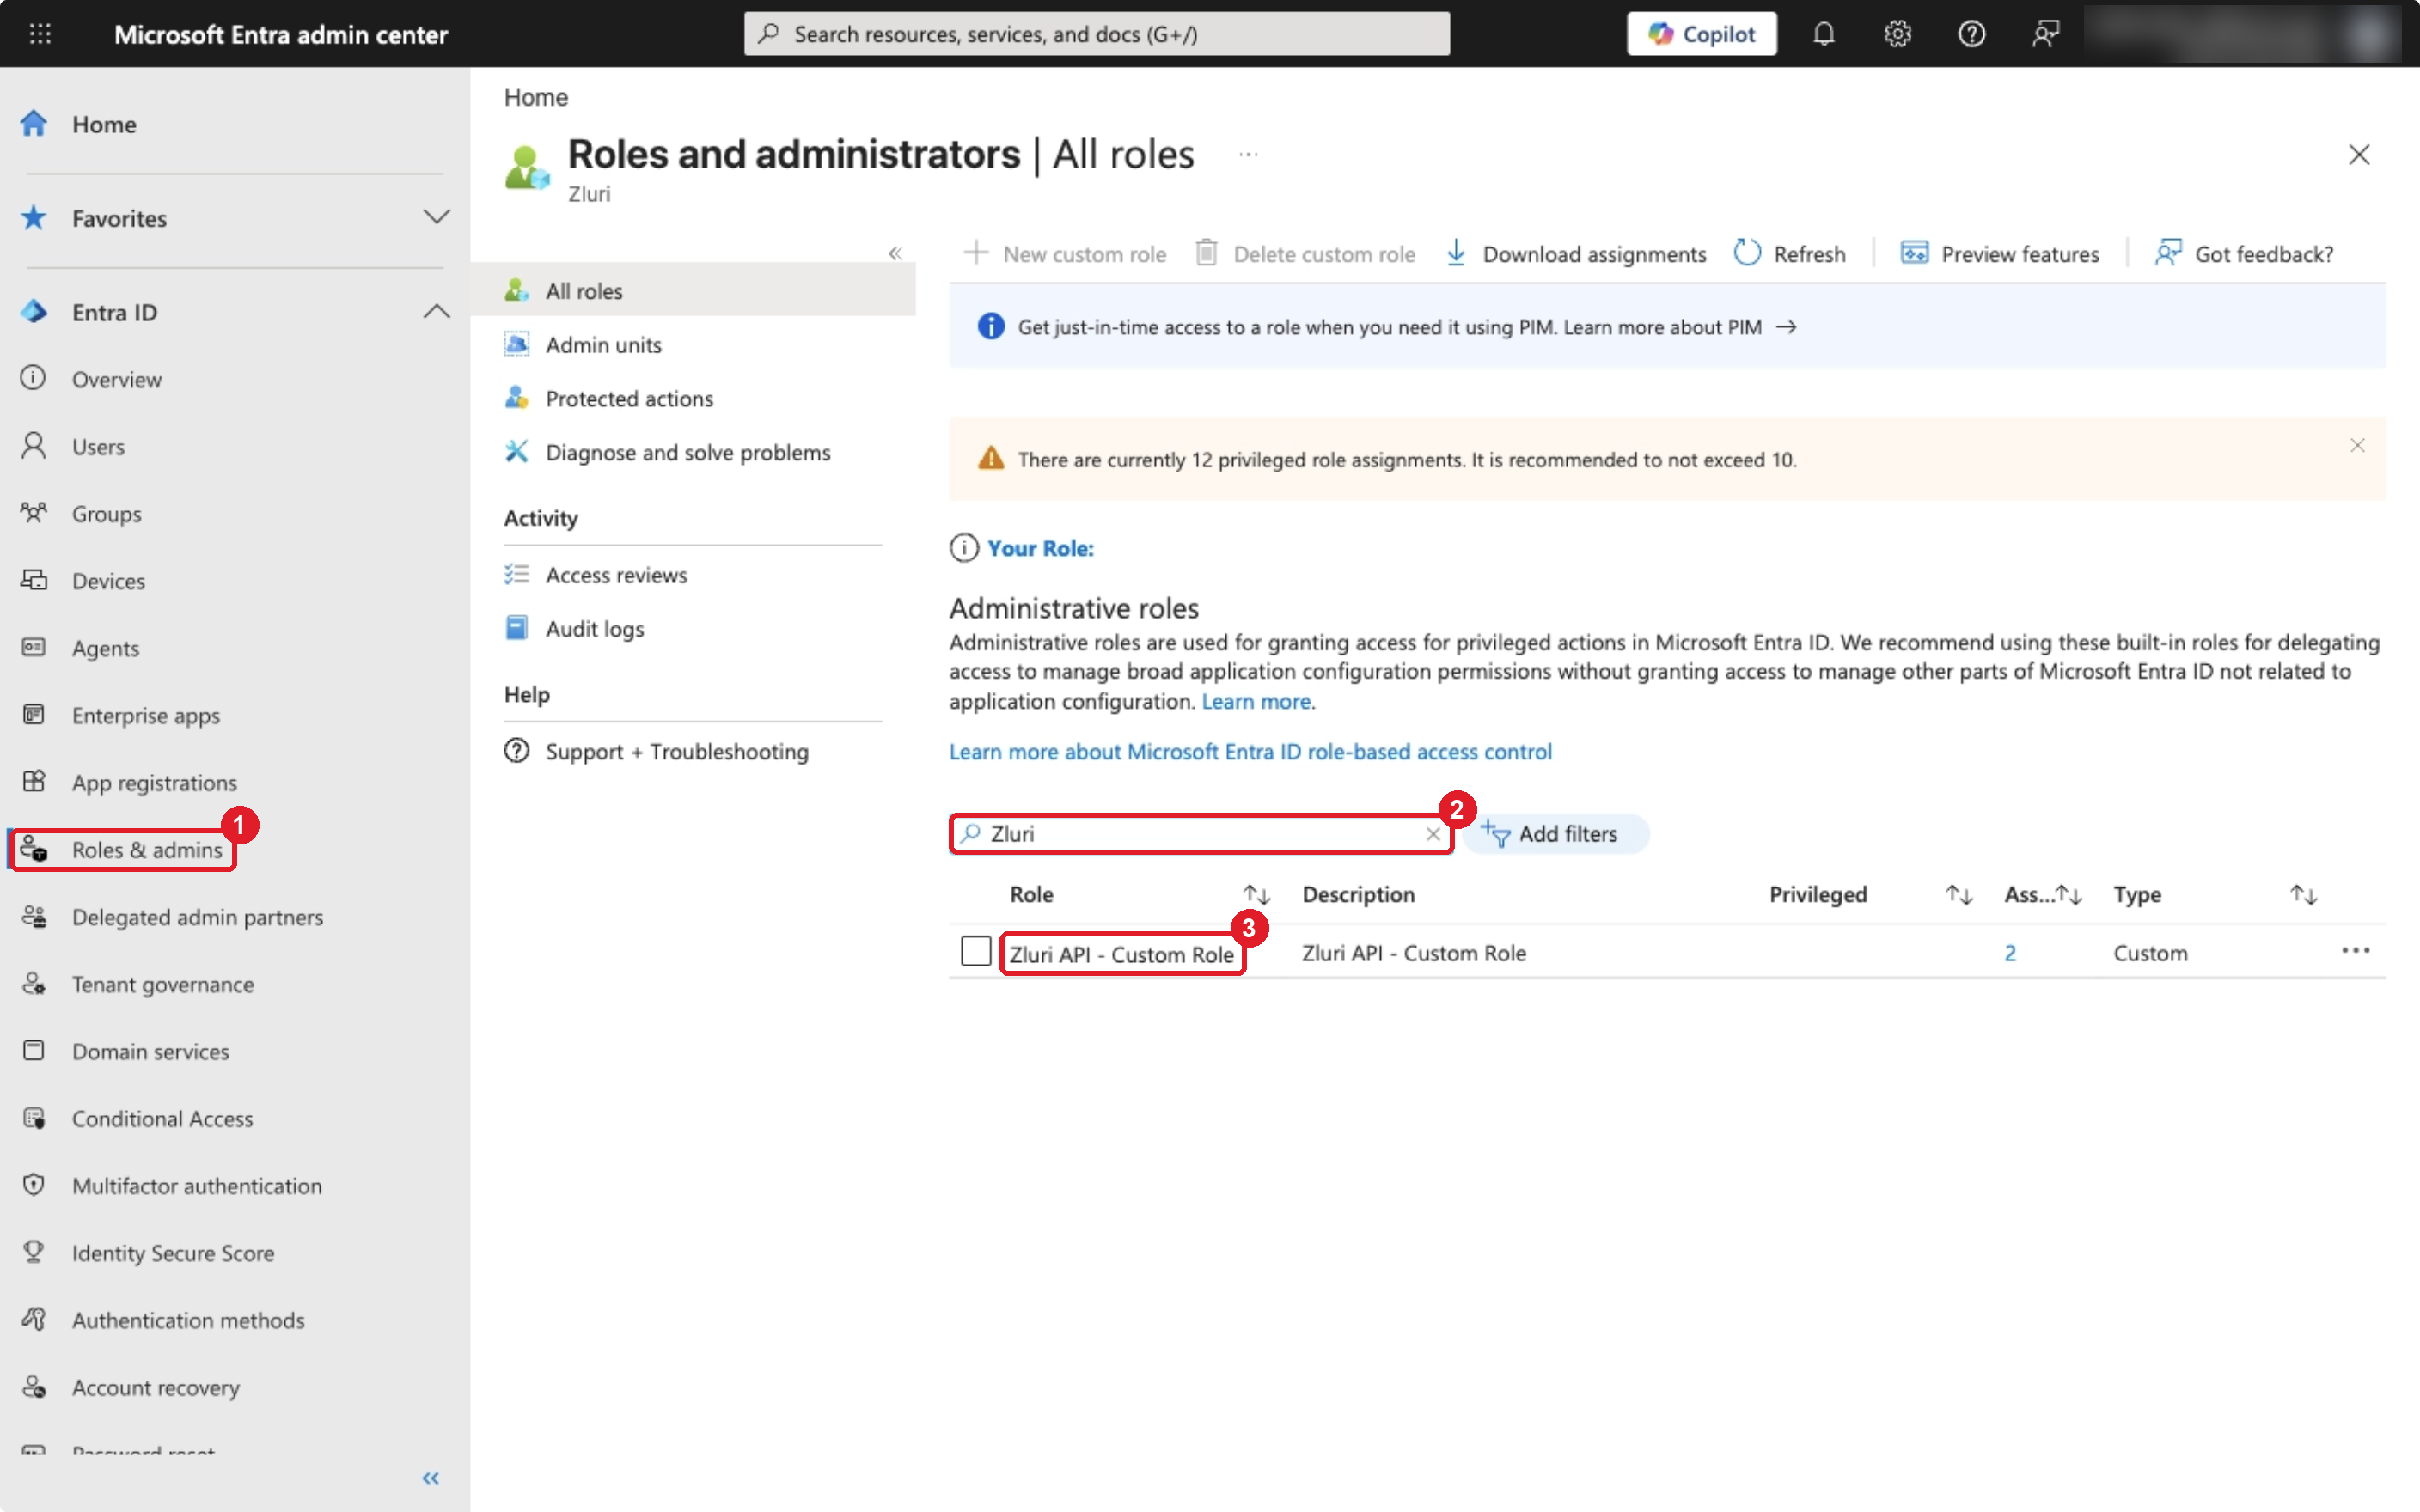
The Type column reads Custom for your role, and the Assignments column shows how many identities currently hold it.
-
The role opens on its Assignments page, listing everyone who currently holds it.
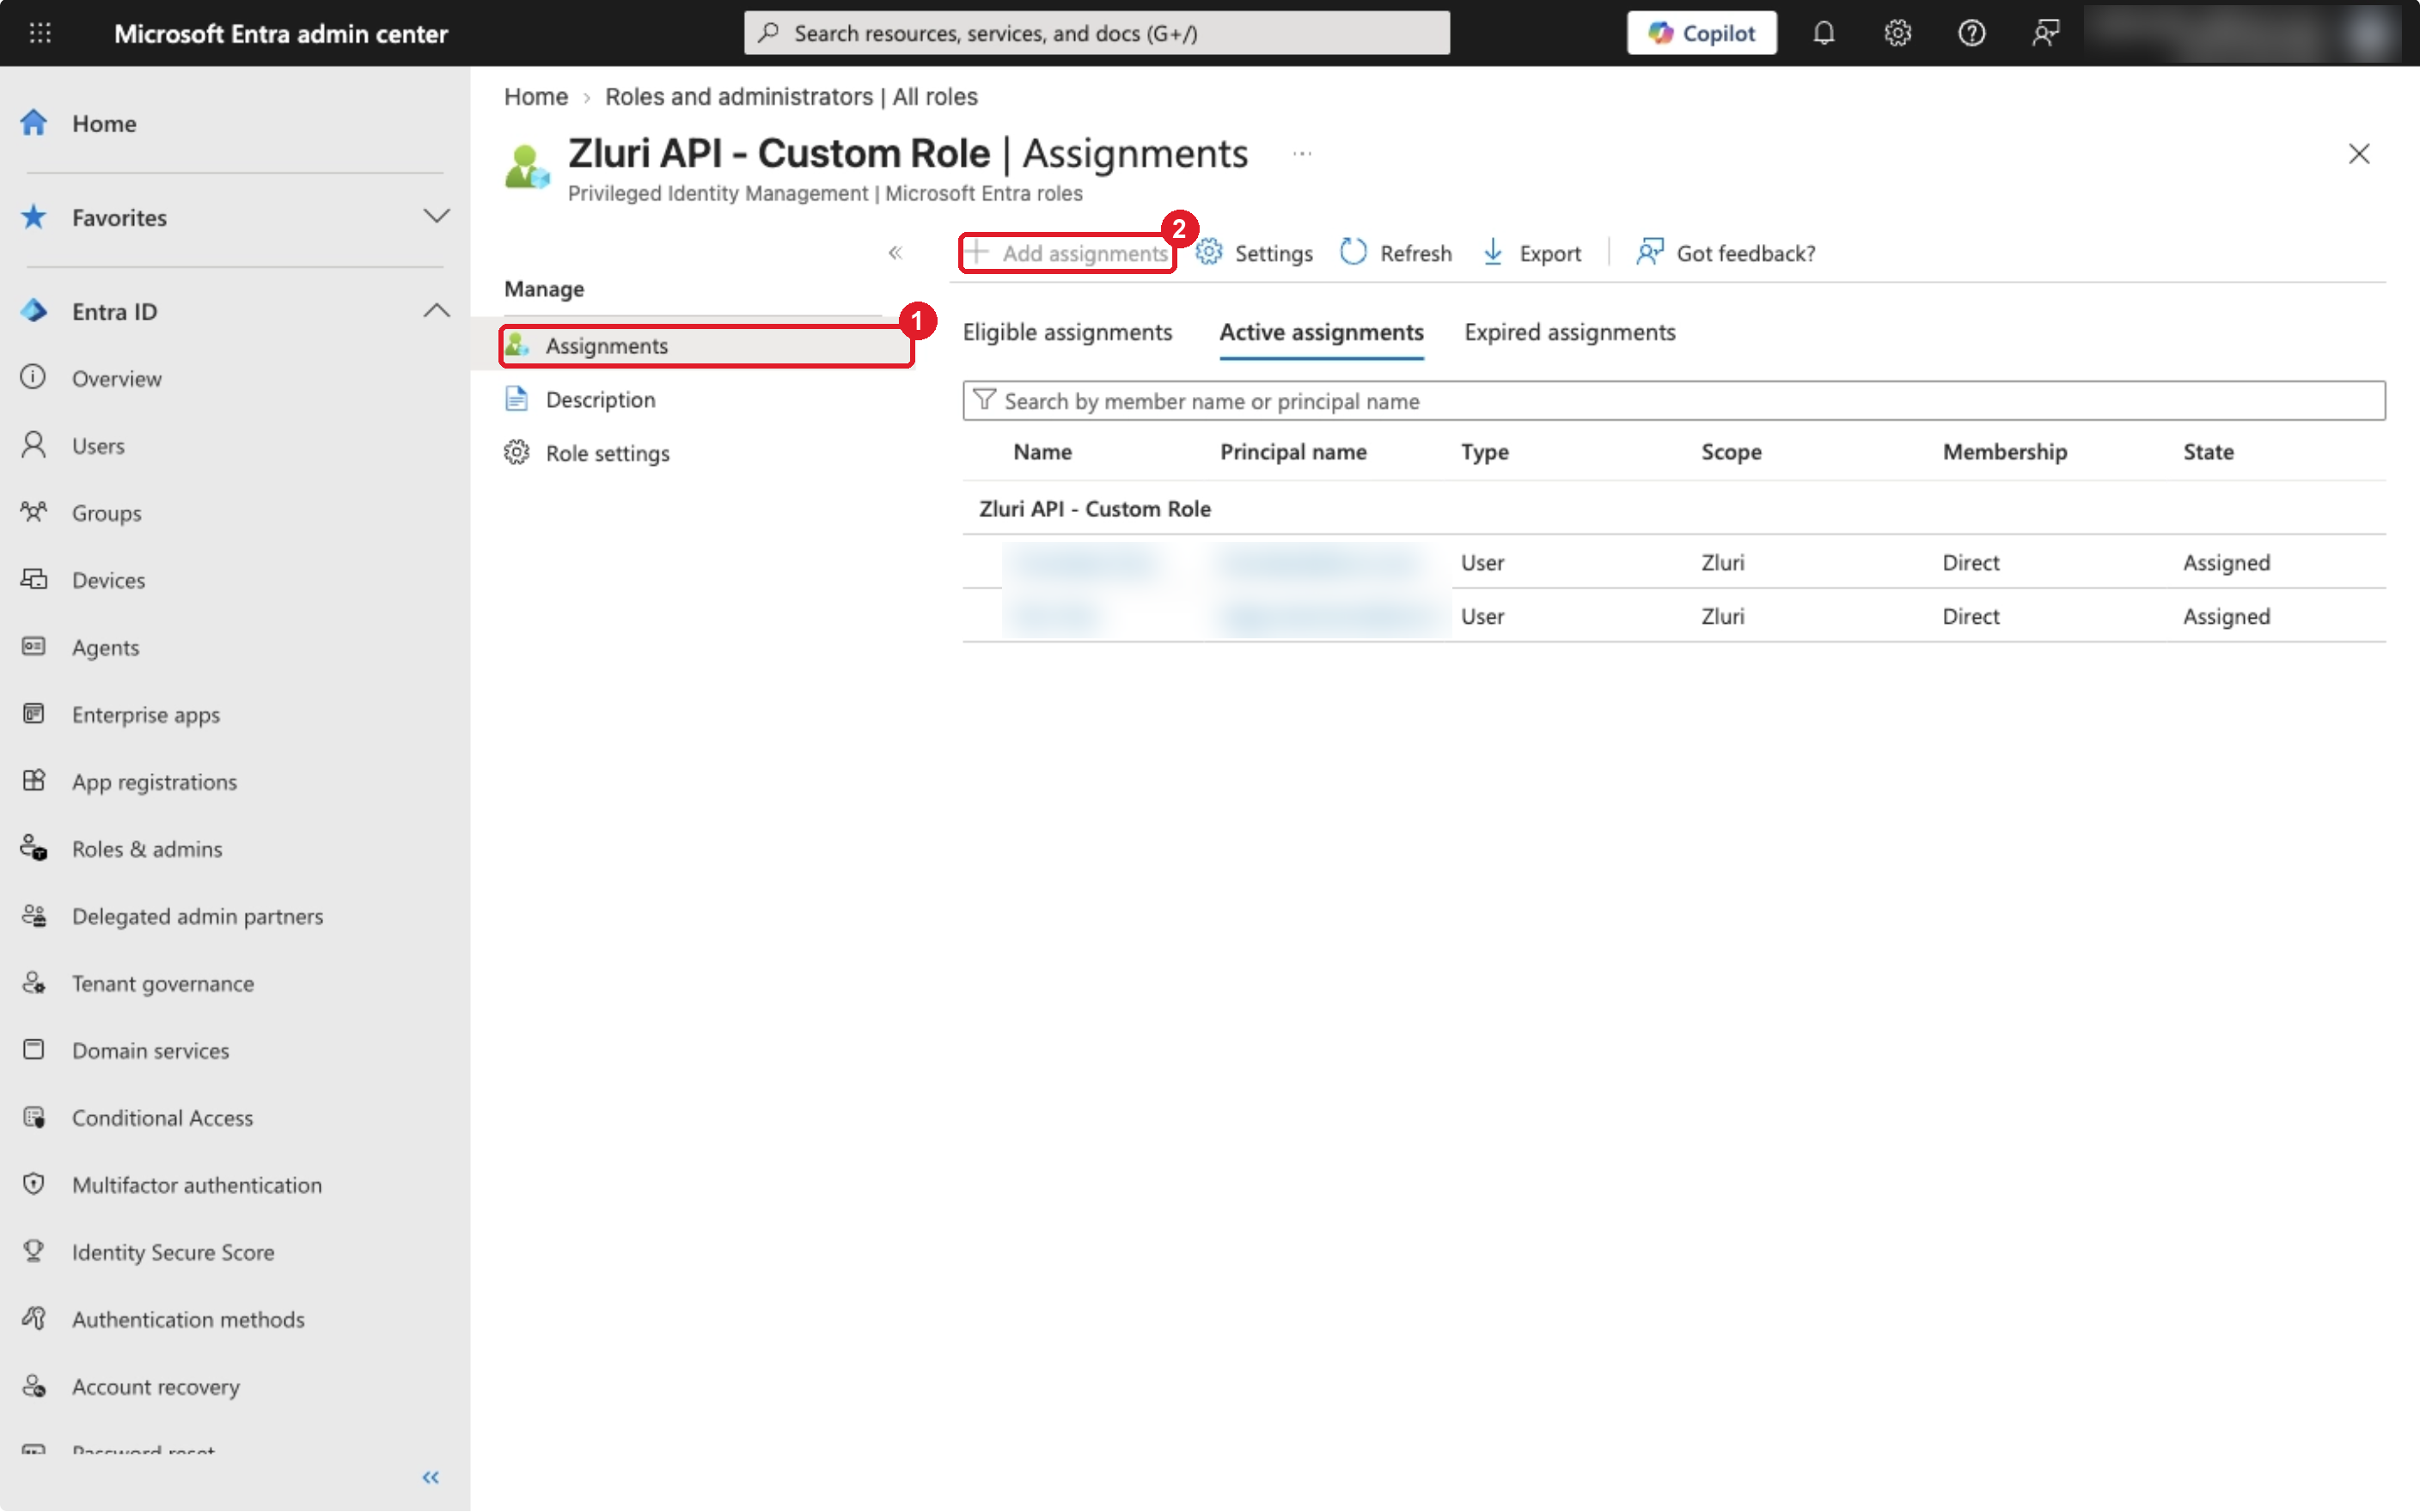
If you see Eligible assignments, Active assignments, and Expired assignments tabs and a Privileged Identity Management subtitle, your tenant has Entra ID P2 with PIM. Follow With PIM in the next step. If you see a single plain list with no tabs, follow Without PIM.
-
Add the assignment:
- Without PIM (Entra ID Free / P1): select + Add assignments. In the panel, search for and select the user, group, or service principal from the table above, then select Add. The assignment takes effect immediately and never expires.
- With PIM (Entra ID P2): select + Add assignments. Choose the member you want to assign, then select Next. On Membership settings, set Assignment type. Set the duration, then select Assign.
-
Back on the role's Assignments page (refresh if needed), confirm your identity now appears with:
- Type: User, Group, or Service Principal, matching what you intended
- Scope: the directory or tenant name, for tenant-wide access
- Membership: Direct
- State: Assigned
With PIM, check that it is listed on the Active assignments tab, not Eligible assignments.
Groups: only role-assignable groups appear in the picker. An ordinary security group is not listed. If the group you want is missing, assign the role to the user directly, or create a role-assignable group.
With PIM, choose Active + Permanent, not Eligible. PIM defaults toward Eligible, which means the holder must activate the role (often with MFA or an approval) before it does anything. Zluri's sync authenticates on a schedule with no human present, so it cannot activate an eligible role. An Eligible assignment produces a connection that authenticates but returns permission errors or empty data. Set Assignment type to Active, and leave it Permanent (clear any end date). A time-bound Active assignment silently breaks the sync the moment it expires.
PIM assignments cannot be removed within five minutes of being created. If you assign the wrong identity, wait five minutes before correcting it.
After the role is assigned, connect the instance as described below. If the instance was already connected, trigger a fresh sync.
Troubleshooting
| Symptom | Cause | Fix |
|---|---|---|
| Add assignments is greyed out | You are not a Privileged Role Administrator | Ask someone who is. The button is disabled because of your own role. |
| The group you want isn't in the picker | It isn't role-assignable | Assign the role to the user directly, or create a role-assignable group. |
| Zluri connects but returns no users | The role is assigned to the wrong identity, or the PIM assignment is Eligible | Confirm the assignee is the connecting account and that the assignment is Active. |
| Sync worked, then stopped | A time-bound assignment expired, or the assignee's account was disabled | Reassign as Permanent, and move to a service account. |
| Permission errors despite an Active assignment | A permission is missing from the role definition | Re-check all nine permissions in the role definition. |
Connect the Azure AD instance in Zluri
-
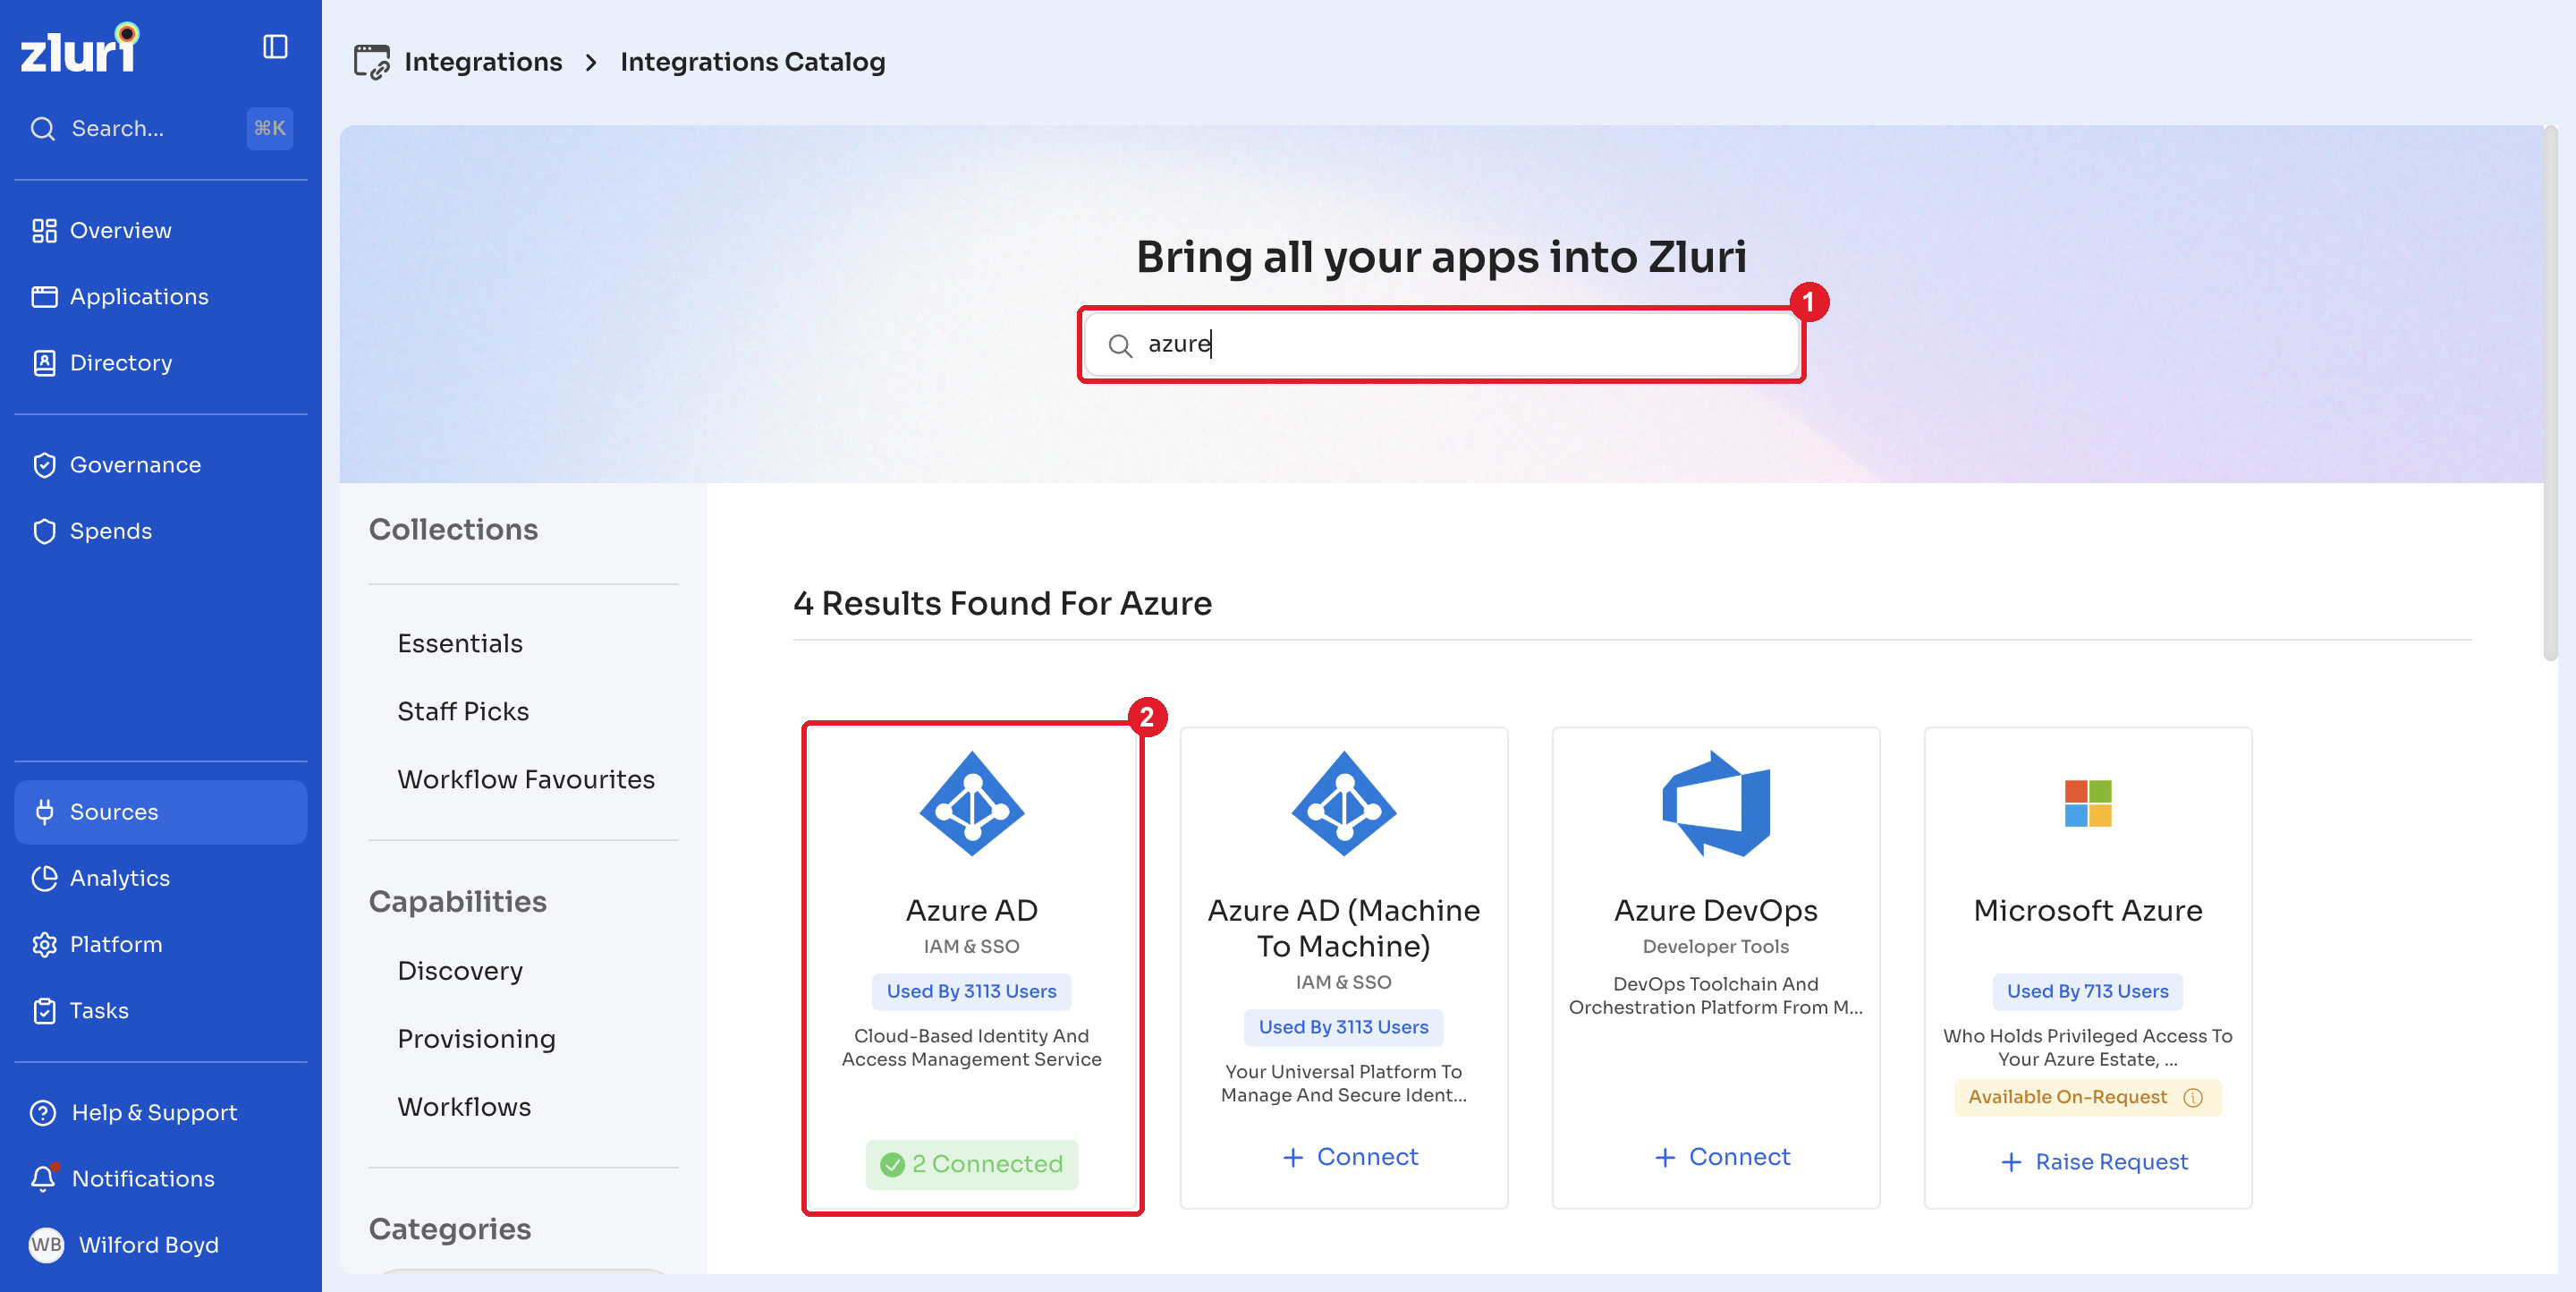
Open the Integrations Catalog, search for “azure”, and click ➕ Connect on the Azure AD entry.
-
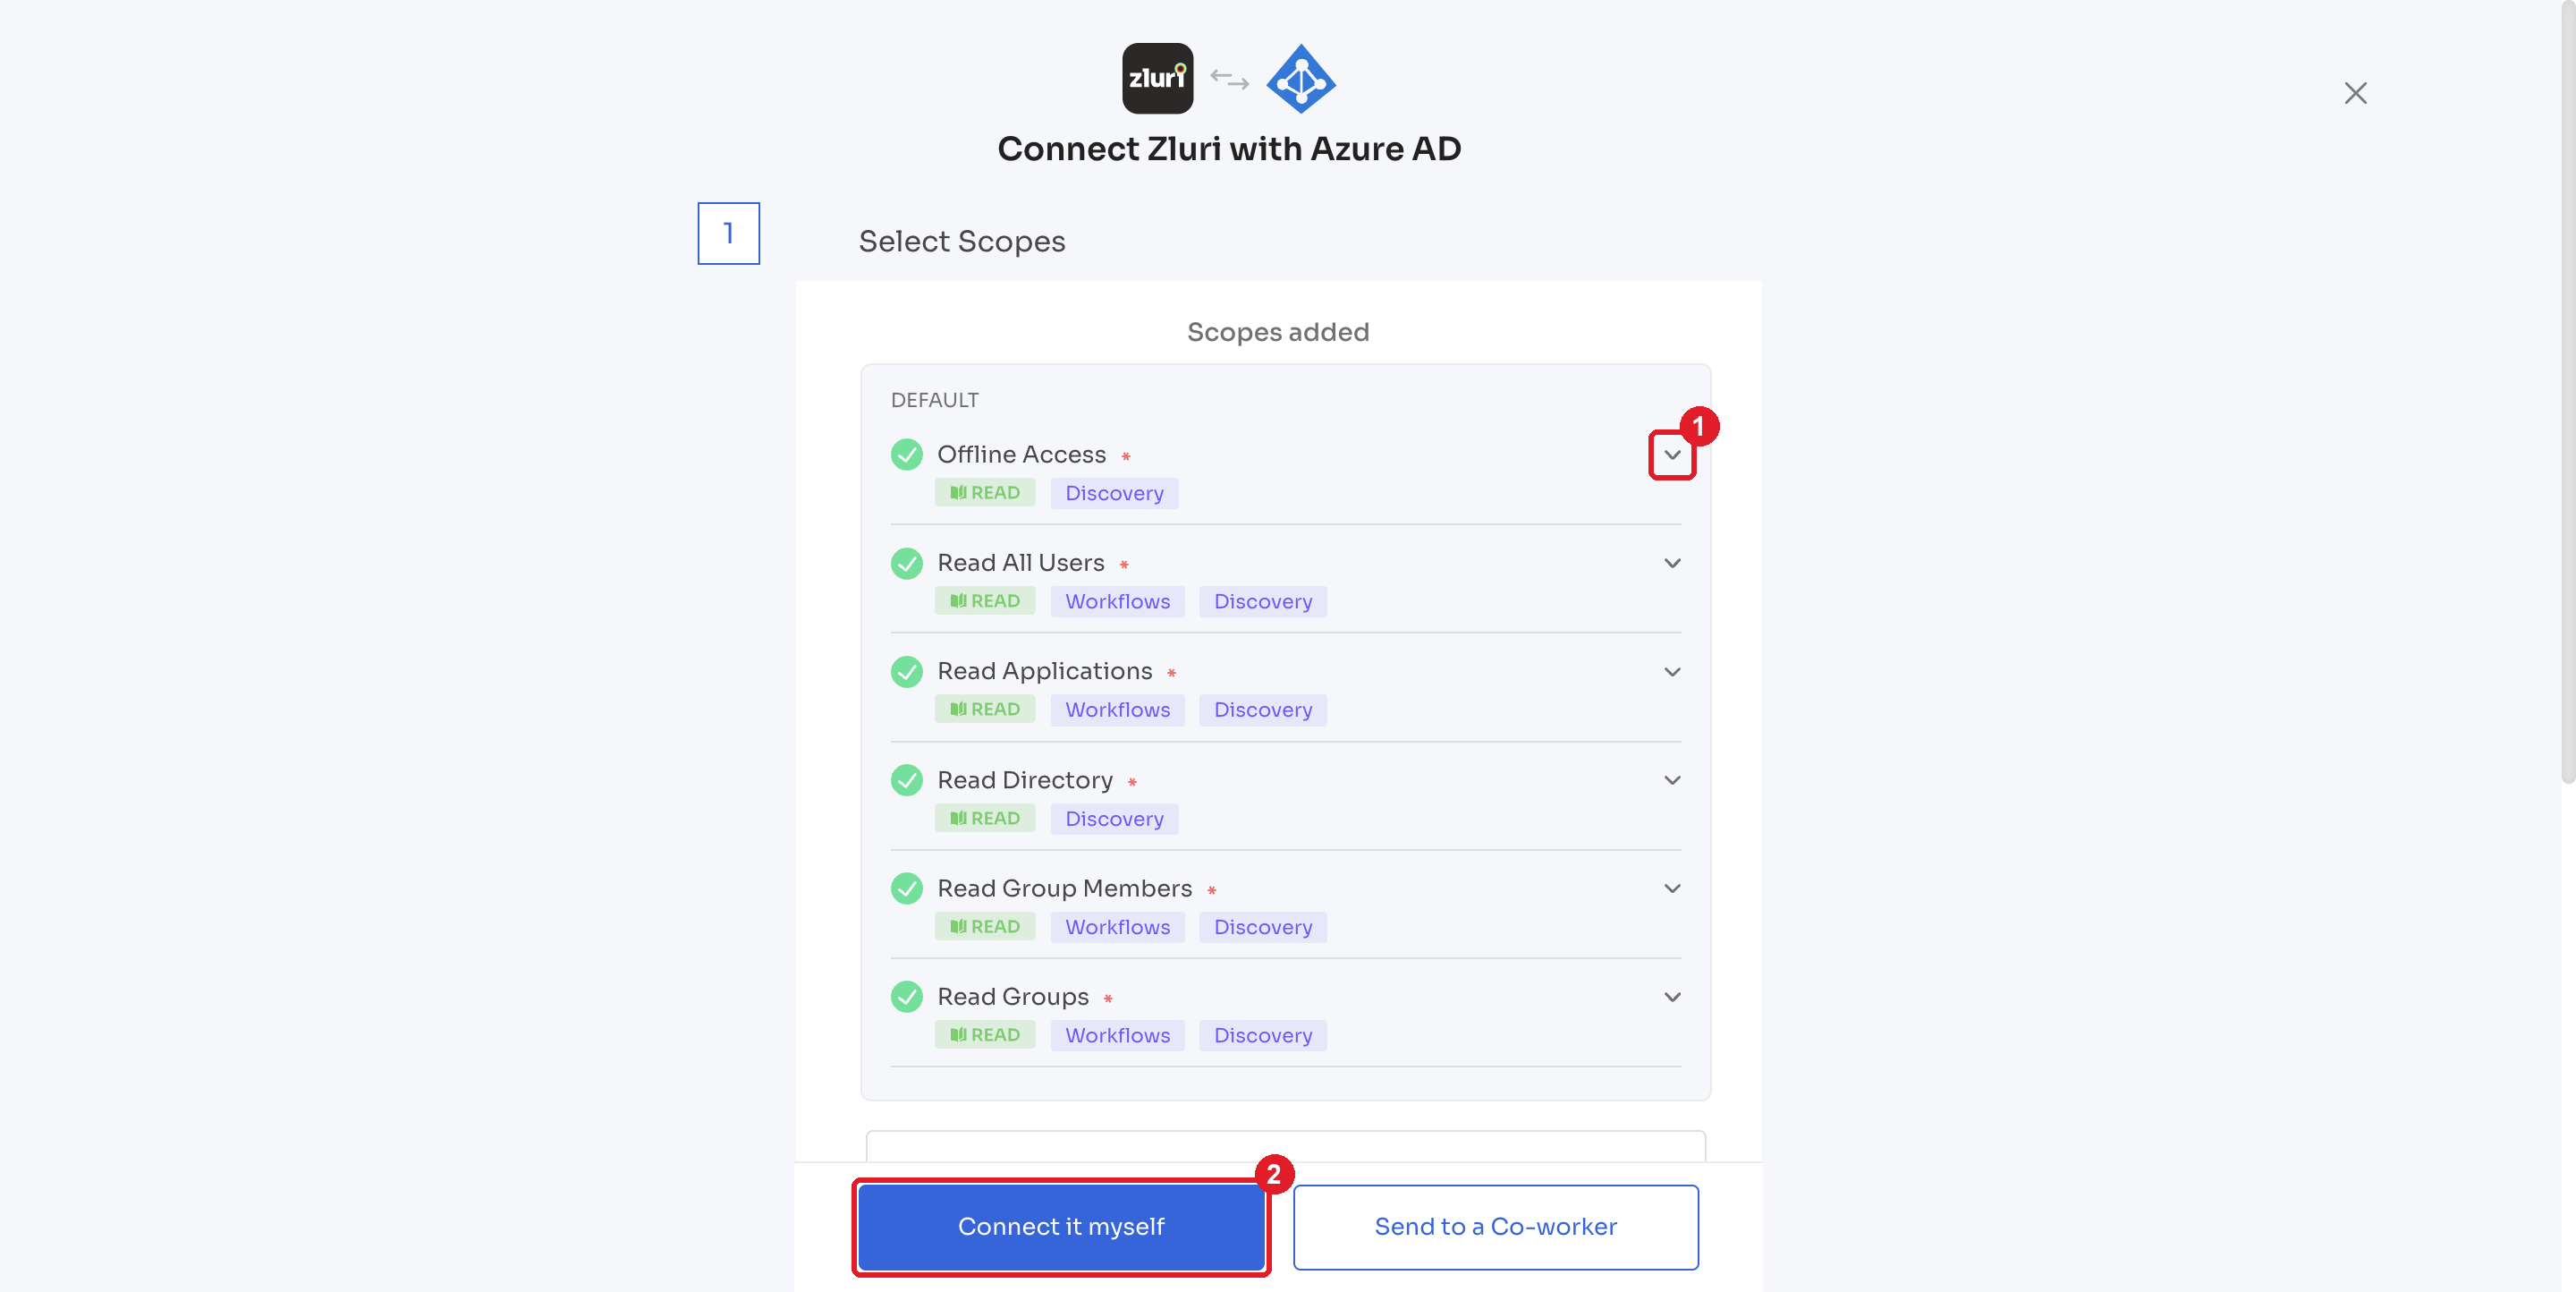
Choose the scopes for the integration, and click Connect. You can click the down-arrow button towards the right of a scope to find out what it does.
-
You will now see a popup window asking you to authorize the request on Azure AD’s end. Accept the request.
-
Give the connection a name and description, and you’re ready to go!
Important Note for Recently Created Entra/Microsoft TenantsIf you are connecting a new Microsoft Entra tenant (created within the past 48 hours), please note:
- It may take up to 48 hours after tenant creation for Entra to generate usage reports data.
- During this initial period, requests to the Reports APIs may fail.
- All other scopes and data—such as Users, Groups, Group Members, Applications, Licenses/SKUs, and Audit Logs—will function as expected.
- Reports data will only become available after Microsoft finishes initializing the new tenant.
Instructions
- You can proceed with connecting your tenant to Zluri right away.
Exclude the “read reports” scope; all other data will sync successfully.- Wait at least 48 hours after tenant creation before enabling the “read reports” permission.
- Once this time has passed, add the “read reports” permission, and then re-connect the integration with Zluri.
- If you're still facing issues, please contact Zluri Support.
Got questions? Feel free to submit a ticket or contact us directly at [email protected].
Updated 6 days ago