Connect
Connect Zluri with Microsoft Active Directory
How To Connect
Connect Zluri with Microsoft Active Directory
Prerequisites
- Admin Access to Zluri
- Access to Active Directory — server hostname/IP, admin Bind DN credentials, and Base DN
- Docker 20.10+ and Docker Compose v2 (or v1) installed on a server in your network
- Hyper -V and WSL 2 should be enabled in Windows OS.
- Check the Docker Desktop Installation guide at Docker Desktop on Windows and Docker Desktop on Mac.
- .pem certificate for SSL/TLS (optional — recommended for LDAPS on port 636)
- Network connectivity — from the Docker host to your AD server (port 389 or 636) and outbound HTTPS to Zluri's servers
1. Network Requirements
- Inbound Ports:
- No inbound ports need to be opened.
- Outbound Connectivity: The server must have internet access for:
- Installing required dependencies (e.g., SQL database)
- Communicating with On-Prem AD services
- Check if a proxy is required. If yes, follow the instructions here while installation to setup proxy.
2. Hardware Requirements
CPU
- Recommended: 8 cores
- Minimum: 4 cores
- Note: The agent will work with 4 cores but may experience slower performance.
RAM
- Recommended: 16 GB
- Note: Using 8 GB RAM may lead to slower performance and potential instability.
Storage
- Minimum Required: 50 GB available disk space
3. Operating System
- Any modern operating system is supported (e.g., Windows Server 2022+/Linux distributions)
- For Windows - Docker Desktop is not supported on server versions of Windows, such as Windows Server 2022, 2025.
We recommend using the Windows build for Windows Operating System.
If you still wish to proceed with Docker build please make sure these steps are followed for a hassle free setup.
- Install Docker Engine instead of Docker Desktop on Windows Server 2022+.
- Install WSL to support Linux Container:
- Install WSL by running this command in powershell:
wsl --install - Restart machine. After restart, open Ubuntu shell by running this command:
wsl -d Ubuntu - Inside Ubuntu shell, run these commands:
curl -fsSL https://get.docker.com | shsudo usermod -aG docker $USERMake sure that you can run Linux containers via Docker Engine in Windows Server 2022+.
- Install WSL by running this command in powershell:
For Linux - require docker running linux container. For more information on how to run containers on Windows Server, see Microsoft's official documentation.
To keep WSL alive in Windows follow these steps:
- Run this commands in powershell to open Ubuntu :
wsl -d Ubuntu- Inside ubuntu run this:
sudo nano /etc/wsl.conf - then this inside that run -
[boot] systemd=true
- Inside ubuntu run this:
- Open a new powershell and run this command:
wsl --shutdownwsl -d Ubuntu
- Inside ubuntu run these three commands:
sudo systemctl enable dockersudo systemctl start dockerdocker compose up -d
- Open new powershell window and run this:
$action = New-ScheduledTaskAction -Execute "wsl.exe" -Argument "-d Ubuntu -- sleep infinity" $trigger = New-ScheduledTaskTrigger -AtStartup $settings = New-ScheduledTaskSettingsSet -ExecutionTimeLimit 0 Register-ScheduledTask -TaskName "WSL-Keepalive" -Action $action -Trigger $trigger -Settings $settings -RunLevel Highest -User "SYSTEM"
Use Cases Supported
- Optimised for single-directory or single-domain environments (not for forests).
- Runs on any OS — Linux, Windows, or macOS (via Docker).
- Supports both LDAP (port 389) and LDAPS (port 636) connections.
- The connector runs as a Docker container and persists across restarts. It does not depend on an active user session.
Part 1: Set Up the Connection in Zluri
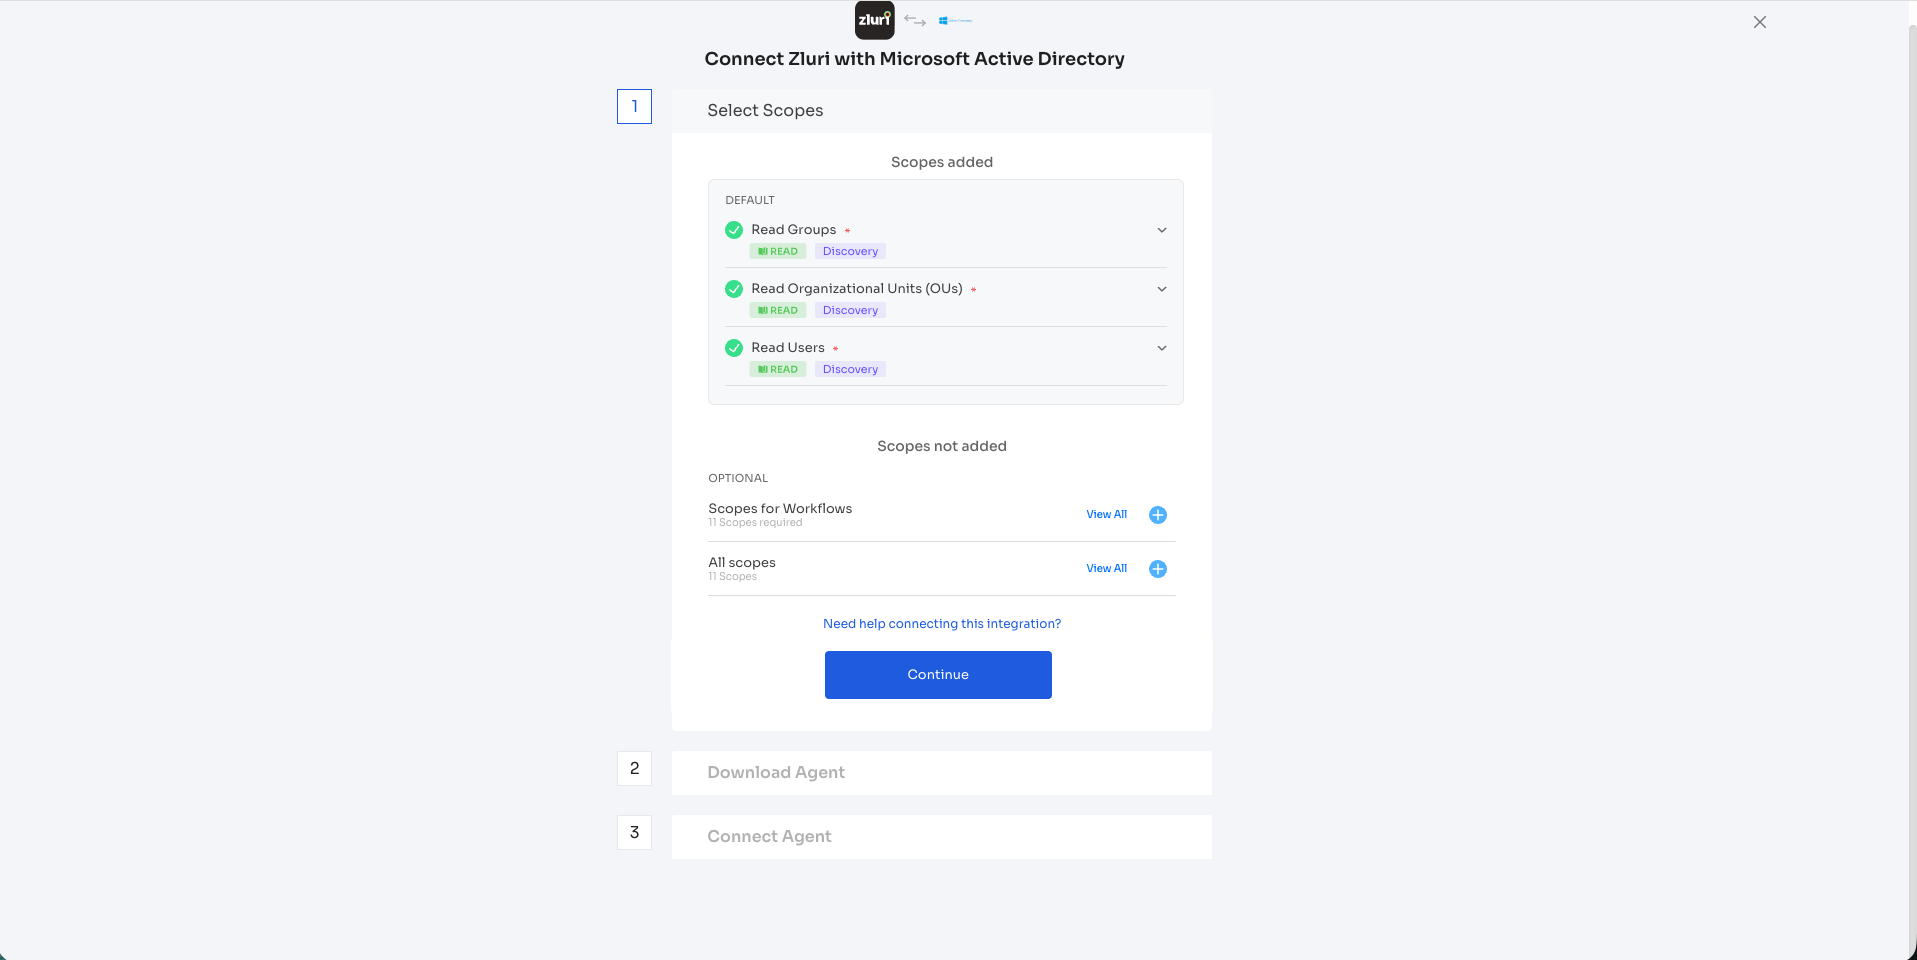
Step 1 — Select Scopes
-
Open the Integrations Catalog in Zluri, search for "Microsoft Active Directory", and click + Connect.
-
Review the scopes for the integration. You can click the down-arrow button to the right of a scope to learn what it does.
Default scopes (automatically added):
- Read Groups (READ · Discovery)
- Read Organizational Units (OUs) (READ · Discovery)
- Read Users (READ · Discovery)
Optional scopes (not added by default):
- Scopes for Workflows — enables write-back actions like creating users, modifying group memberships, etc. Click View All to see all workflow scopes and click the + icon to add them.
- All scopes — adds every available scope. Click View All to review.
-
Click Continue to proceed.
Note: If you need assistance, click the "Need help connecting this integration?" link for guided setup support.
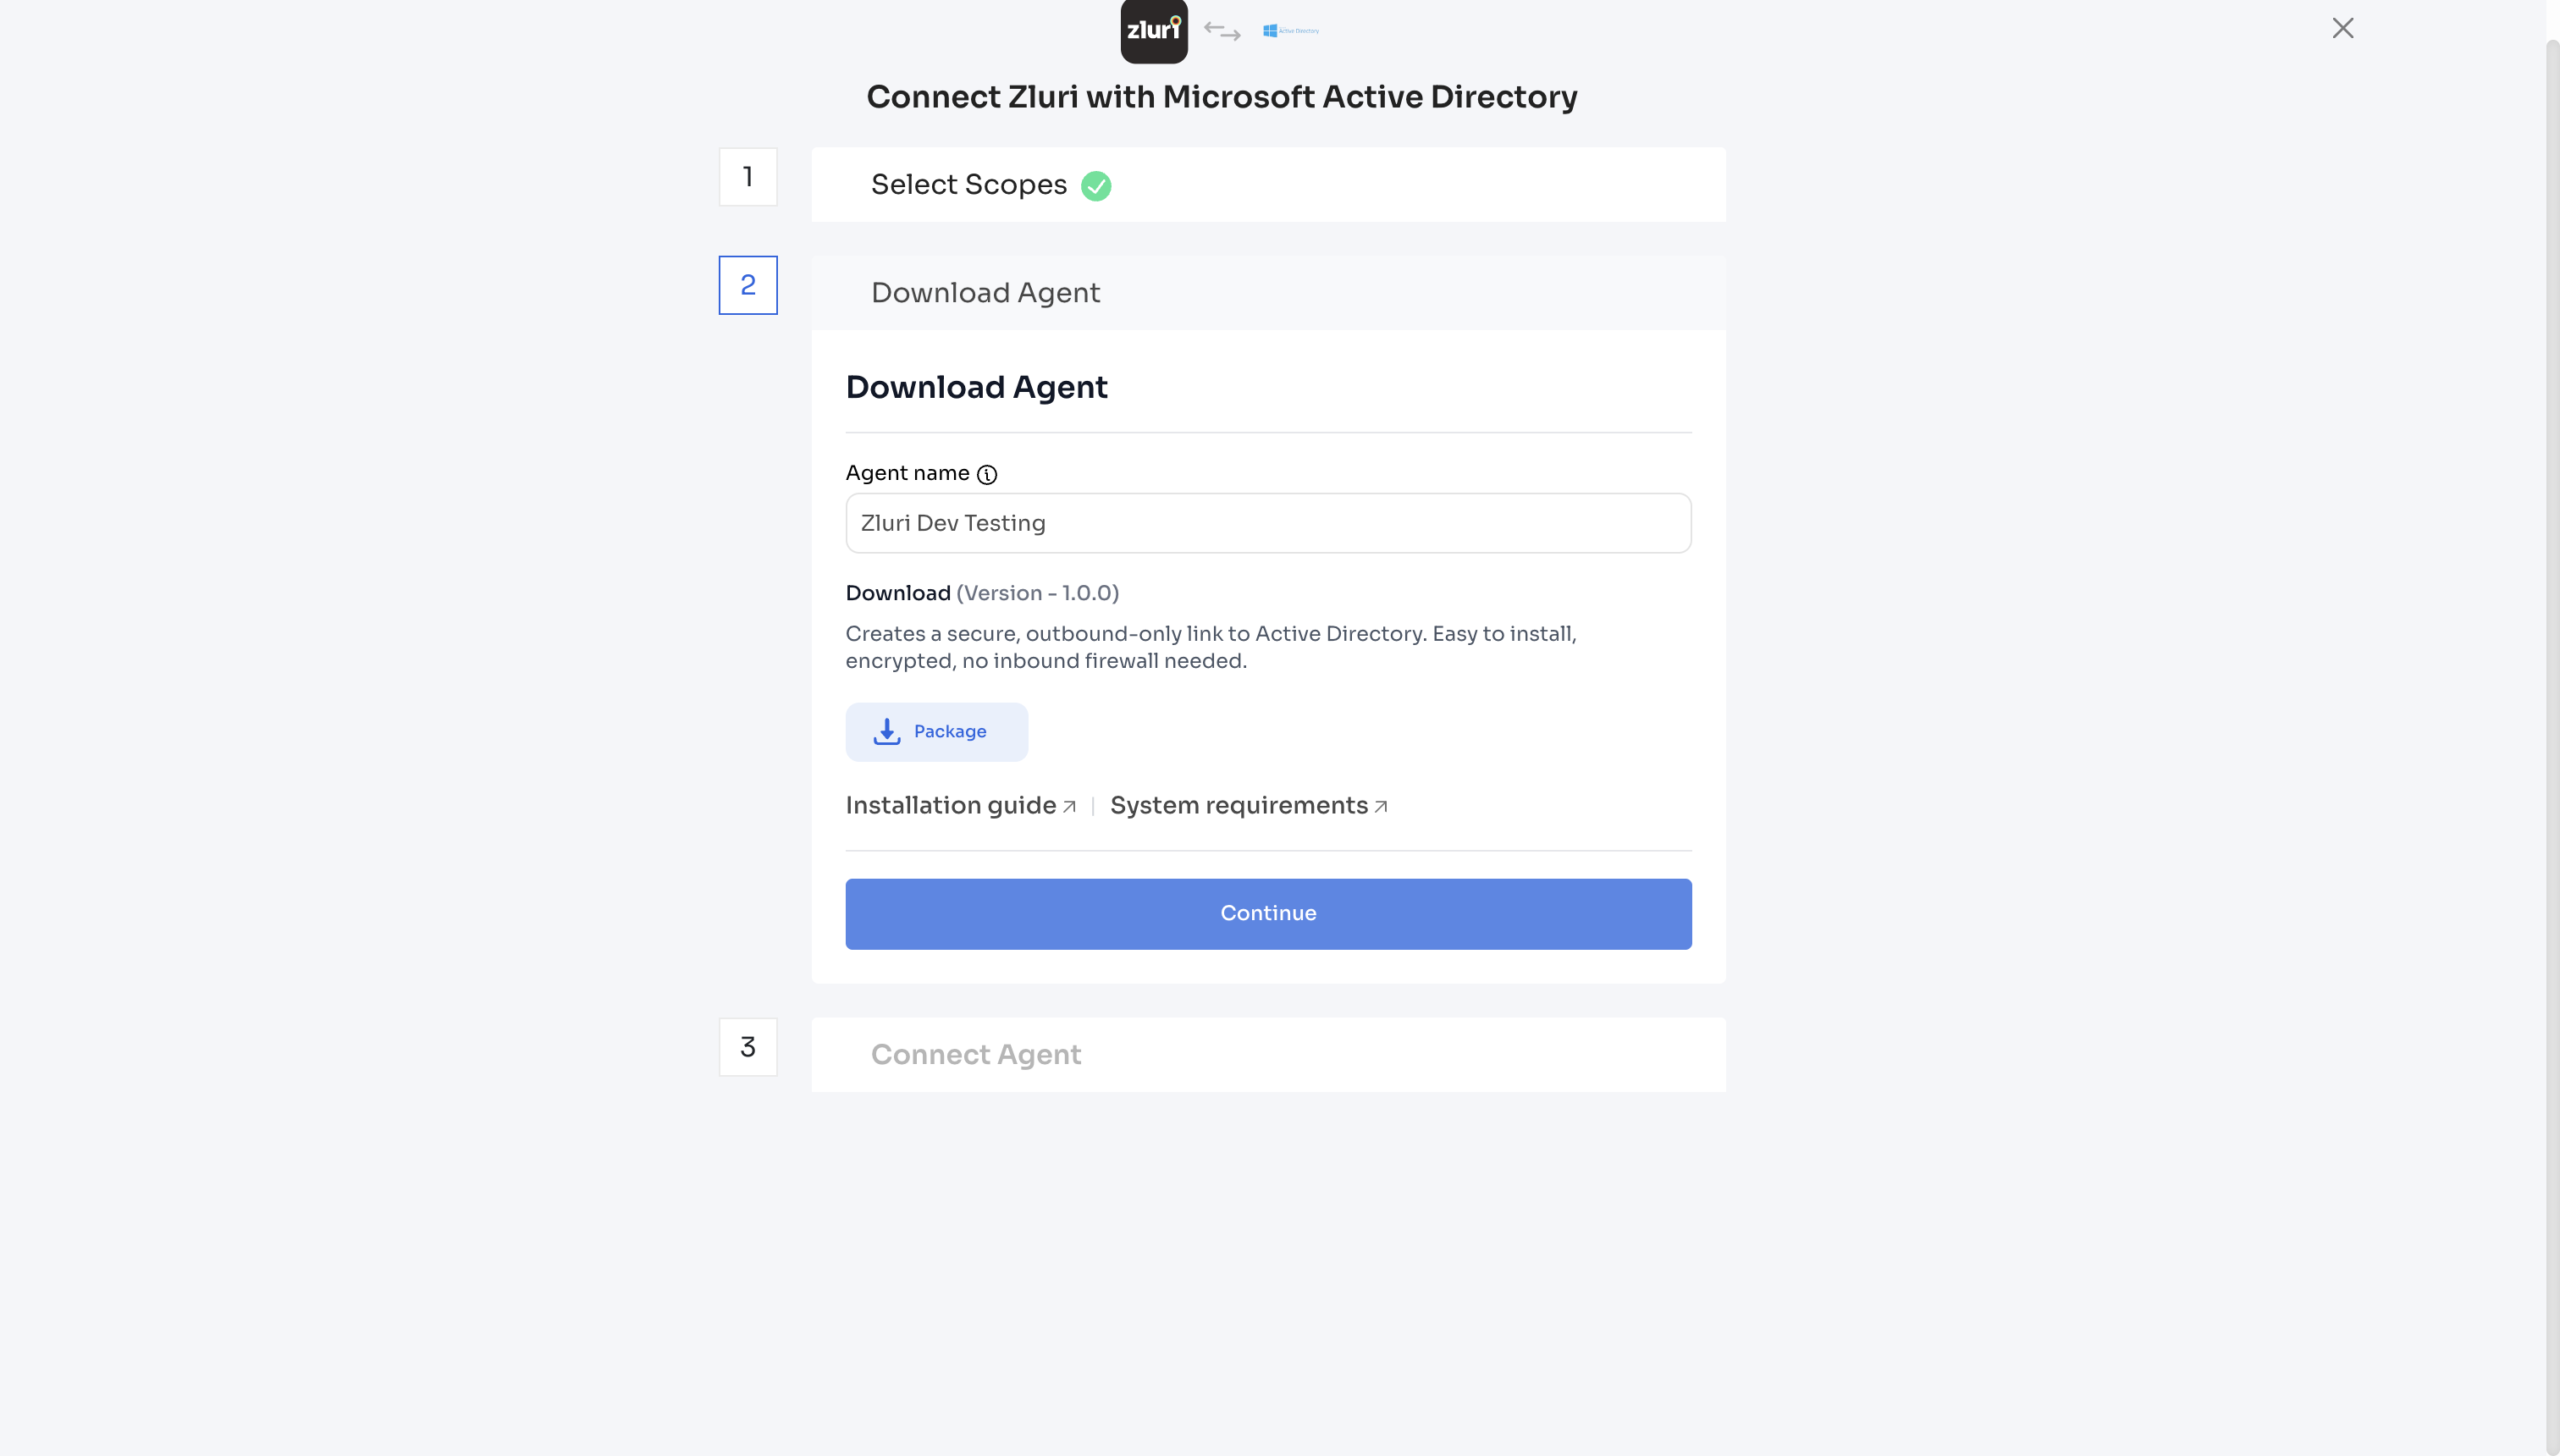
Step 2 — Download Agent
-
Enter an Agent name (mandatory and unique — e.g., "Zluri Dev Test"). The info icon (ⓘ) next to the field label provides naming guidance.
-
Under Download (Version - 0.1.5), you'll see the description: "Creates a secure, outbound-only link to Active Directory. Easy to install, encrypted, no inbound firewall needed."
-
Click the Package button to download the connector package. This contains the Docker image archive (
.tar.gz) anddocker-compose.ymlfile needed for deployment. -
Optionally, review the Installation guide and System requirements links for reference.
-
Click Continue to proceed to the next step.
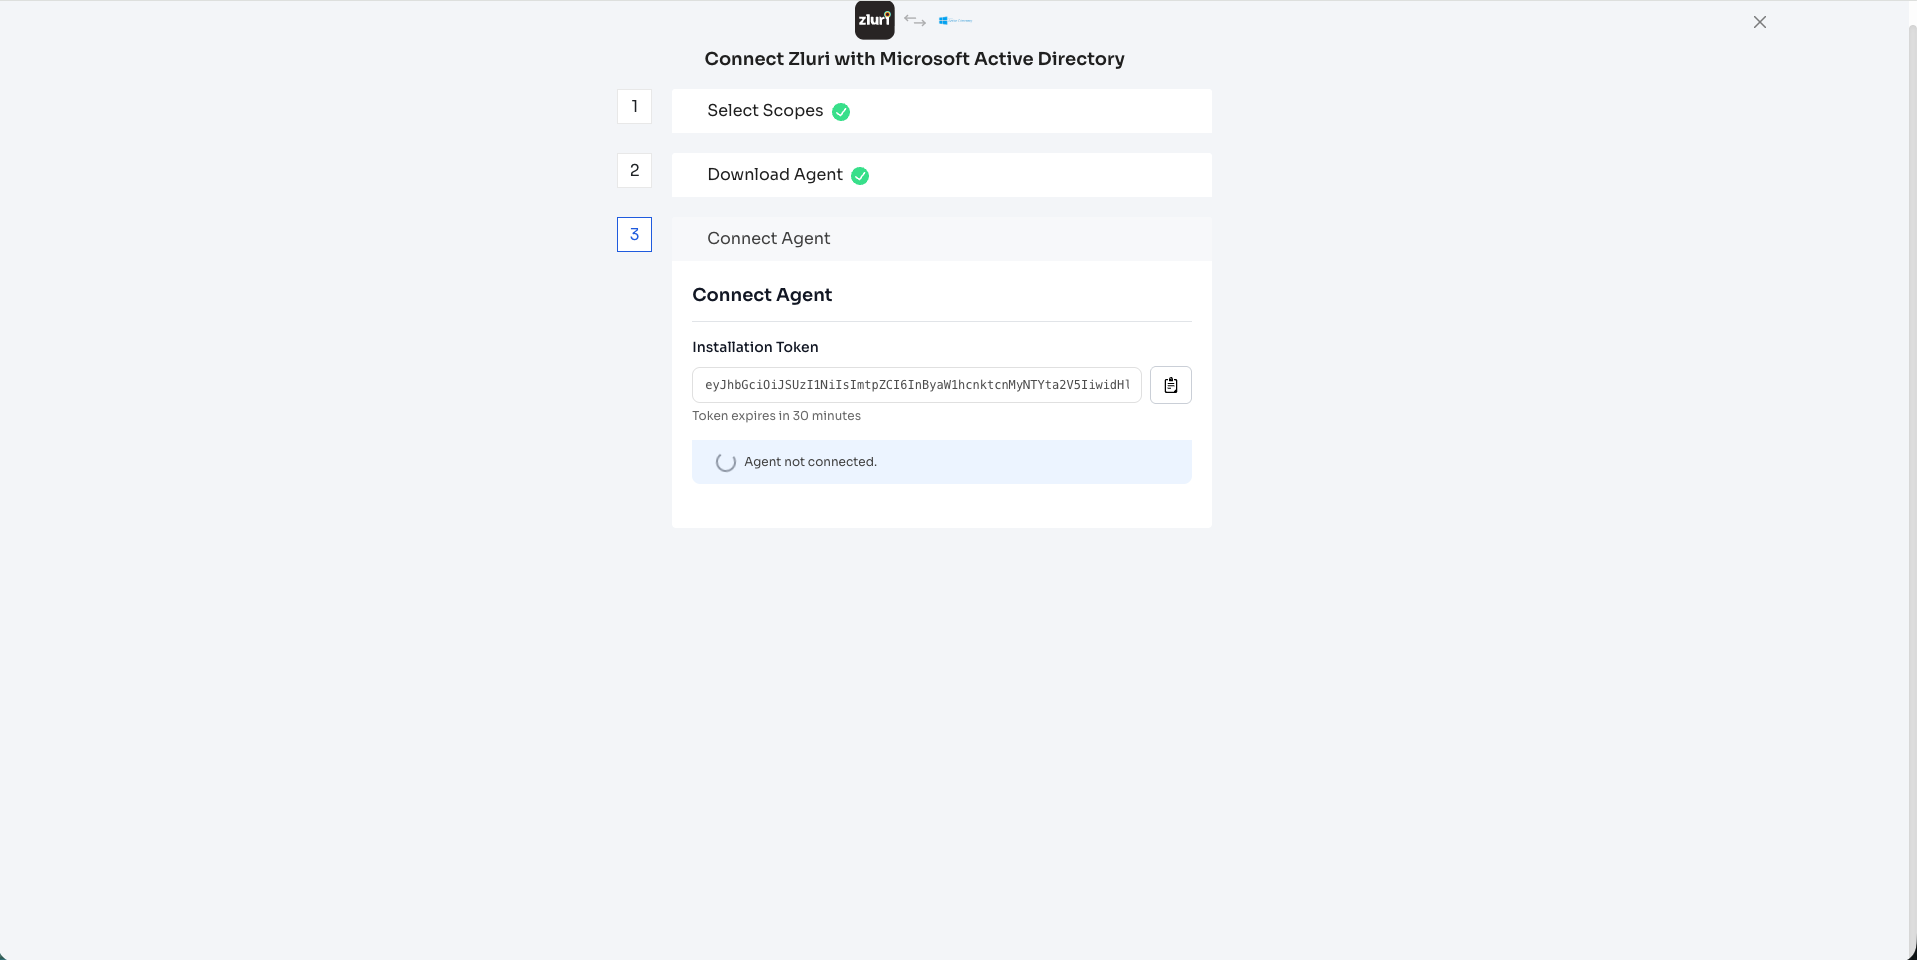
Step 3 — Connect Agent
-
The Installation Token is displayed in the text field — a long JWT token. Click the copy icon (📋) to the right of the token field to copy it.
-
Note the message: "Token expires in 30 minutes". Keep the token somewhere safe — you'll need it when registering the agent in the connector's Web UI.
-
Below the token, you'll see the status indicator: "Agent not connected." This will update to "connected" once you complete all setup steps (Parts 2–5).
Important: Do not close this page. You can return to it to check the connection status. If the token expires, navigate to Integrations > Microsoft Active Directory settings to generate a new one.
Part 2: Deploy the Connector (Docker)
Transfer the downloaded connector package to the server where you want to run the connector. Unzip it. You need the Docker image archive (.tar.gz) and the docker-compose.yml file.
Step 1 — Load the Docker Image
Navigate to the directory containing the downloaded files and open terminal in folder to load the image:
Mac/Linux:
docker load < zluri-ldap-connector.tar.gzWindows:
docker load -i zluri-ldap-connector.tar.gzYou should see the output:
Loaded image: zluri-ldap-connector:latest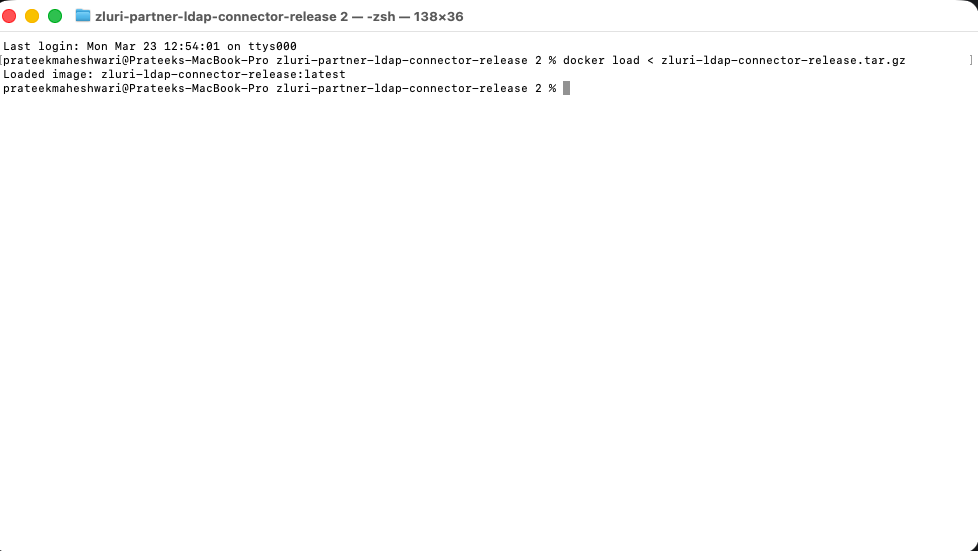
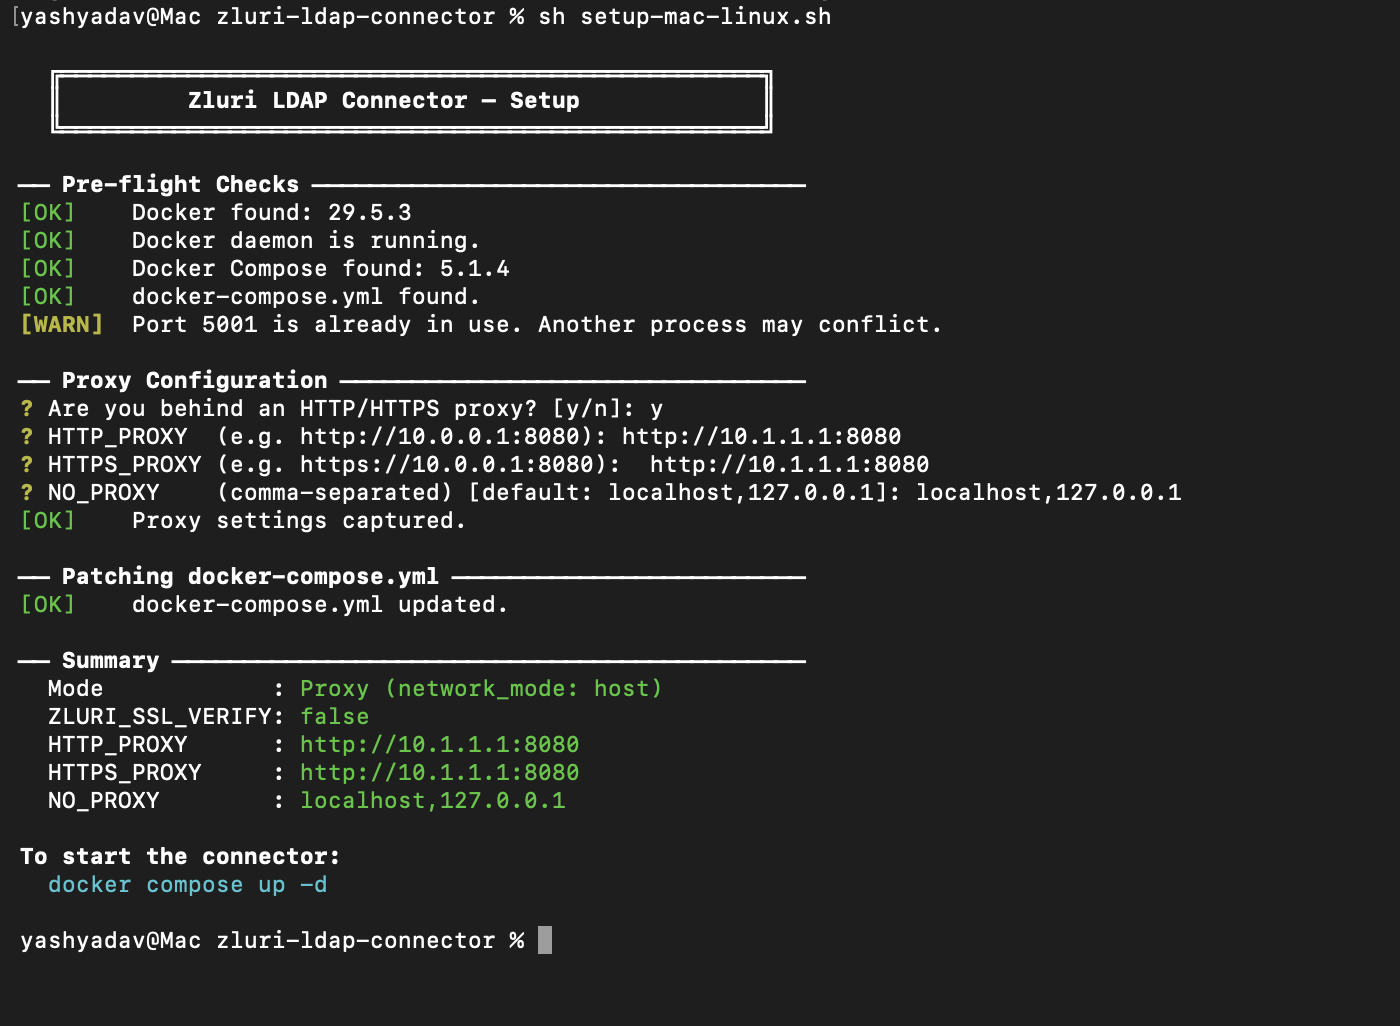
Step 2 — Set Proxy
Once loading the docker image, follow the below steps to setup proxy.
Ignore this step if proxy isn't required. Move to step 3 below.
- For Docker Build run this command in terminal:
sh setup-mac-linux.shORbash setup-mac-linux.shfile to set up proxy. - For Windows: Double click on the file names
setup-windows.batto set up proxy.
In both the above steps, it'll guide you to setup proxy with these steps:
-
Are you behind an HTTP/HTTPS proxy? Answer in Y/N.
-
It asks - HTTP_PROXY (e.g. http://10.0.0.1:8080): enter your proxy here
-
It asks - HTTPS_PROXY (e.g. https://10.0.0.1:8080): enter your proxy here
-
NO_PROXY (comma-separated) [default: localhost,127.0.0.1]: enter your local host here
-
Final Output: [OK] Proxy settings captured.
Step 3 — Start the Connector
Run Docker Compose to start the connector:
docker compose up -dYou'll see the container being created and started:
[+] Running 5/5
 ✔ Volume "..._connector-certs"   Created
 ✔ Volume "..._connector-logs"    Created
 ✔ Volume "..._connector-uploads" Created
 ✔ Volume "..._connector-data"    Created
 ✔ Container zluri-ldap-connector  Started
Verify the container is running:
docker ps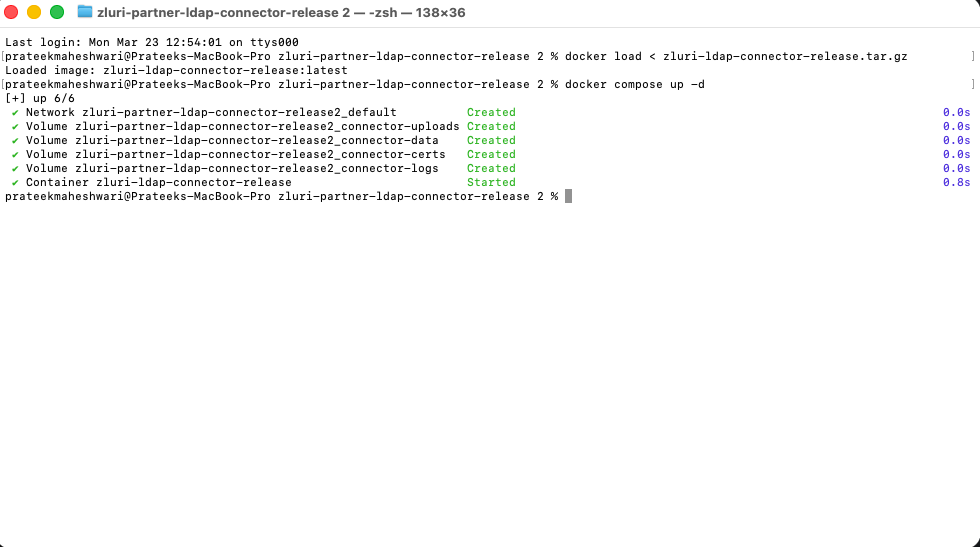
Part 2 (Alternative): Deploy the Connector on Windows (MSI)
📘 Docker or Windows?
This is the Windows / MSI alternative to Part 2: Deploy the Connector (Docker). If you downloaded the Windows.msiinstaller in Part 1 → Step 2 — Download Agent, follow the steps here instead of Part 2 (Docker), then continue to Part 3: Create Your Account & Register the Agent.The connector's behaviour is identical to the Docker build — it runs on-premises and talks to Zluri over outbound HTTPS only. Only the way it is installed and run differs.
Note: Part 1, and everything from Part 3 onward (Part 3: Create Your Account & Register the Agent, Part 4: Add a Directory Connection, Part 5: Configure the Zluri Integration, Part 6: Verify the Connection in Zluri) are the same for both builds. Only this deployment step changes.
What's different from the Docker build
| Docker build | Windows (MSI) build | |
|---|---|---|
| What you download | Docker image archive (.tar.gz) + docker-compose.yml | A single Zluri AD Connector.msi installer |
| How it runs | docker compose up -d container | A Windows background service (Scheduled Task) that starts on boot and restarts on failure |
| Database | MySQL container | Bundled SQLite (no separate database to install) |
| Agent Web UI | https://localhost:5001 | http://127.0.0.1:5055 |
| Prerequisites | Docker 20.10+, Docker Compose v2 | None — the installer is self-contained |
📘 No Docker, Python, or database is needed for the MSI build. The installer bundles everything, including a local SQLite database. You only need a Windows machine (Windows Server 2016+ or Windows 10/11) with local administrator rights that can reach your AD server and Zluri over outbound HTTPS.
Step 1 — Run the installer
- Copy
Zluri AD Connector.msito the Windows machine. - Right-click the file → Install, or double-click it. Accept the User Account Control (UAC) prompt so the installer can run with administrator rights.
- Follow the wizard through to completion.
The installer will:
- Install the app to
C:\Program Files\Zluri Inc\Zluri AD Connector - Create the runtime data folder at
C:\ProgramData\Zluri\AD Connector(holds the SQLite database, logs, uploaded certificates, and local config) - Register the connector as a background service named
Zluri AD Connectorand start it immediately
When setup finishes you'll see a confirmation dialog:
"Zluri AD Connector has been installed successfully and is now running as a background service. The connector will start automatically on every system boot."
Important: If you see a "requires administrator privileges" message, the post-install step could not complete. Open File Explorer, go to
C:\Program Files\Zluri Inc\Zluri AD Connector\_installer, right-clickrun_post_install.bat, and choose Run as administrator.
Step 2 — Confirm the service is running
The connector runs as a Scheduled Task. To verify from an administrator Command Prompt or PowerShell:
schtasks /query /tn "Zluri AD Connector"The Status should read Running. The service auto-starts on every boot and is automatically restarted (within ~1 minute) if the process is ever stopped unexpectedly.
Step 3 — Continue to Part 3
The connector is now deployed. Continue with Part 3: Create Your Account & Register the Agent exactly as documented — with one difference:
Note: When Part 3 asks you to open the agent Web UI, use
http://127.0.0.1:5055for the Windows (MSI) build (the Docker build useshttps://localhost:5001). The UI is bound to localhost only and is not reachable from other machines. Everything else in Parts 3–6 is identical.
Managing the Windows service (MSI)
Run these from an administrator Command Prompt / PowerShell.
| Action | Command |
|---|---|
| Check status | schtasks /query /tn "Zluri AD Connector" |
| Stop (intentional — will not auto-restart) | schtasks /end /tn "Zluri AD Connector" |
| Start | schtasks /run /tn "Zluri AD Connector" |
| View logs | Open C:\ProgramData\Zluri\AD Connector\logs |
| Database location | C:\ProgramData\Zluri\AD Connector\data\connector.db |
Upgrading the MSI build
To upgrade to a newer build, simply run the new .msi — it replaces the installed version in place while preserving all runtime data (database, logs, certificates, and configuration) under C:\ProgramData\Zluri\AD Connector.
Tip: Migrating from an older (non-background-service) build? Place the new
.msiin the same folder as the providedupgrade.bat, then right-clickupgrade.bat→ Run as administrator. It stops the old process and installs the background-service build for you.
Uninstalling the MSI build
- Open Settings → Apps → Installed apps (or Control Panel → Programs and Features).
- Select Zluri AD Connector → Uninstall.
During uninstall you'll be asked whether to remove runtime data:
- Keep data (default) — the SQLite database, logs, certificates, and config are preserved at
C:\ProgramData\Zluri\AD Connectorfor a future reinstall. - Remove runtime data — deletes that folder entirely. Choose this only if you want a clean removal.
The uninstaller stops and removes the background service automatically.
Part 3: Create Your Account & Register the Agent
Open a browser and navigate to:
https://<SERVER_IP>:<PORT>Example:
For Docker Build: https://localhost:5001 or 127.0.0.1:5001.
For Windows Build: 127.0.0.1:5055.
Note: Your browser will show a certificate warning for self-signed certs — accept the exception to proceed. HTTPS is always on; a self-signed certificate is auto-generated on first boot.
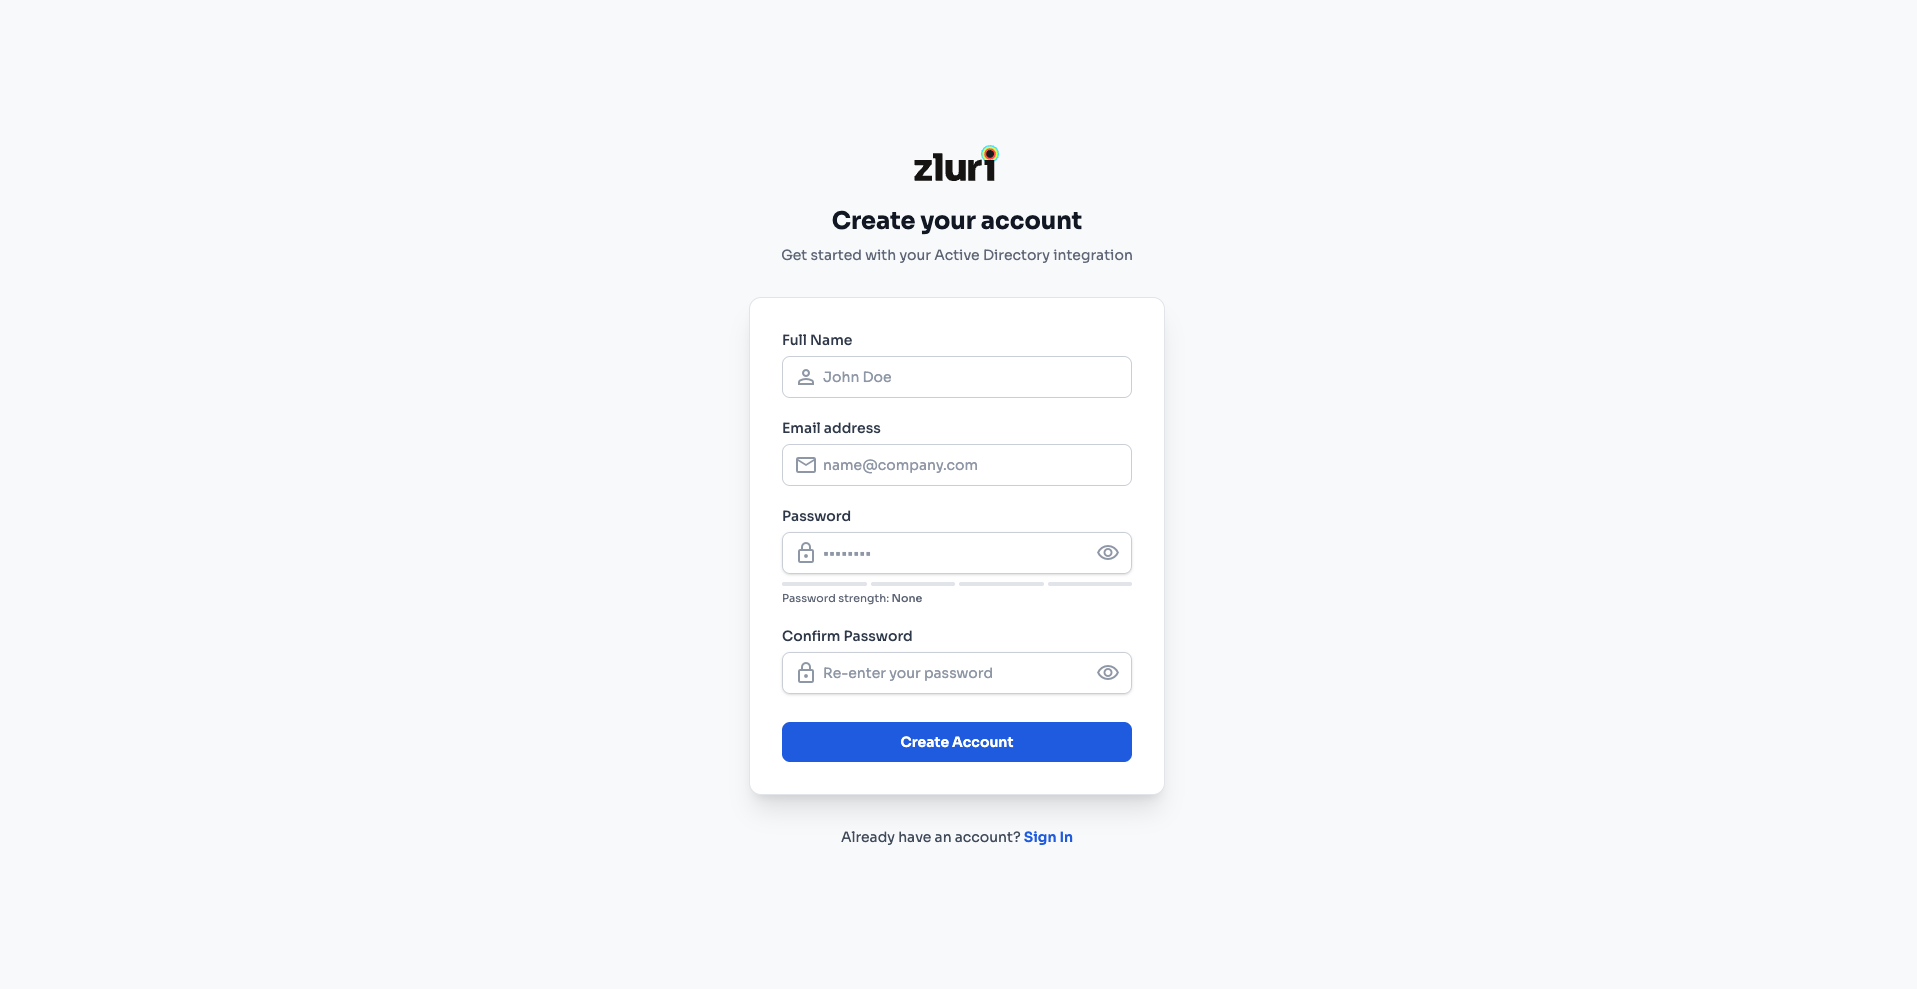
Step 1 — Create Your Account
On first access, you'll see the "Create your account" page with the subtitle: "Get started with your Active Directory Integration."
This creates a local user. Only the logged-in user to the agent has access to active directory integration. This is a mandatory security layer to ensure that no one apart from the individual who has setup their account on agent can access Active Directory integration and do changes to it.
Fill in the following fields:
| Field | Description |
|---|---|
| Full Name | Your name (e.g., "John Doe") |
| Email address | Your work email (e.g., [email protected]) |
| Password | Choose a strong password. A password strength indicator is shown below the field. |
| Confirm Password | Re-enter the password to confirm. |
Click Create Account to proceed.
Tip: If you already have an account, click the "Already have an account? Sign In" link at the bottom.
Step 2 — Register the Agent with Zluri
After signing in, you'll see the Dashboard with a yellow banner: "Agent registration required" — "Enter your Zluri API token below to register this agent. You won't be able to configure AD or Zluri instances until this is complete."
The dashboard shows:
- Connection Status: Not Registered
- Heartbeat: Inactive
- Polling Time: Unknown
To register:
- In the Register Agent section, locate the Zluri API Token field.
- Paste the Installation Token you copied from the Zluri UI in Part 1, Step 3.
- You'll see a hint: "You can find this token in Overview > Integrations > Microsoft Active Directory."
- Click Register Agent.

Once registration succeeds, you'll see a green "Agent registered successfully!" toast notification. The dashboard will update to show:
- Connection Status: Registered
- Heartbeat: Active (with interval shown, e.g., 60s)
- Polling Time: 1 min
- Agent Status badge in the top-right changes to Agent Active (green)
The Zluri API Token is now masked (e.g., z|ur1_a|_p1 ••••••••••••) for security.

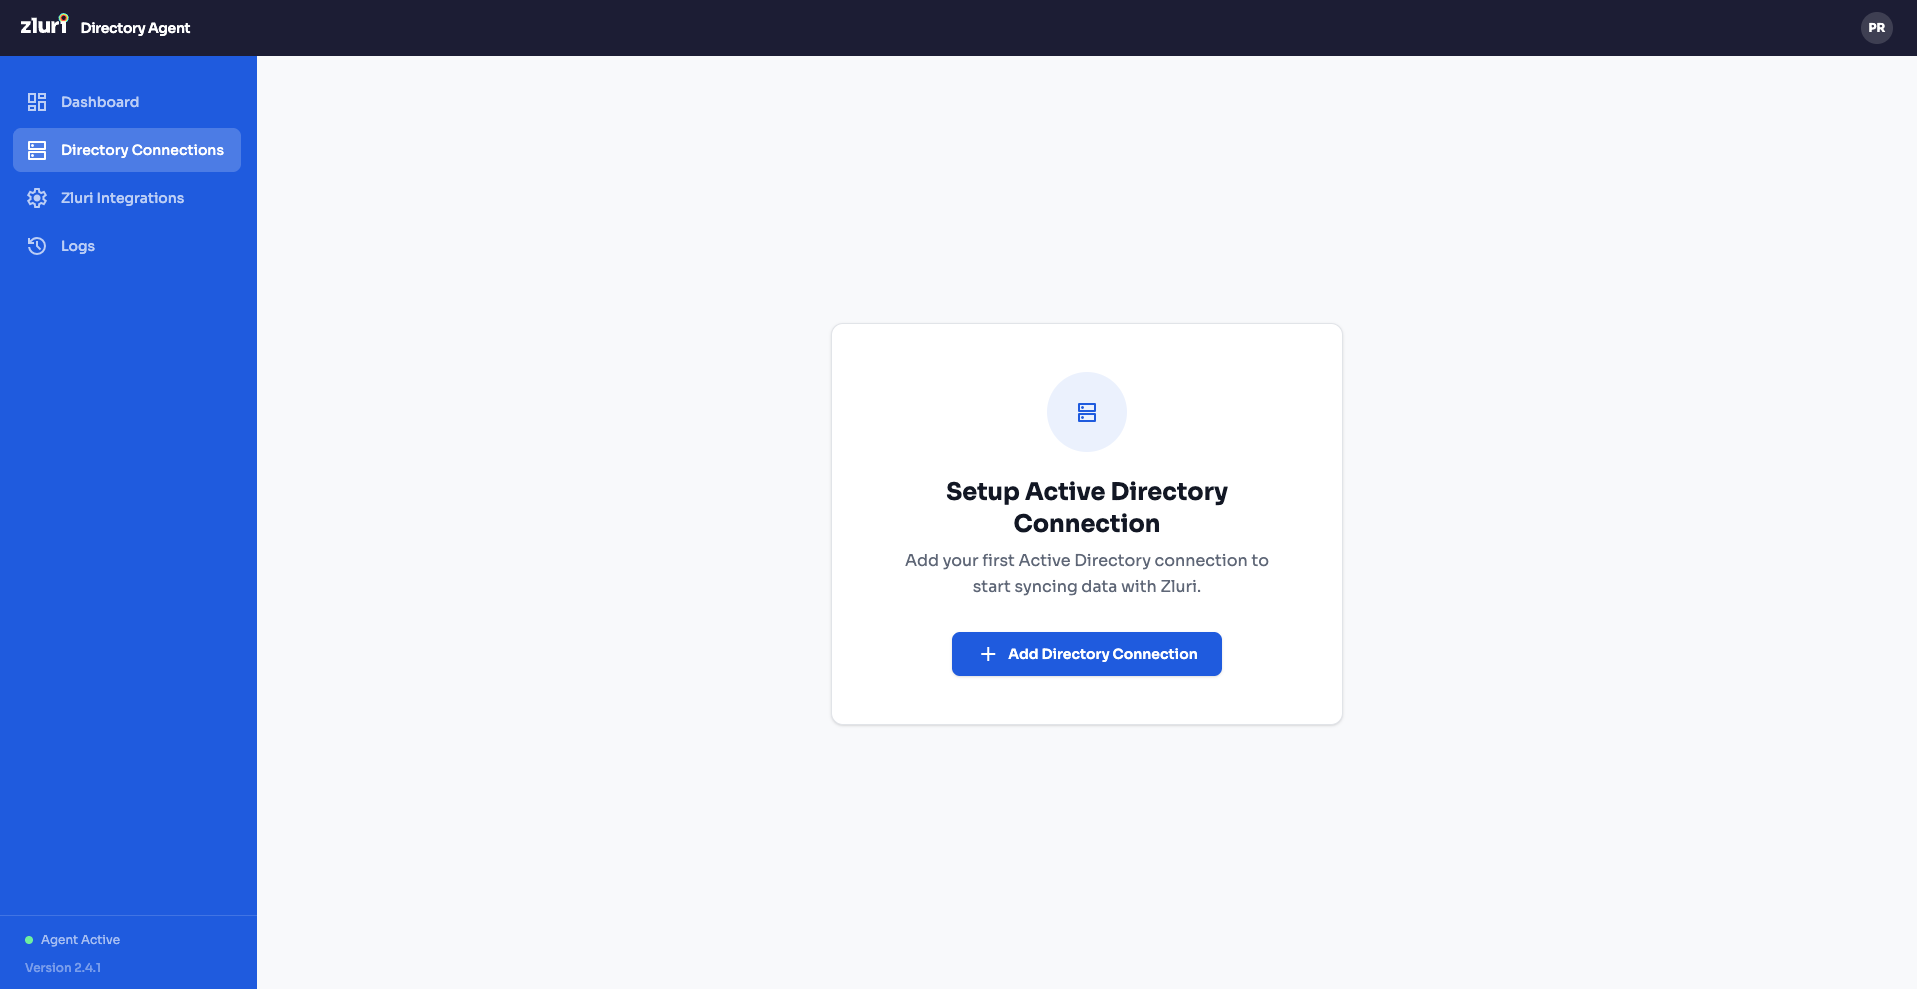
Part 4: Add a Directory Connection
Now you need to connect the agent to your on-premises Active Directory server.
Step 1 — Navigate to Directory Connections
Click Directory Connections in the left sidebar. You'll see the "Setup Active Directory Connection" page prompting you to add your first connection.
Click + Add Directory Connection.
Step 2 — Enter Connection Settings
The "Add Active Directory Connection" form has three sections. Start with Connection Settings:
| Field | Description | Example |
|---|---|---|
| Directory Name | A friendly name for this connection | Zluri Dev |
| Host / IP | Hostname or IP address of your AD server | ECOMPANY.DELPM.diut.dev |
| Port | LDAP port — 389 for LDAP, 636 for LDAPS | 636 |
| Use SSL/TLS (LDAPS) | Toggle ON for secure connection (recommended) | ON (blue toggle) |
| SSL/TLS Certificate | Upload a .pem certificate. Click to upload (accepts .pem, .crt files) | (select file) |
| Bind DN | Distinguished Name of the service account used to authenticate with AD | cn=Administrator,cn=Users,dc=zluri,dc=dev |
| Bind Password | Password for the Bind DN account | (your password) |
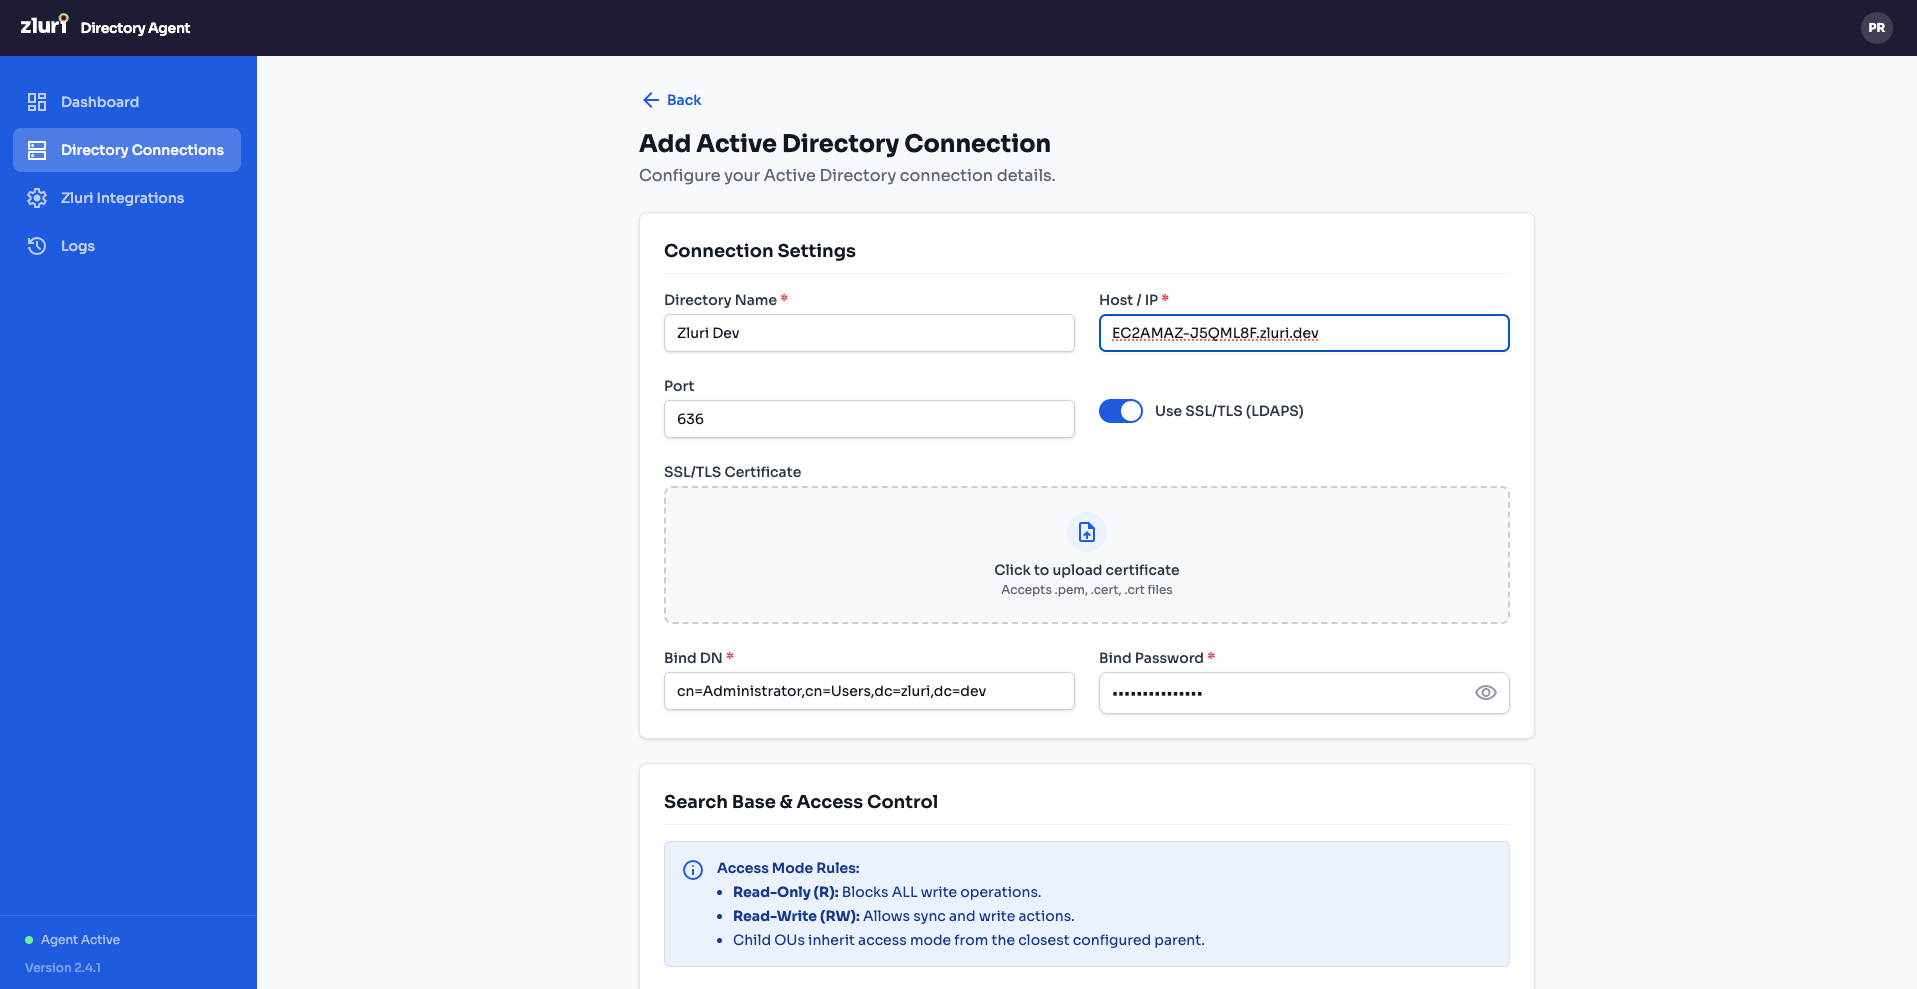
Recommended Setup: Secure Port 636Use Secure Port 636 with LDAPS and SSL/TLS certificates.
- Reason: Without LDAPS on 636, the "Add User with Work Email" workflow action will create a disabled user without a password.
- When using Port 636, the user is created with a password and an enabled account.
How to Find Your Bind DN
- Open Active Directory Users and Computers (ADUC) on your AD server.
- Enable View > Advanced Features.
- Navigate to the user account you want to use as the service account.
- Right-click the user > Properties > Attribute Editor tab.
- Look for the distinguishedName attribute — this is your Bind DN.
- Example:
CN=Administrator,CN=Users,DC=example,DC=com
- Example:
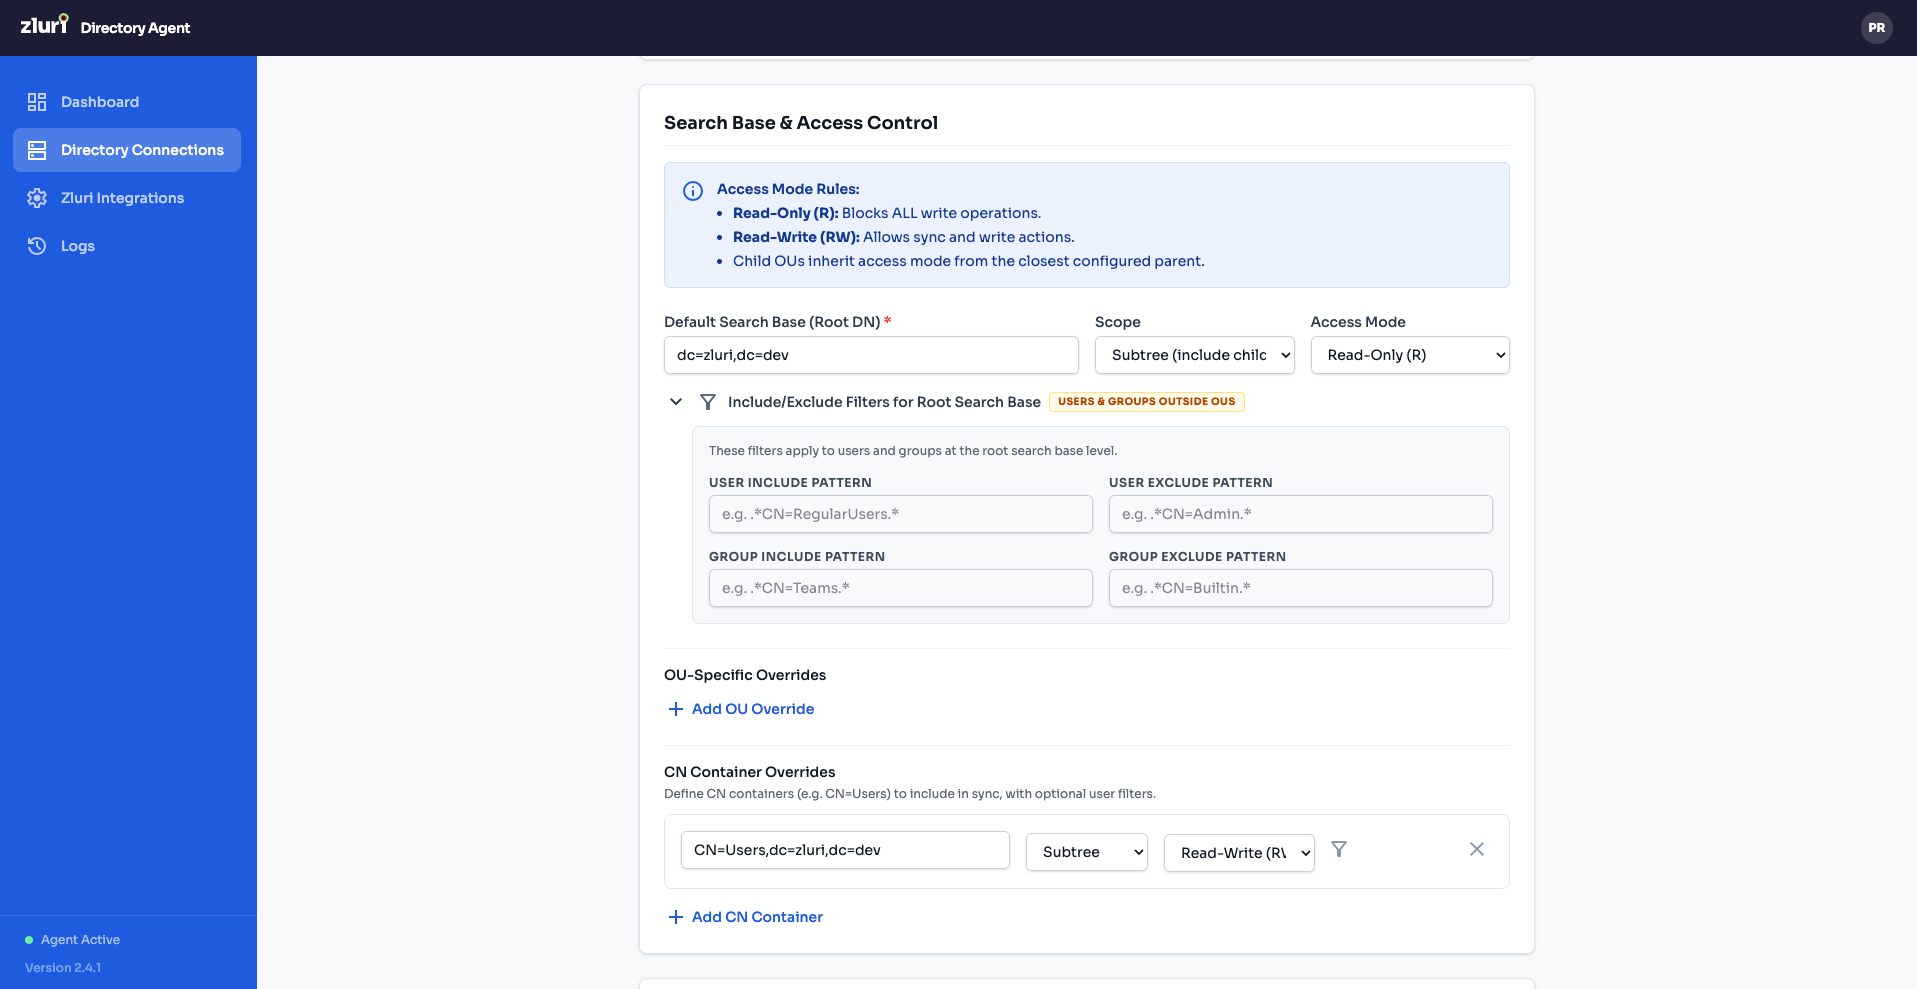
Step 3 — Configure Search Base & Access Control
Scroll down to the Search Base & Access Control section. This controls which parts of your AD are synced and with what permissions.
Access Mode Rules (explained at the top of the section):
- Read-Only (R): Blocks ALL write operations.
- Read-Write (RW): Allows sync and write actions.
Default Search Base
| Field | Description | Example |
|---|---|---|
| Default Search Base (Root DN) | The root DN where the agent starts searching | dc=zluri,dc=dev |
| Scope | How deep to search: Subtree (Include-only) searches all child OUs | Subtree (Include-only) |
| Access Mode | Default permission for all entities under this base | Read-Only (R) |
Include/Exclude Filters for Root Search Base
Click "Show & Manage Access Filter" to expand the filter panel. These regex-based filters control which users and groups are synced from the root search base:
| Filter | Description | Example |
|---|---|---|
| USER INCLUDE PATTERN | Regex pattern — only users matching this DN pattern are synced. Empty = include all. | ^CN=ActiveUsers,.* |
| USER EXCLUDE PATTERN | Regex pattern — users matching this DN pattern are skipped. | ^CN=Guest,.* |
| GROUP INCLUDE PATTERN | Regex pattern — only groups matching are synced. Empty = include all. | ^CN=(TEAM|APP)_.* |
| GROUP EXCLUDE PATTERN | Regex pattern — groups matching are skipped. | ^CN=BuiltIn,.* |
OU-Specific Overrides
For granular control over specific OUs, click + Add OU Override to add rules that override the default search base settings for particular OUs. Each override lets you set a different baseDN, scope, access mode, and filters.
OU Container Overrides
If your AD stores objects in the built-in OU containers, you can define overrides for those containers. For example, the default CN=Users,CN=dc=zluri,dc=dev container with Subtree scope and Read-Write (R) access. Click + Add OU Container to add more.
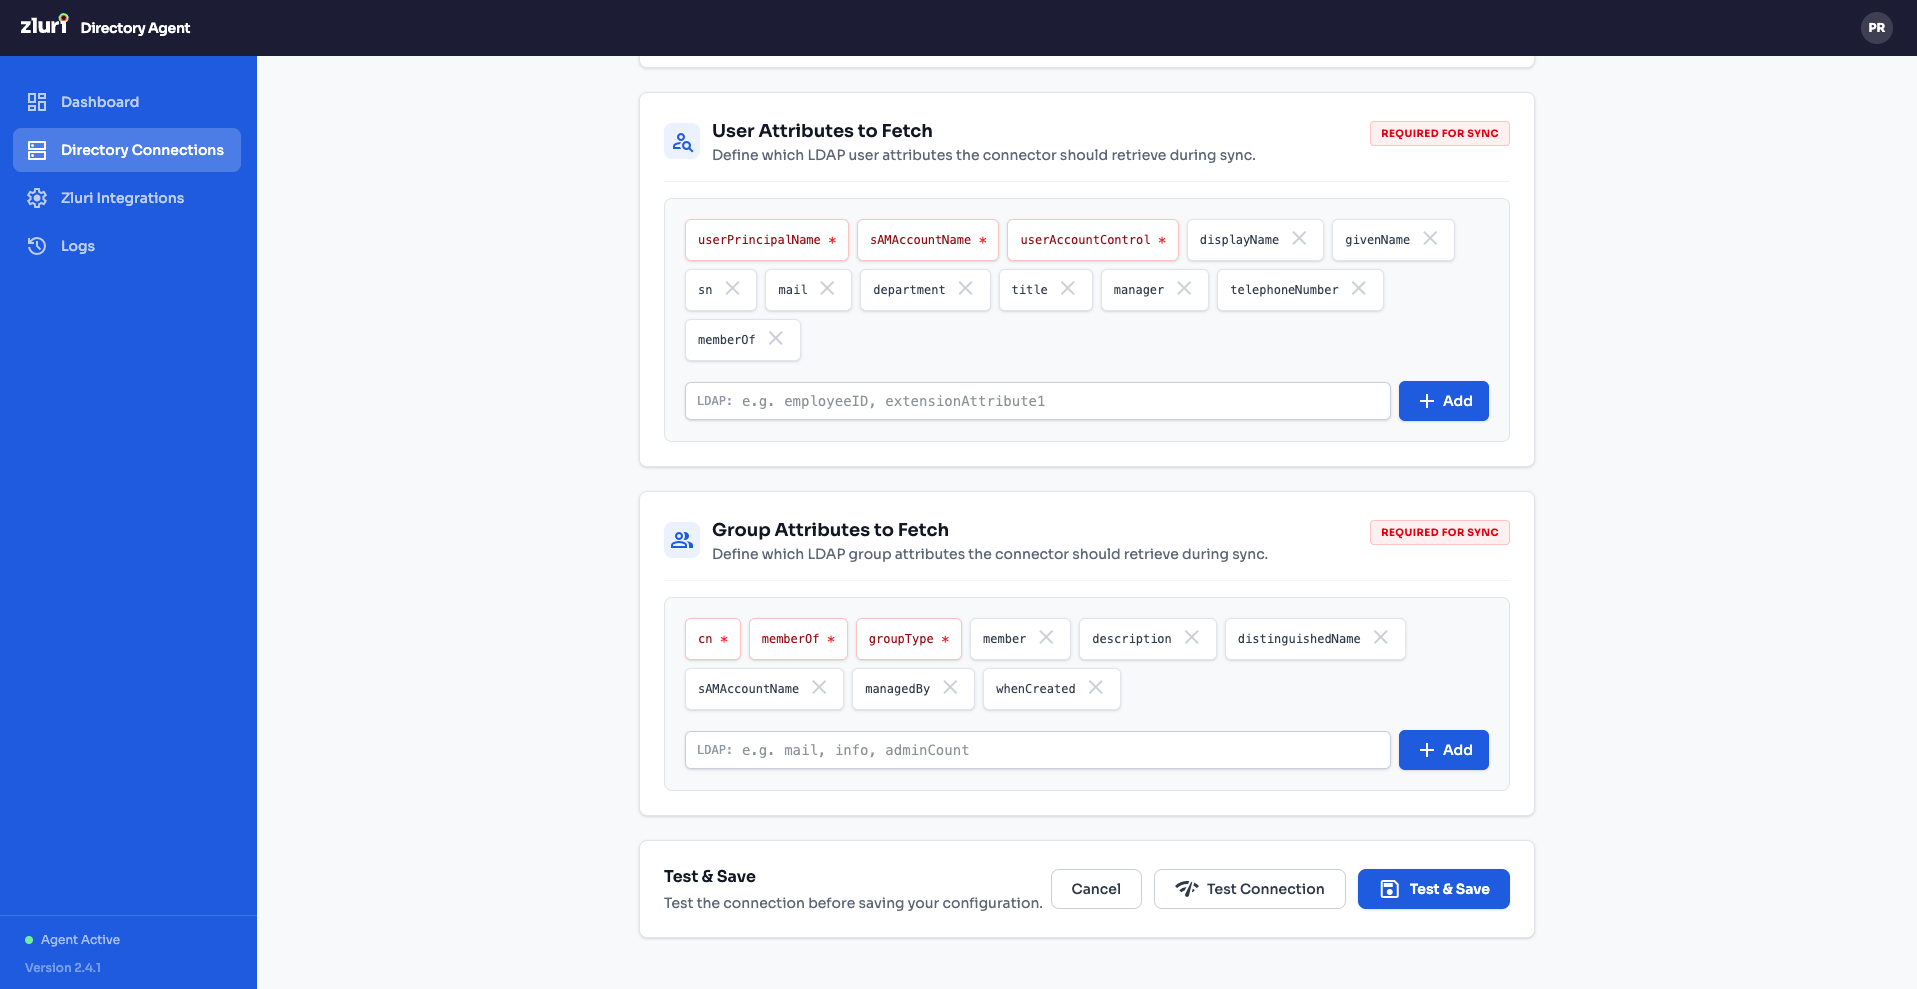
Step 4 — Configure Attributes to Fetch
Scroll down further to the Attributes section. This controls which LDAP attributes the connector retrieves during sync.
User Attributes to Fetch — Shown as tags. The required/immutable attributes are pre-loaded (shown in blue tags). You can add additional attributes by typing in the input field and clicking + Add.
Default user attributes include: sn, sAMAccountName, userPrincipalName, userAccountControl, mail, givenName, proxyAddresses, cn, memberOf, whenChanged, etc.
Group Attributes to Fetch — Similarly shown as tags. Default group attributes include: cn, member, groupType, objectClass, distinguishedName, memberOf, etc.
Note: The connector always fetches a minimal, non-removable set of core attributes (dn, cn, objectClass, etc.) even if they're not listed here. You cannot accidentally remove required attributes.
Step 5 — Test & Save
At the bottom of the form, you'll see the Test & Save bar:
- Click Test Connection to verify the agent can reach your AD server with the provided credentials and settings.
- Once the test passes, click Test & Save to save the directory connection.
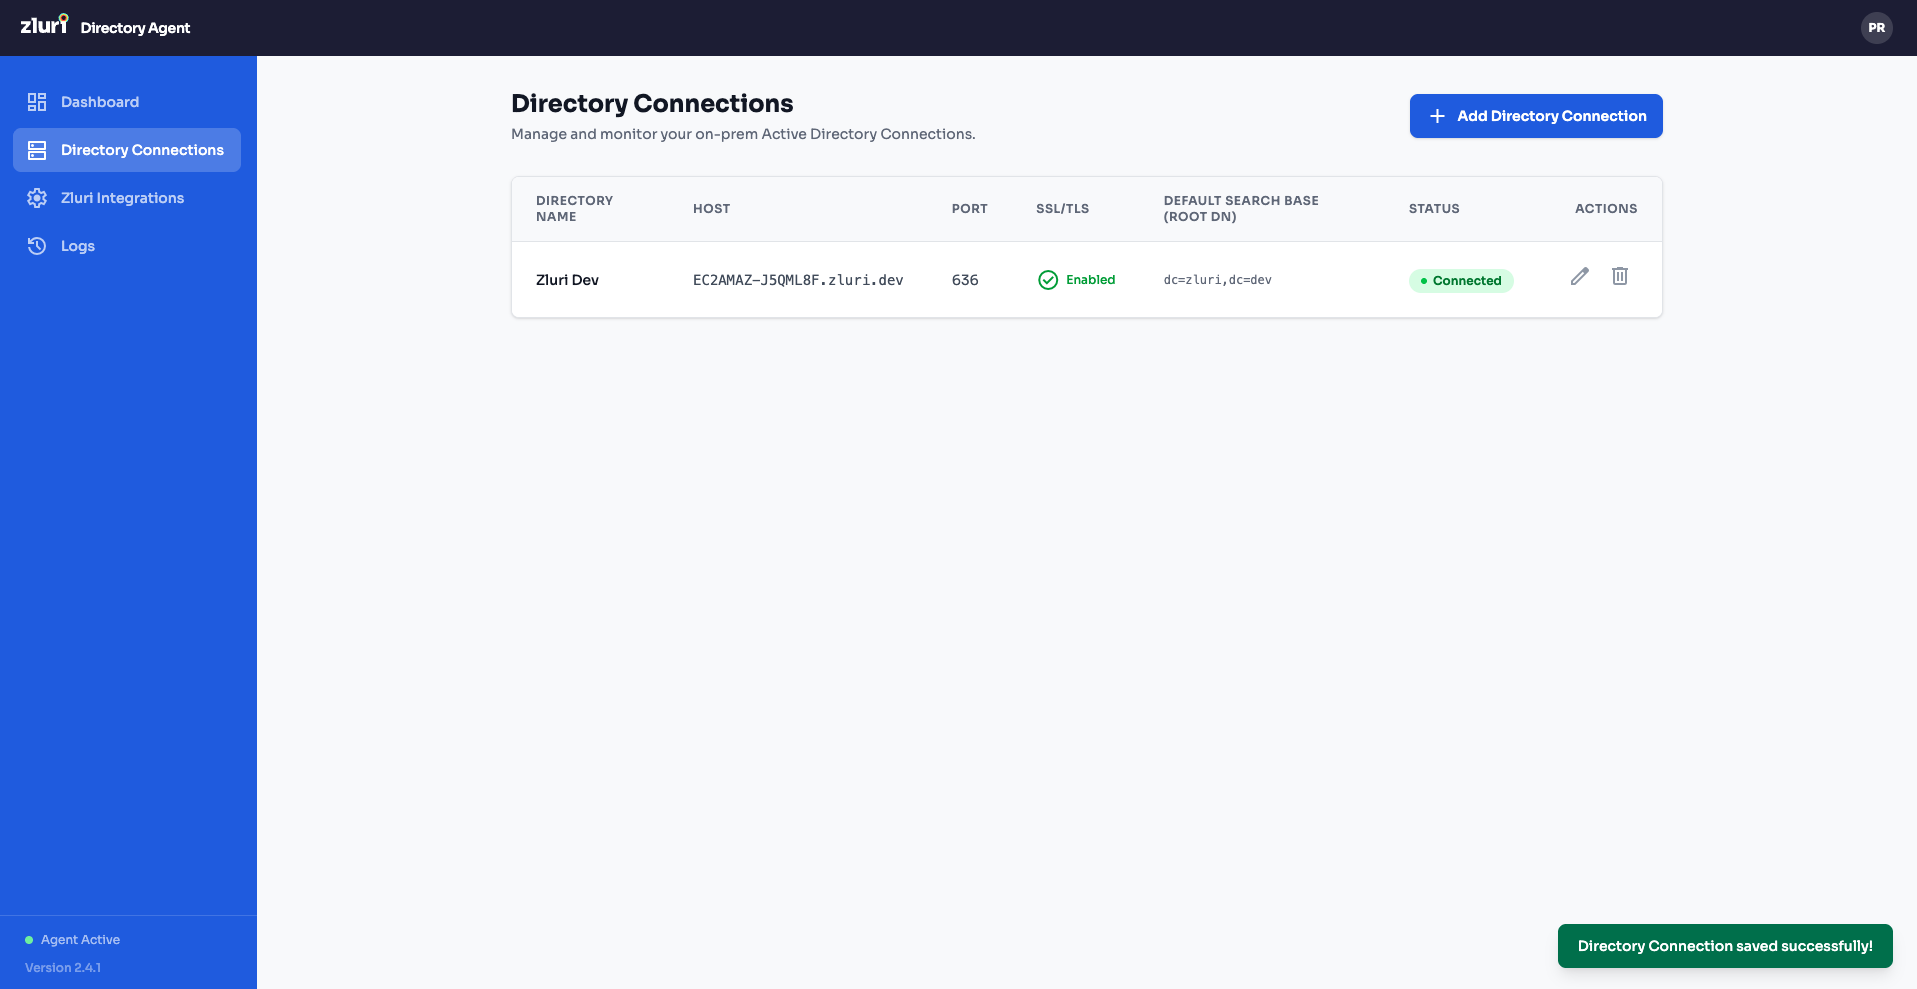
Step 6 — Directory Connection Saved
After saving, you're taken to the Directory Connections list view. Your new connection appears with:
| Column | Example Value |
|---|---|
| Directory Name | Zluri Dev |
| Host | ECOMPANY.DELPM... |
| Port | 636 |
| SSL/TLS | Enabled |
| Default Search Base | dc=zluri,dc=dev |
| Status | Connected (green) |
| Actions | Edit (✏️) and Delete (🗑️) icons |
A green "Directory Connection saved successfully!" toast confirms the save.
Part 5: Configure the Zluri Integration
With the AD connection established, you now need to create a Zluri Integration — this maps AD attributes to Zluri fields and sets the sync schedule.
Step 1 — Navigate to Zluri Integrations
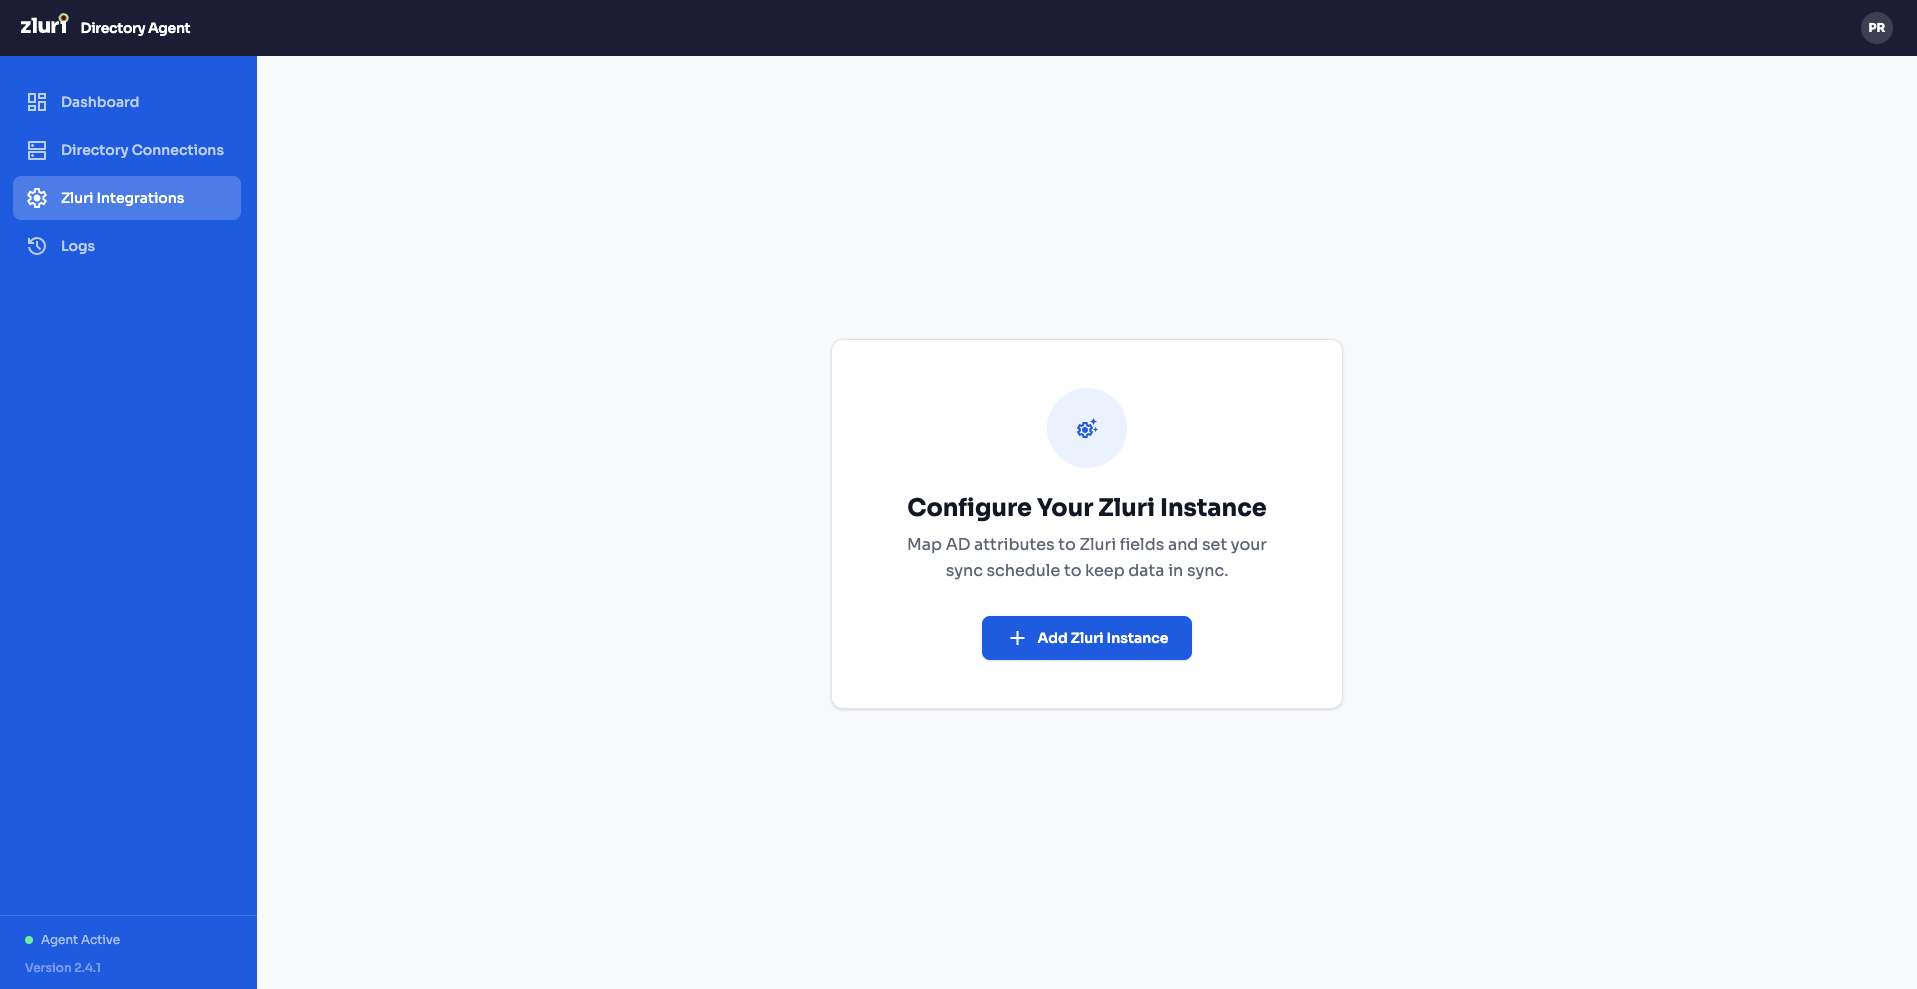
Click Zluri Integrations in the left sidebar. You'll see the "Configure Your Zluri Instance" page with the message: "Map AD attributes to Zluri fields and set your sync schedule to keep data in sync."
Click + Add Zluri Instance.
Step 2 — Create the Integration
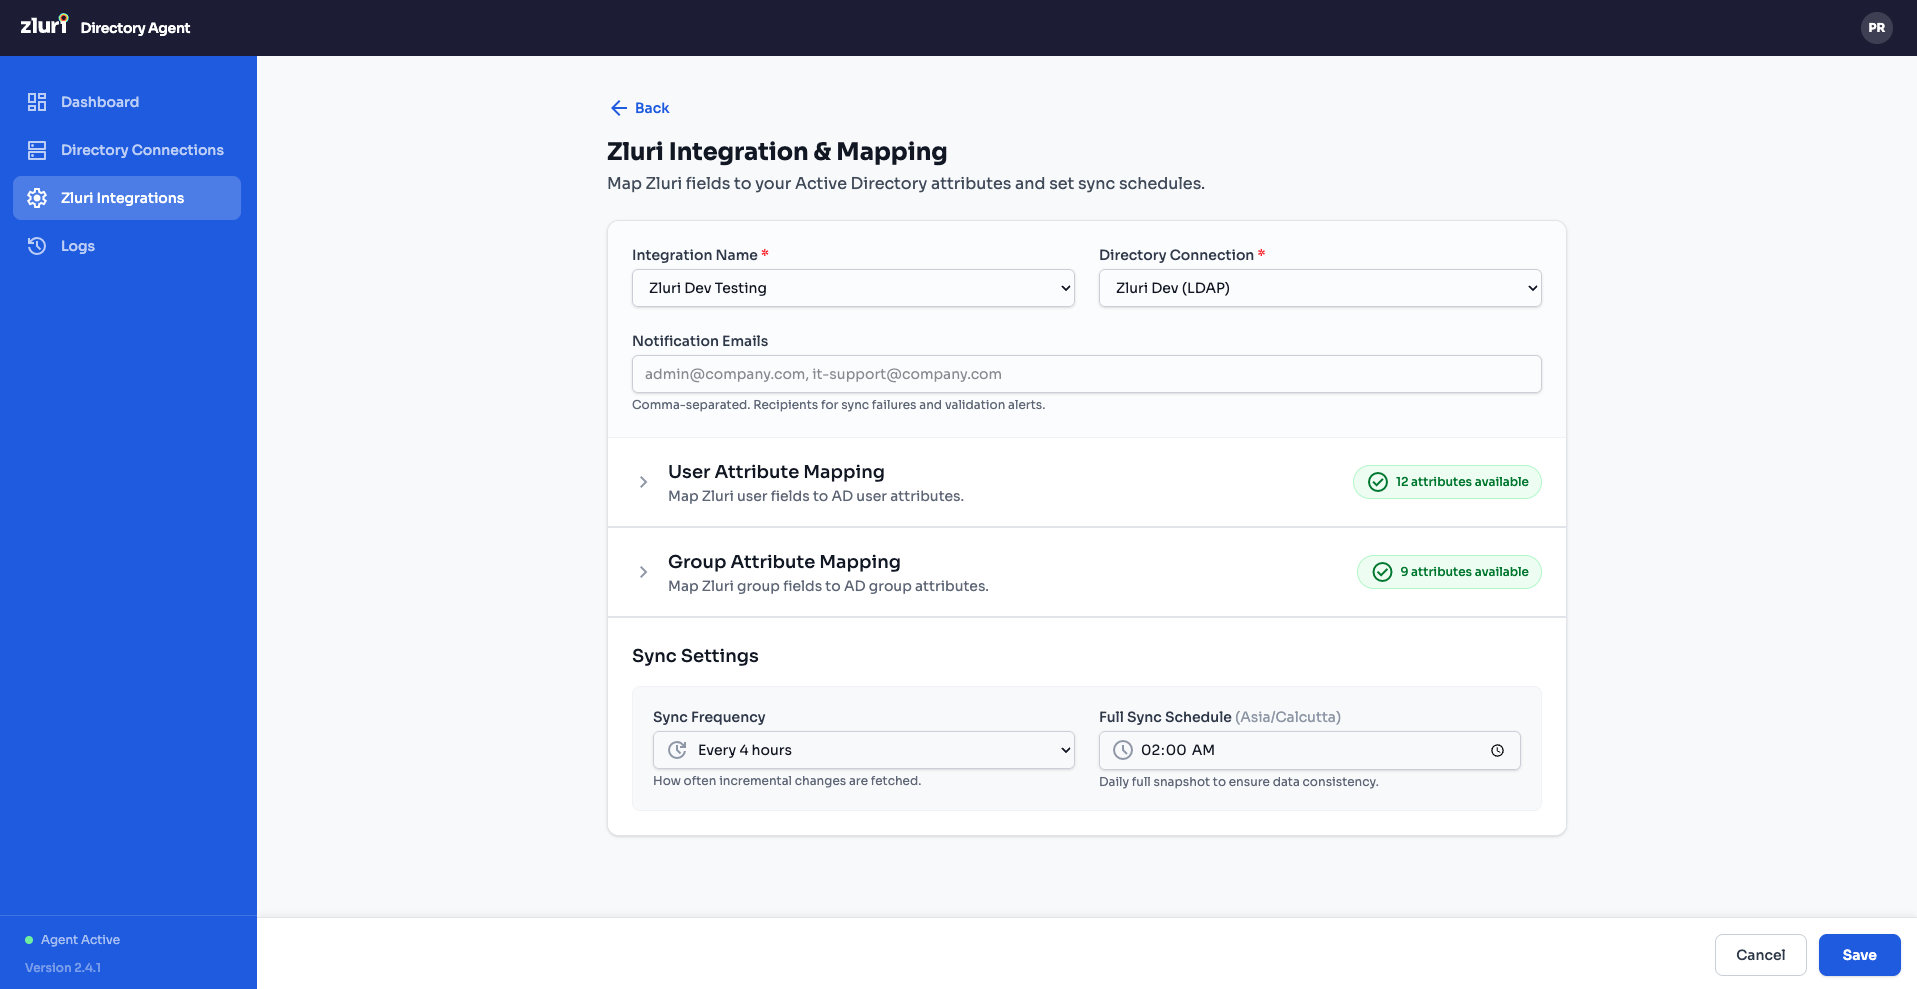
The "Zluri Integration & Mapping" form opens. Fill in the top section:
| Field | Description | Example |
|---|---|---|
| Integration Name | A name for this integration | Zluri Dev Testing |
| Directory Connection | Select the AD connection you created in Part 4 | Zluri Dev (LDAP) |
| Notification Emails | Comma-separated emails for sync failure/success alerts. Accepts regex patterns for validation. | [email protected] |
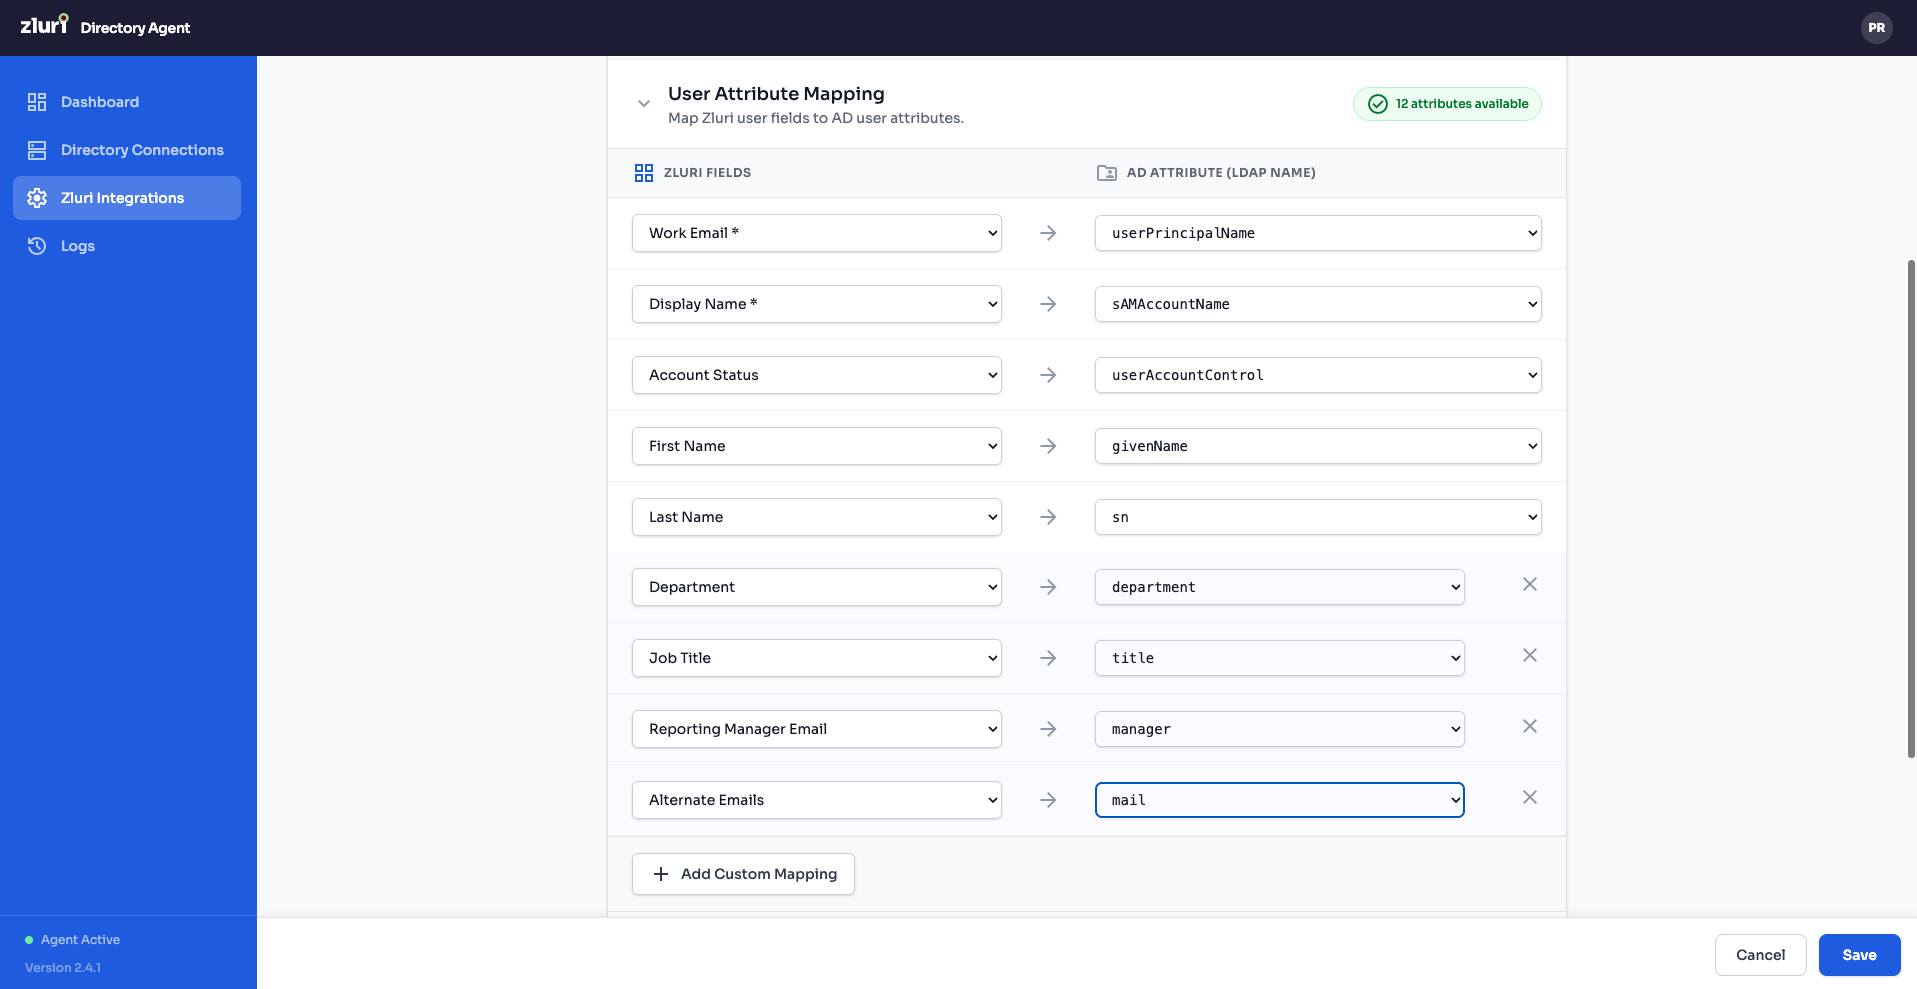
Step 3 — Configure User Attribute Mapping
Expand the User Attribute Mapping section (click the header). You'll see the message: "Map Zluri user fields to AD user attributes."
The mapping is displayed as two columns:
| Zluri Fields(Examples) | → | AD Attribute(Examples) |
|---|---|---|
| Work Email | → | userPrincipalName |
| Display Name | → | sAMAccountName |
| Account Status | → | userAccountControl |
| First Name | → | givenName |
| Last Name | → | sn |
| Department | → | department |
| Job Title | → | title |
| Reporting Manager Email | → | manager |
| Alternate Emails | → | mail |
Each row has a ✕ button to remove the mapping. Click + Add Custom Mapping at the bottom to define additional field mappings.
A badge in the section header shows the count (e.g., "13 attributes available") indicating how many AD attributes are available for mapping.
You can toggle between ZLURI FIELDS and AD ATTRIBUTES (LDAP NAMES) tabs at the top of the mapping section.
Step 4 — Configure Group Attribute Mapping
Expand the Group Attribute Mapping section similarly. Map Zluri group fields to AD group attributes. The setup is analogous to user mapping.
Step 5 — Set Sync Schedule
In the Sync Settings section at the bottom of the form:
| Setting | Description | Example |
|---|---|---|
| Sync Frequency | How often changes are synced | Every 4 hours (dropdown selection for 2,4,8,12 & 24) |
| Full Sync Schedule (daily/default) | Time of day for a complete directory sync | 03:00 AM (time picker with 🔍 icon) |
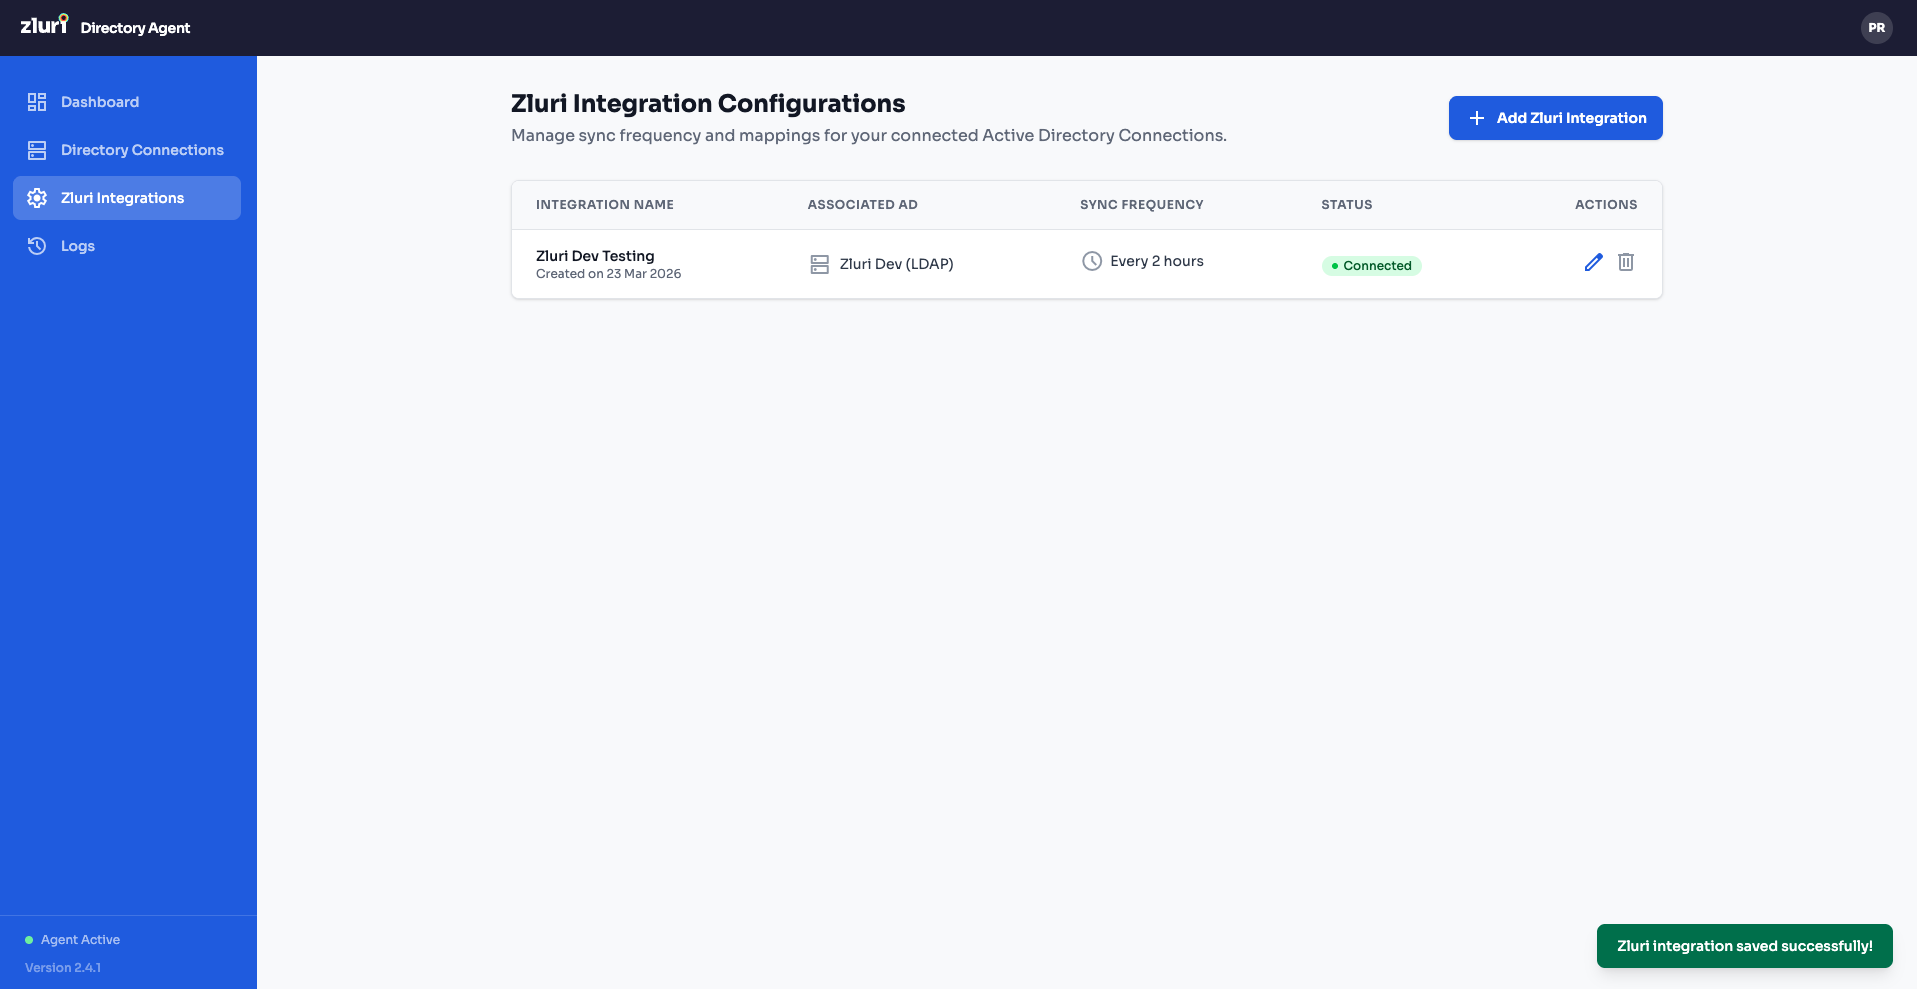
Step 6 — Save the Integration
Click Save to create the integration. You'll be taken to the Zluri Integration Configurations list view showing:
| Column | Example Value |
|---|---|
| Integration Name | Zluri Dev Testing |
| Associated AD | Zluri Dev (LDAP) |
| Sync Frequency | Every 2 Hours |
| Status | Connected (green) |
| Actions | Edit (✏️) and Delete (🗑️) icons |
A green "Zluri integration saved successfully!" toast confirms the save.
Part 6: Verify the Connection in Zluri
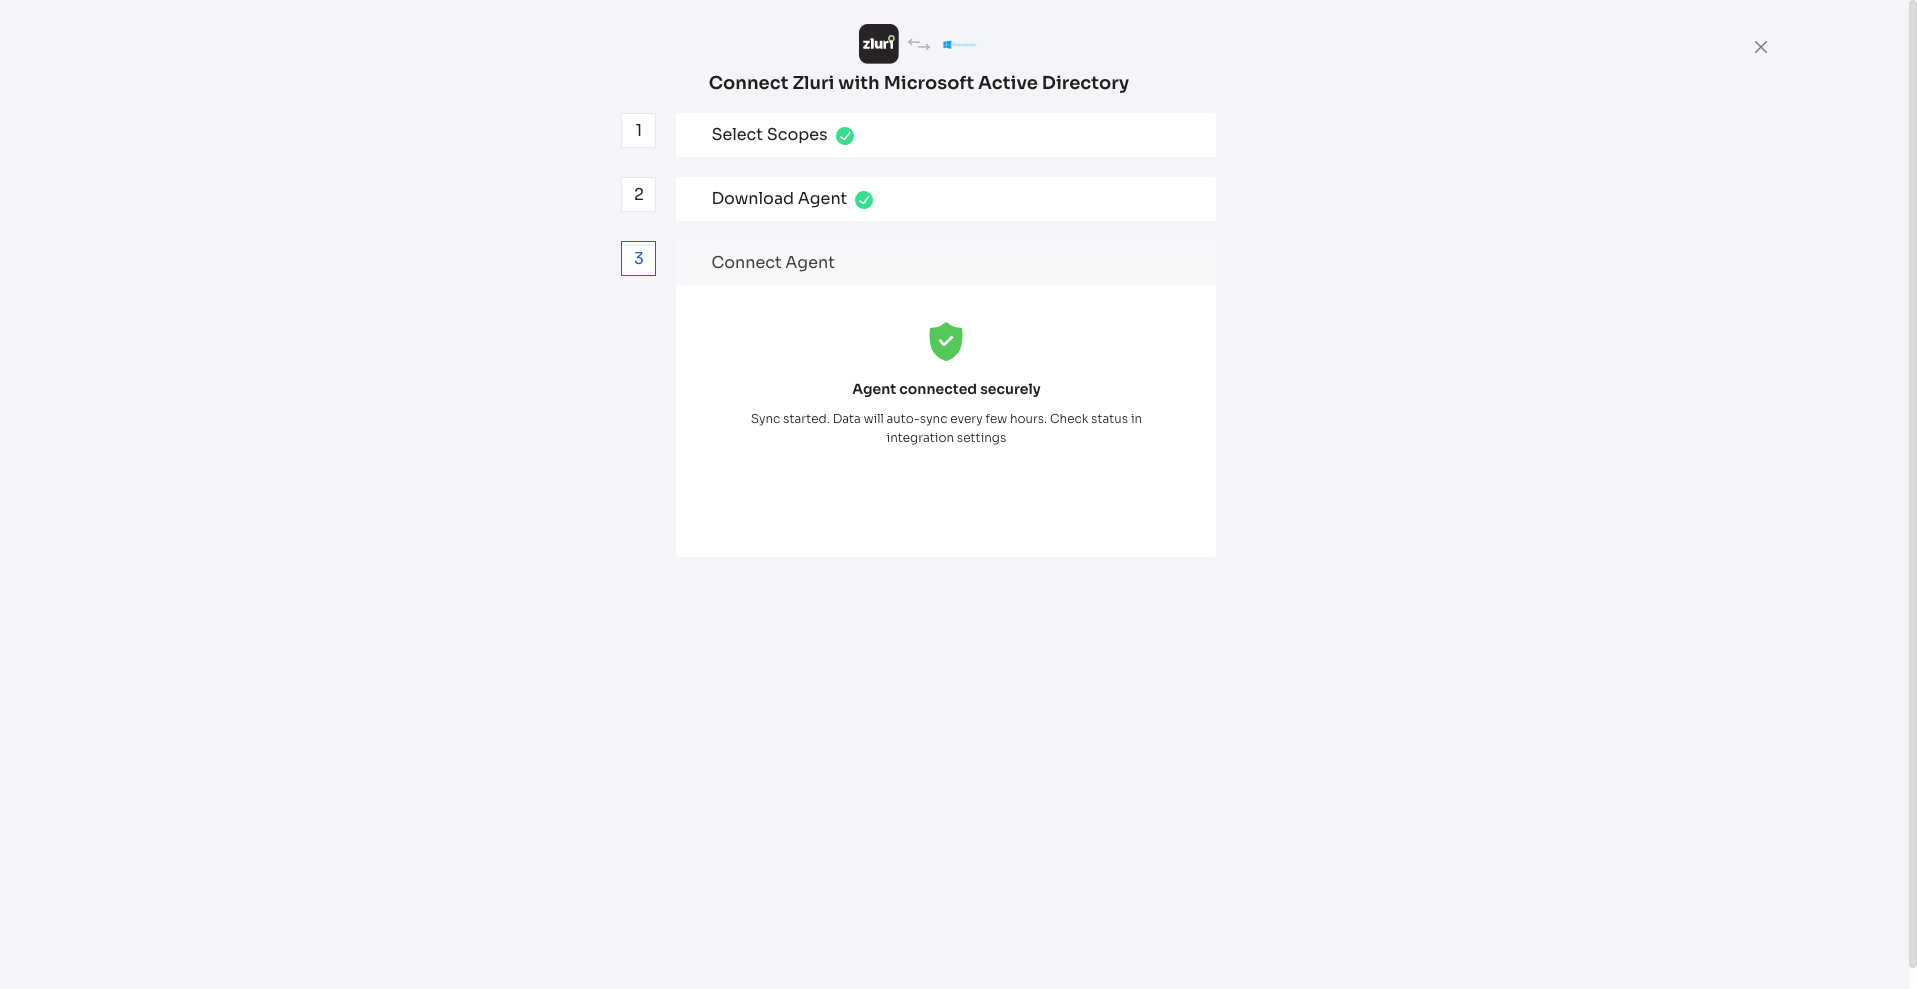
Go back to the Zluri platform (the browser tab from Part 1). The Step 3 panel will now show:
- A green shield icon with a checkmark
- "Agent connected securely"
- "Sync started. Data will auto-sync every few hours. Check status in Integration settings."
All three steps show green checkmarks — Select Scopes ✅, Download Agent ✅, Connect Agent ✅.
Your Microsoft Active Directory is now fully connected to Zluri.
HTTPS / TLS Configuration
HTTPS is always on. The connector never starts without a valid certificate.
Self-Signed Certificate (Default)
On first start, if no certificate exists, the container automatically generates a self-signed certificate valid for 10 years. It is stored in the connector-certs Docker volume and persists across container restarts.
The SAN (Subject Alternative Name) of the generated cert includes:
- The bind IP you supplied (
$HOST) 127.0.0.1DNS:localhost
Replace with a CA-Signed Certificate
To replace the auto-generated certificate with your own CA-signed certificate:
docker cp /path/to/your-cert.pem zluri-ldap-connector:/certs/cert.pem
docker cp /path/to/your-key.pem  zluri-ldap-connector:/certs/key.pem
docker restart zluri-ldap-connector
The container prints the loaded certificate's subject and expiry date on every start so you can confirm which cert is in use.
Persistent Data (Docker Volumes)
| Volume | Mount Point | Contents |
|---|---|---|
connector-certs | /certs | TLS certificate and private key |
connector-logs | /app/logs | Application logs |
connector-uploads | /app/uploads | Uploaded files (e.g., LDAP SSL certificates) |
connector-data | /var/lib/mysql | Internal MySQL database files |
All volumes survive docker restart, docker stop/start, and even docker rm + docker run (as long as the named volumes are not explicitly removed).
Useful Management Commands
While running these actions, make sure you're in the same directory folder where the agent is OR open the terminal at folder where the package is un-zipped.
# Stop the connector (keeps volumes)
docker compose down

# Stop and remove all data (WARNING: deletes all data)
docker compose down -v

# Restart
docker compose restart

# View logs
docker logs -f <container_id>

# Open a shell inside the container
docker exec -it <container_id> bash

# Check MySQL inside the container
docker exec -it <container_id> mysql -u root -p zluri_ldap_connector
Upgrade Docker Build
Once you've downloaded the latest docker build, please follow the steps to migrate to the latest build without loosing data and volumes.
- Open Terminal and run this command:
docker volume ls - Confirm the volume names as zluri-partner-ldap-connector-v110_connector-certs which has v110 listed in it.
- If v110 is listed, then follow these steps -
sh migrate.shORbash migrate.sh
- If v110 is not listed, then follow these steps:
- docker compose down
- For
LinuxWindows:docker load < zluri-ldap-connector.tar.gzdocker load -i zluri-ldap-connector.tar.gz docker compose up -d
- If v110 is listed, then follow these steps -
Problems connecting? Feel free to submit a ticket or contact us directly at [email protected].
Updated 1 day ago