
Notification branding
Overview
Branding settings control the visual identity of all notification emails sent from Zluri. You can upload a logo, set a brand color, customize the email header and footer, and choose which footer links appear in every notification.
Changes made here apply globally to all notification emails.
What can be configured
| Setting | Description |
|---|---|
| Brand logo | Upload a logo displayed in the email header (JPG, JPEG, or PNG, up to 5 MB). The workspace logo is used by default; you can override or remove it for notifications. |
| Brand color | Set a primary color for headers and visual elements, either through the color picker or a hex code |
| Email header | Customize the top section of all notification emails using a block-based editor |
| Email footer | Customize the bottom section of all notification emails using a block-based editor |
| Footer items | Choose which fixed links appear in the footer and where each one should point |
How the email is structured
Every notification email is made up of three parts: the header, the body, and the footer. Each part is controlled by a different setting in Zluri.
Header
The header is the top section of every notification email. By default, it displays your brand logo centered at the top of the email.

| What you see in the email | Where it is configured |
|---|---|
| Brand logo | Brand Logo under Settings → Notifications → Branding |
| Header layout and any additional content | Header Editor under Settings → Notifications → Branding → Email Header → Configure |
Body
The body is the main content of the email. It is unique to each notification and is configured in the Template Editor for that notification.
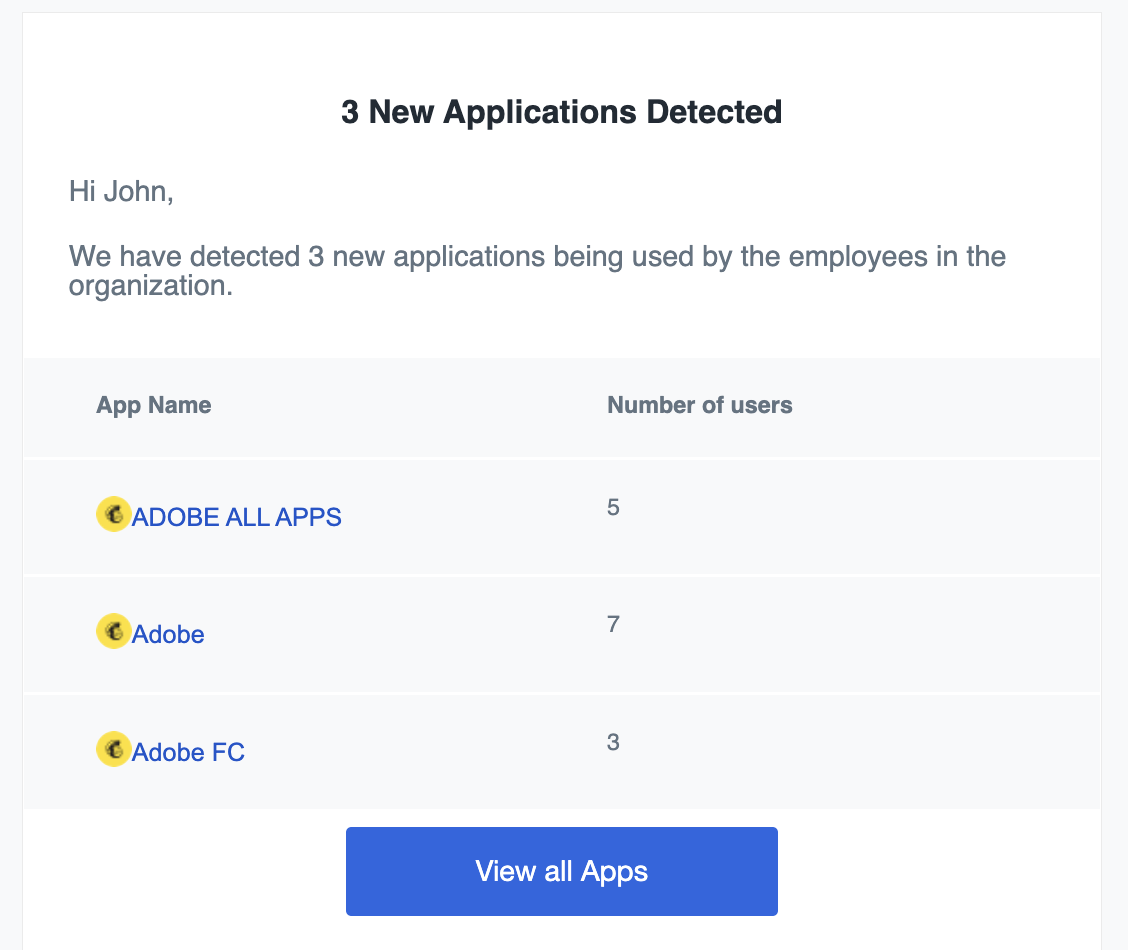
| What you see in the email | Where it is configured |
|---|---|
| Email heading (for example, "3 New Applications Detected") | Heading block in the Template Editor canvas |
| Greeting (for example, "Hi John,") | Text block using the {USER_NAME} placeholder |
| Body text | Text block in the Template Editor canvas |
| Data table (for example, App Name, Number of users) | Pre-built table block in the template, populated by system placeholders such as {{app_name}} and {{no_of_users}} |
| CTA button (for example, "View all Apps") | Pre-built button block in the template |
Dynamic values such as the user's name, app count, and table data are populated automatically at send time using placeholders defined in the template. These are not editable directly in the branding settings.
Footer
The footer appears at the bottom of every notification email and is shared across all notifications. It is configured in the Footer Editor and the Footer Items settings.
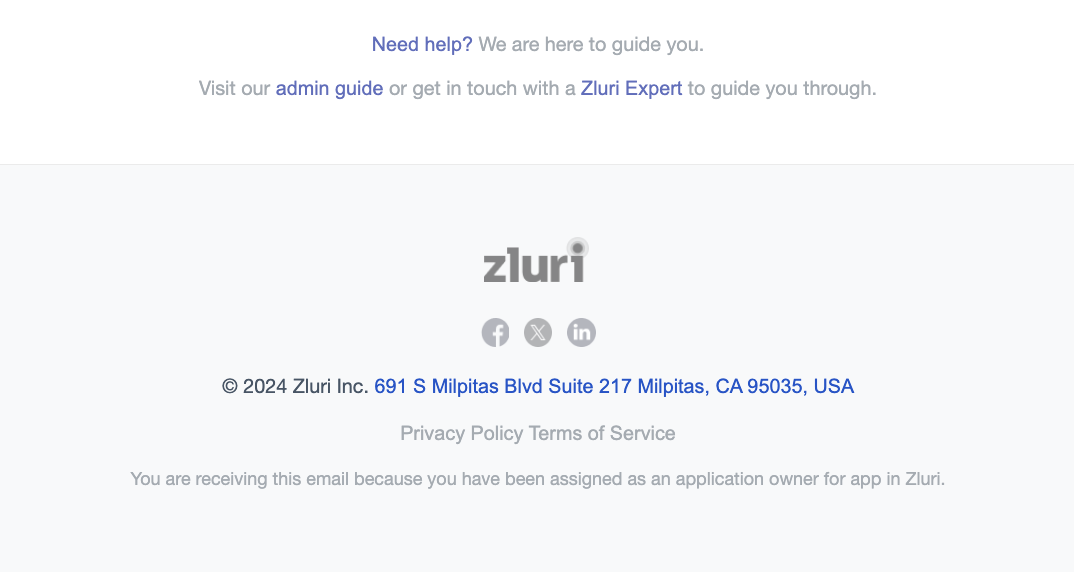
| What you see in the email | Where it is configured |
|---|---|
| Zluri logo | Footer Editor canvas under Settings → Notifications → Branding → Email Footer → Configure |
| Social icons (Facebook, X, LinkedIn) | Footer Editor canvas |
| Copyright text and address | {{branding.copyright_and_address}} system placeholder in the Footer Editor. Resolved from your organization's branding settings. |
| Privacy Policy link | Footer Items - Privacy Policy |
| Terms of Service link | Footer Items - Terms and Conditions |
| "Need help?" support text and links | Footer Editor canvas |
| "You are receiving this email because..." note | System-generated. Not editable. Describes why the recipient received the notification. |
Step 1: Open branding settings
- Go to Settings → Notifications → Branding
- Click Configure
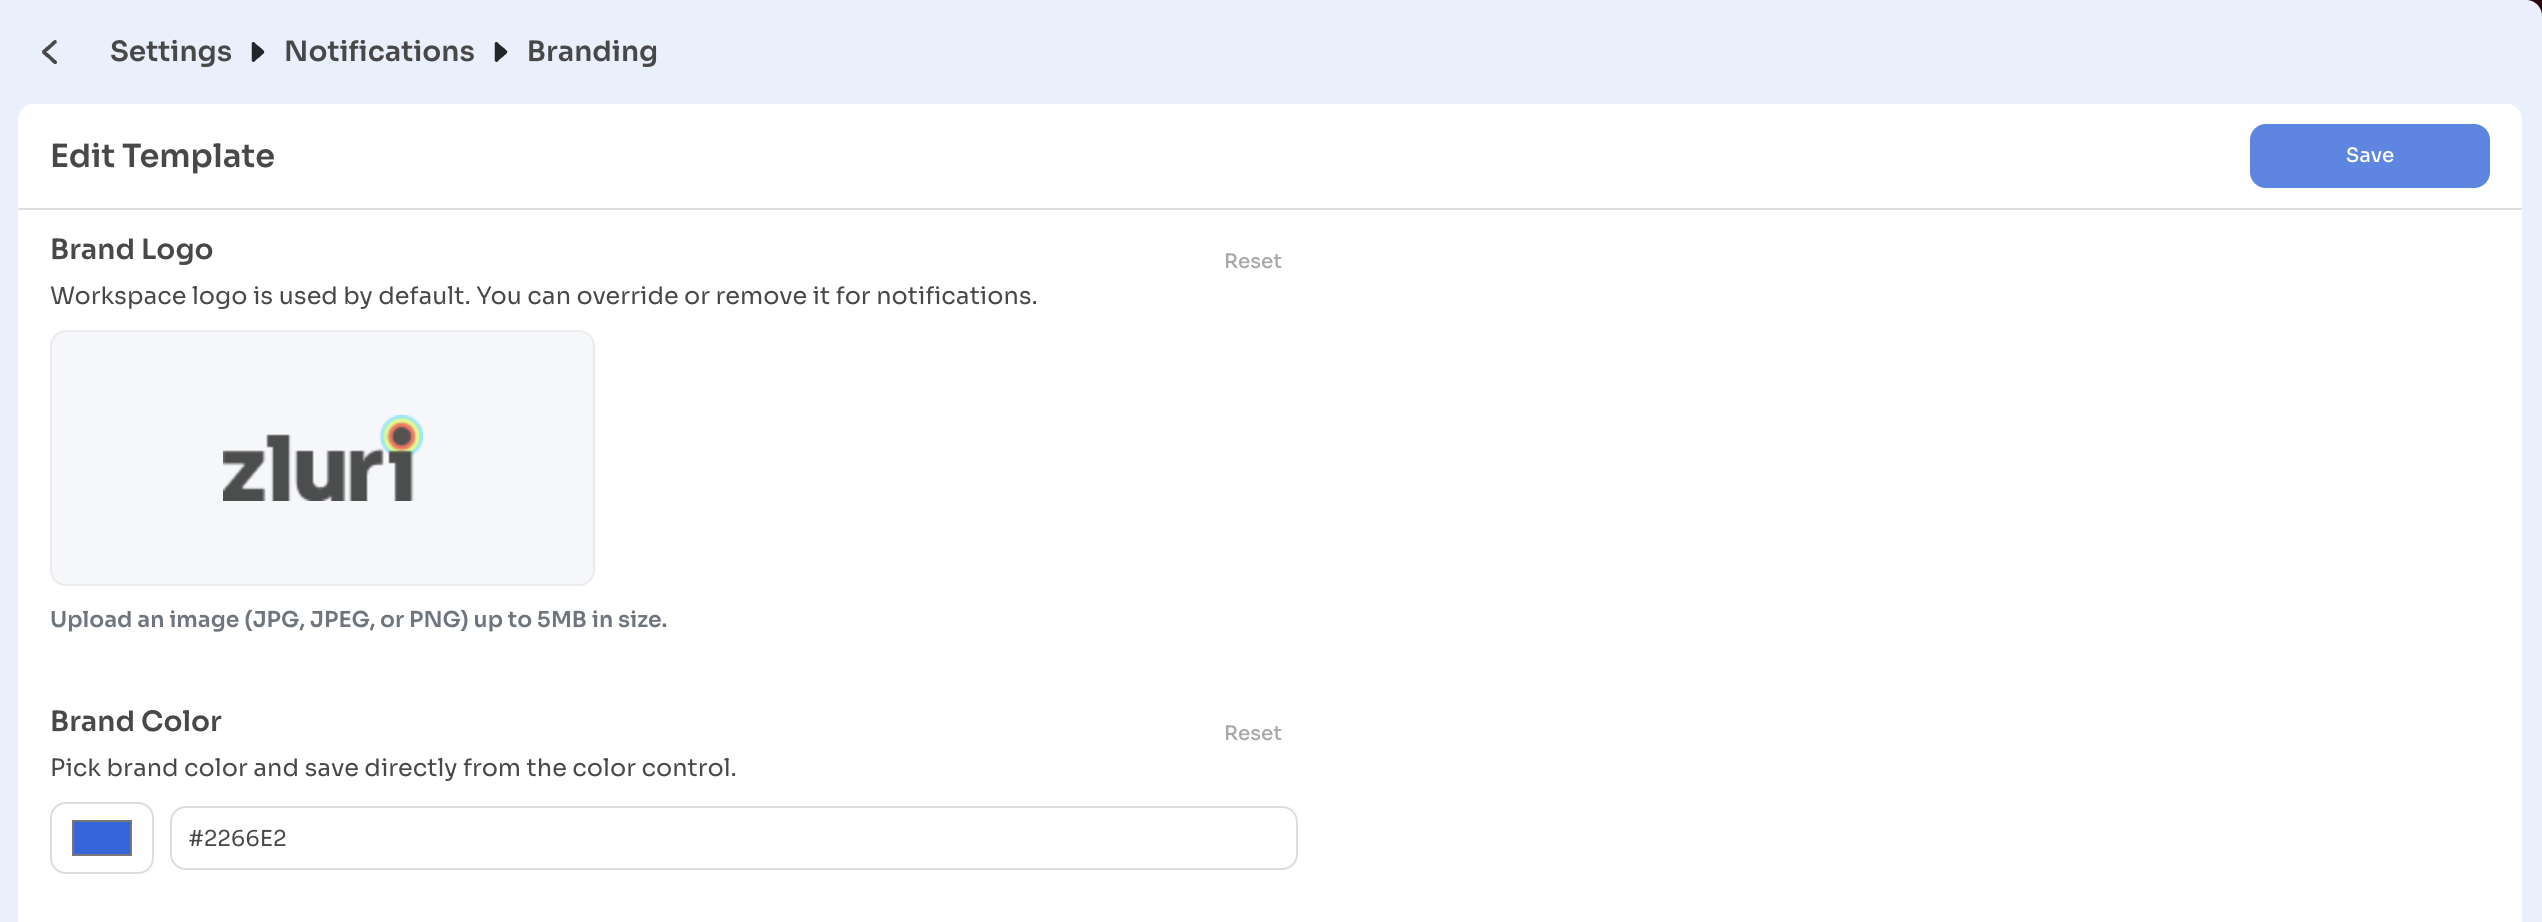
The branding page opens as an Edit Template form.
Step 2: Update logo and color
Brand logo
- Under Brand Logo, click to upload a logo (JPG, JPEG, or PNG, up to 5 MB)
- Click Reset next to Brand Logo to revert to the workspace logo
Brand color
-
Under Brand Color, click the color swatch to open the color picker, or enter a hex code directly in the field (for example,
#2266E2) -
The selected color applies to headers and visual elements across all notification emails
Step 3: Customize the email header
The header appears at the top of every notification email. By default, it displays your brand logo.
-
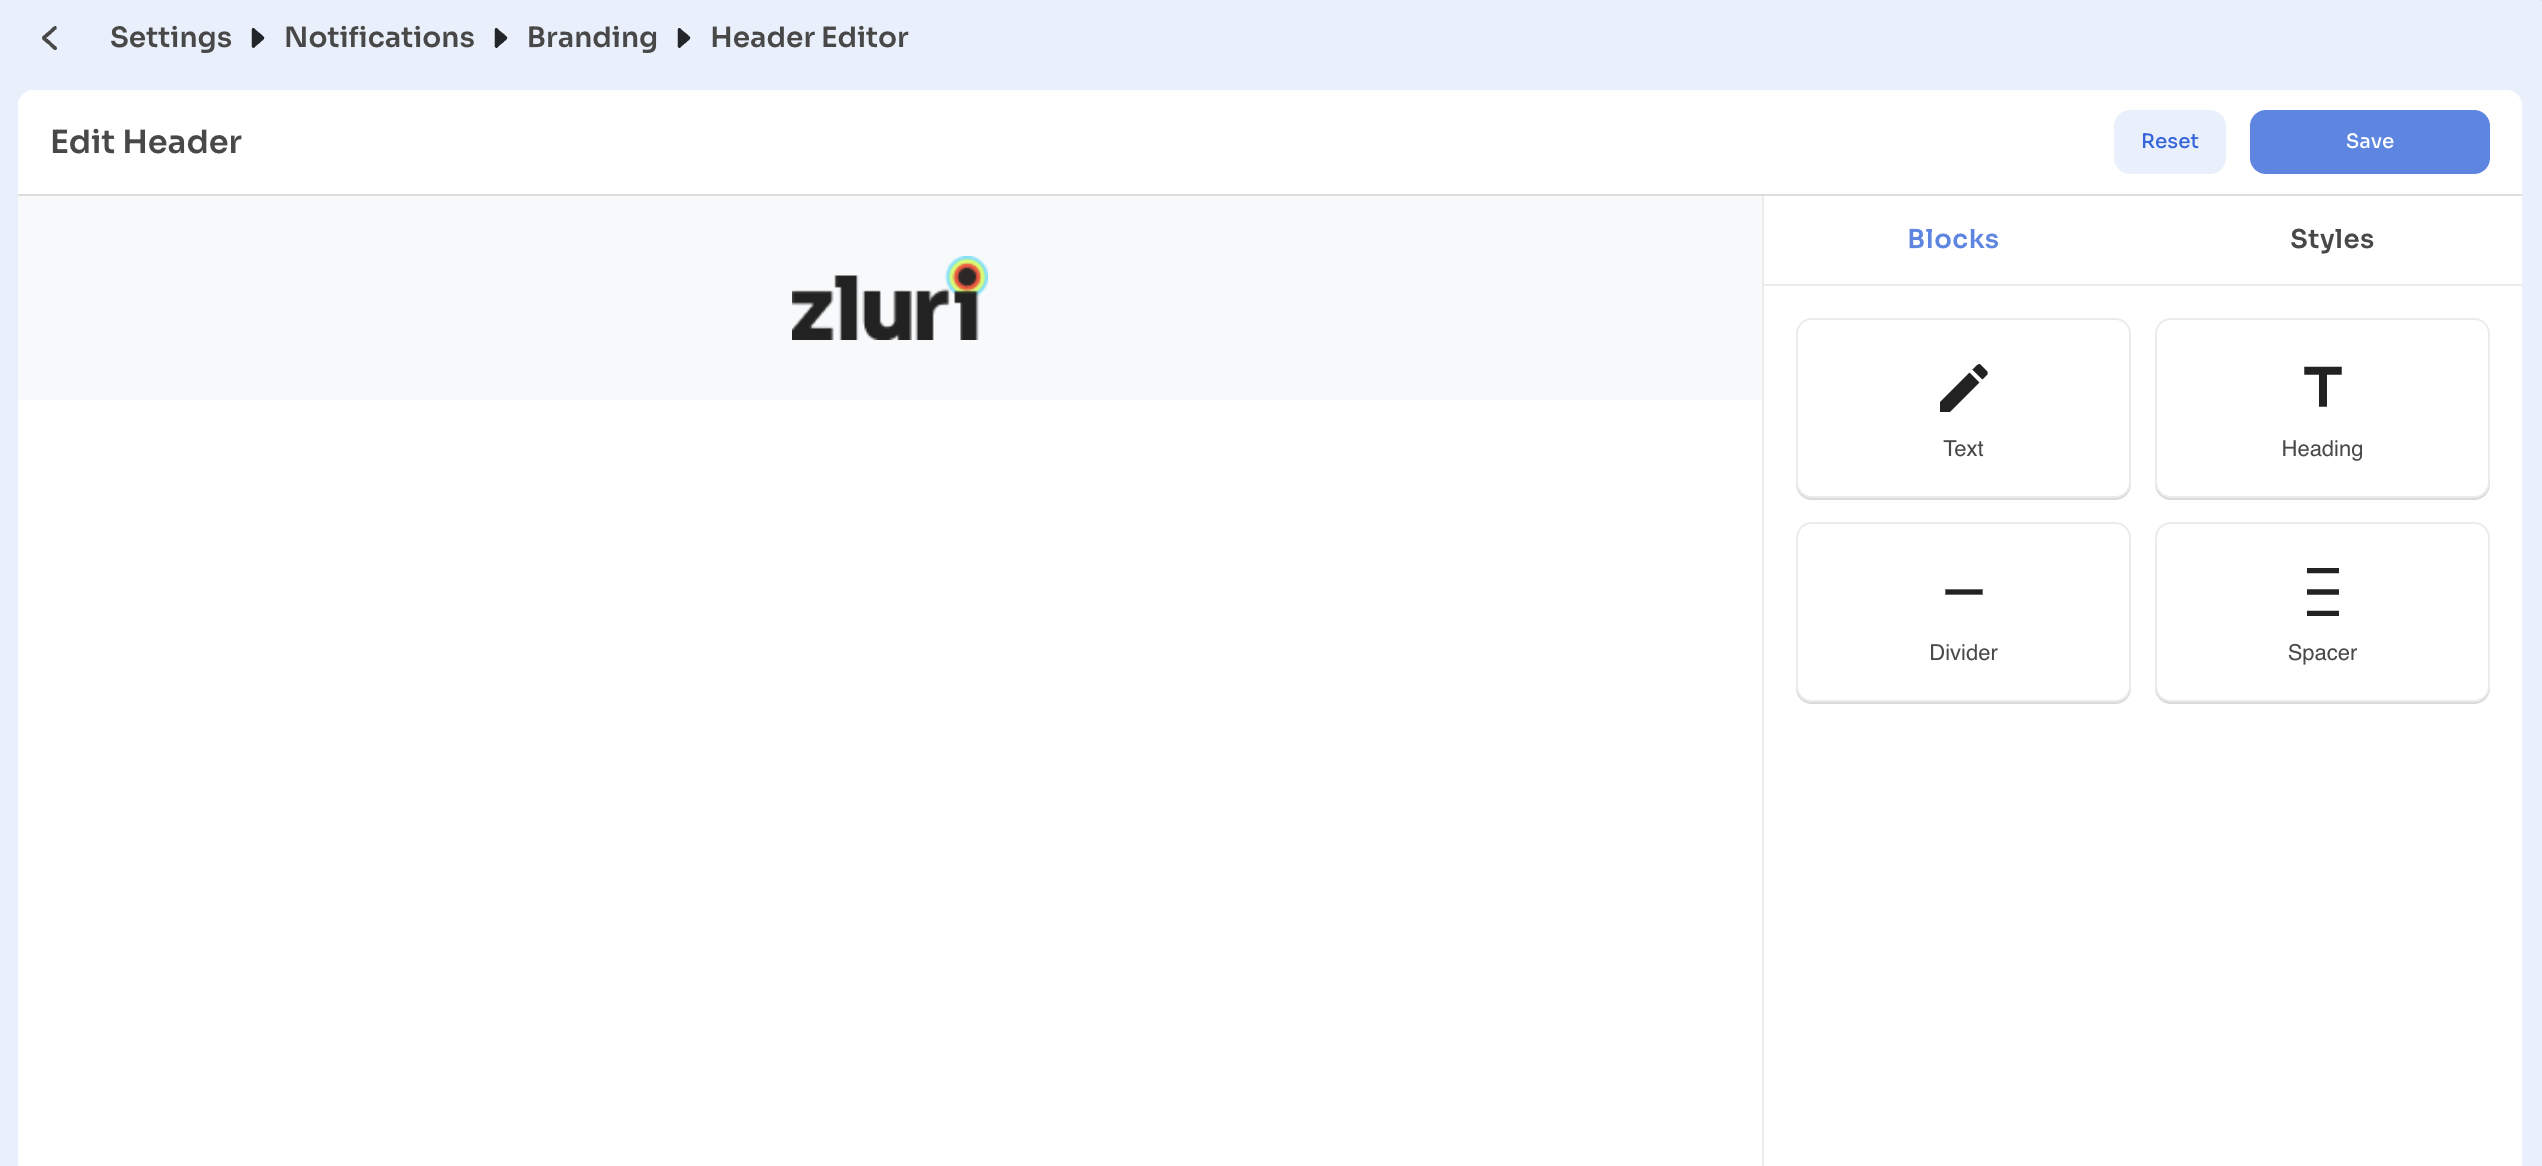
Under Email Header, click Configure. The Header Editor opens at Settings → Notifications → Branding → Header Editor.
-
The canvas shows the current header. By default, it displays the brand logo.
-
Add content by selecting a block from the right panel:
- Text for additional copy
- Heading for a title or tagline
- Divider to separate elements
- Spacer to add vertical space
-
Select a block on the canvas to edit it. Switch to the Styles tab to adjust margin, typography, color, text alignment, and background color.
-
Click Reset to restore the default header
-
Click Save
Step 4: Customize the email footer
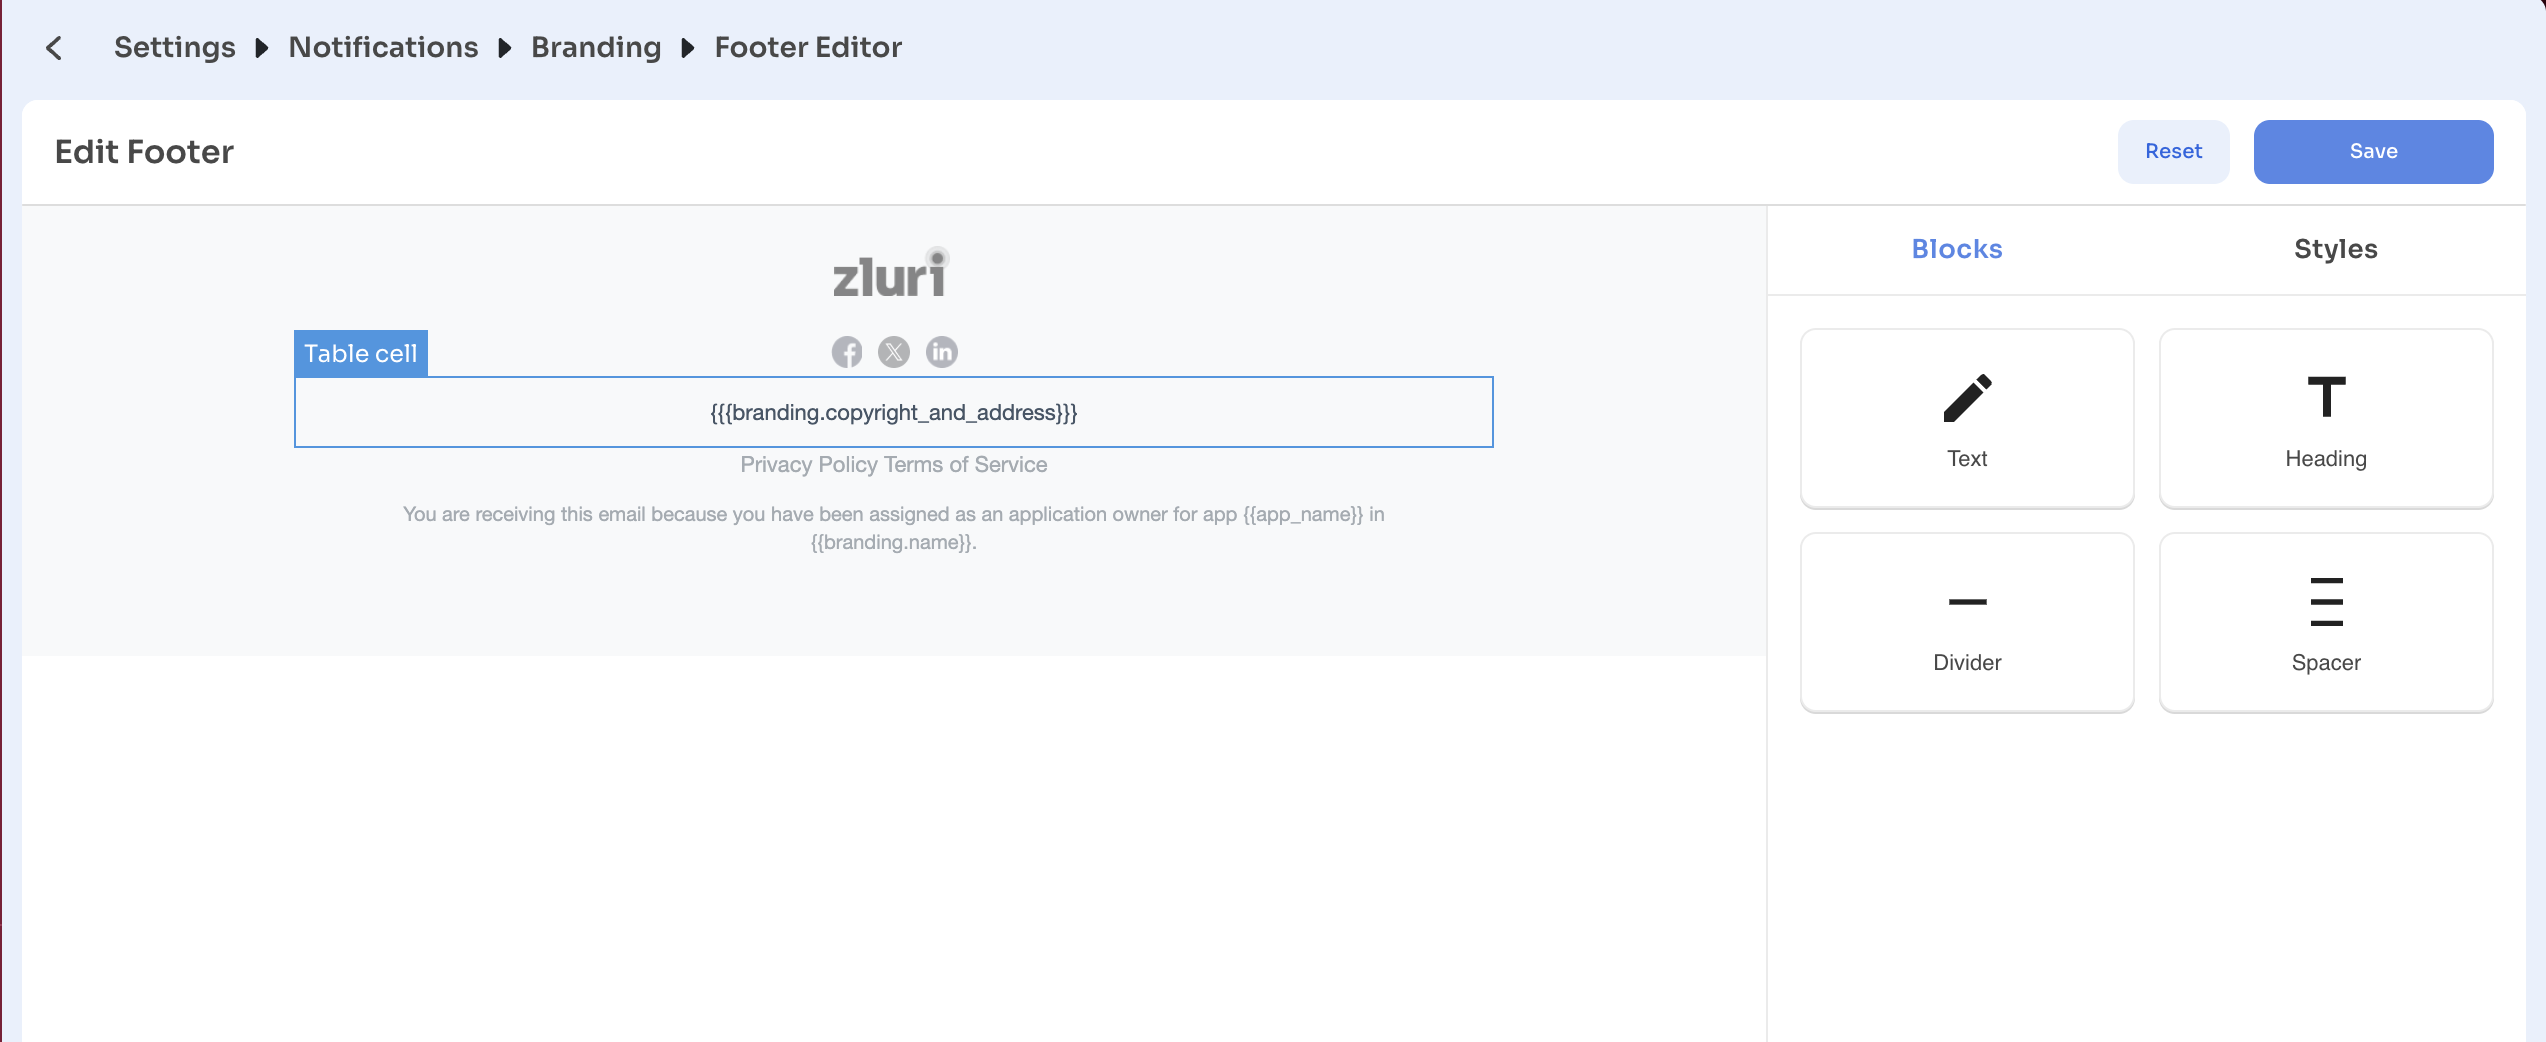
The footer appears at the bottom of every notification email. The default footer includes the Zluri logo, social icons (Facebook, X, LinkedIn), copyright and address, Privacy Policy, Terms of Service links, and a notification context note.
The footer uses system placeholders that resolve automatically:
| Placeholder | What it renders |
|---|---|
{{branding.copyright_and_address}} | Your organization's copyright text and address |
{{branding.name}} | Your organization's name |
-
Under Email Footer, click Configure. The Footer Editor opens at Settings → Notifications → Branding → Footer Editor.
-
The canvas shows the current footer layout.
-
Add or update content using blocks from the right panel (Text, Heading, Divider, Spacer)
-
Select a block on the canvas to edit it. Switch to the Styles tab to adjust formatting.
-
Click Reset to restore the default footer
-
Click Save
Step 5: Configure footer items
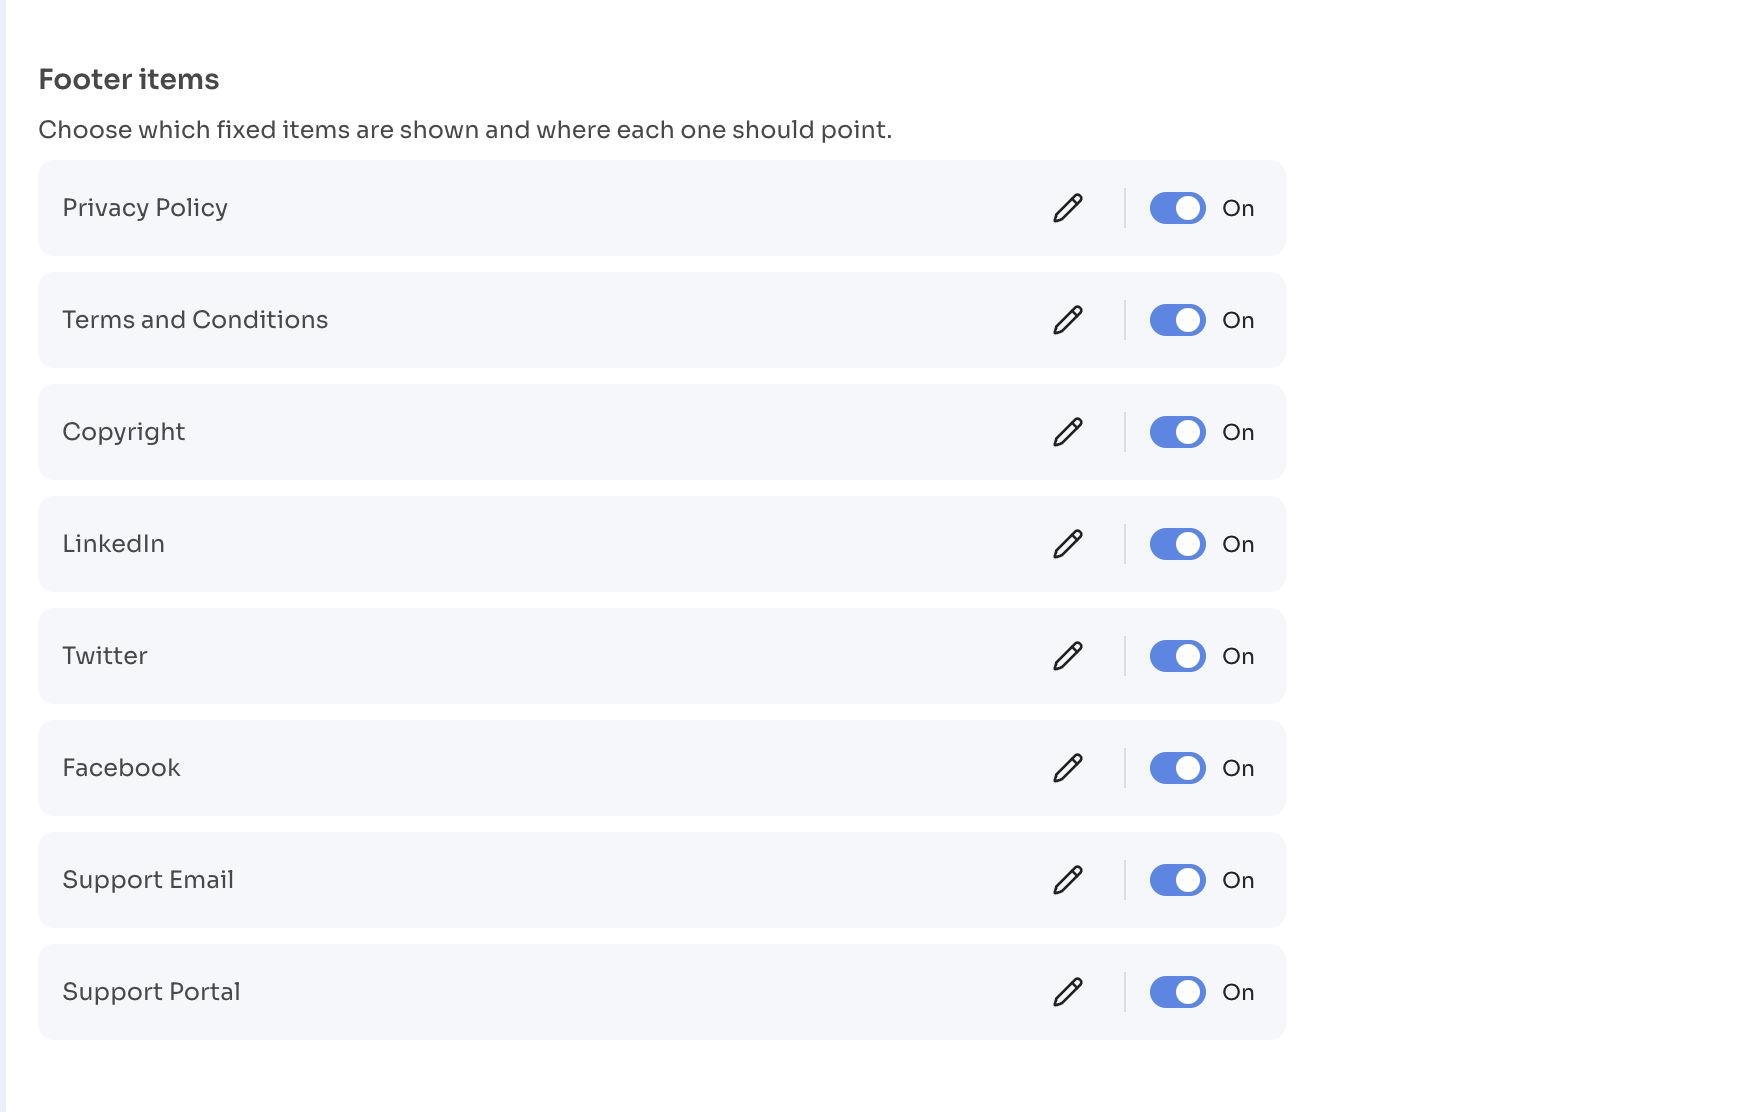
Footer items are fixed links shown in the footer of every notification email. You can turn each item on or off and set its URL.
-
Under Footer Items, turn on the items you want to show
-
Click the edit (pencil) icon next to an item to add or update its URL
-
Click Save in the URL dialog
Available footer items:
| Item | Description |
|---|---|
| Privacy Policy | Link to your organization's privacy policy |
| Terms and Conditions | Link to your terms of service |
| Copyright | Copyright text displayed in the footer |
| Link to your organization's LinkedIn page | |
| Link to your organization's Twitter profile | |
| Link to your organization's Facebook page | |
| Support Email | Support contact email address |
| Support Portal | Link to your support portal |
Step 6: Save branding changes
Click Save at the top right of the branding page to publish all changes. Changes apply to all notification emails immediately after saving.
Best practices
- Use consistent logo and colors across all templates
- Keep the header minimal - the logo alone is sufficient in most cases
- Avoid overly complex footer designs that affect readability
- Always set footer item URLs before turning items on
Updated 5 months ago