
Instances
Overview
Zluri now discovers and displays individual instances for each of your connected applications. An instance represents a separate environment, tenant, or region of the same app. For example, Azure AD-US, Azure AD EU, and Azure AD Germany are three distinct instances of Azure AD.
Previously, Zluri managed access at the application level only. If your organization ran multiple environments of the same app, there was no way to view or manage them separately. This release surfaces each instance individually so you can assign owners, track active accounts, and take actions (edit, merge, or archive) on a per-instance basis.
Zluri discovers instances through direct integrations and SSOs. Connect your apps through a direct integration or SSO to start seeing instance data.
What are instances?
An instance is a discrete deployment of an application within your organization. The same application can have multiple instances across different regions, tenants, or environments. Each instance has its own set of accounts, roles, and sources.
Examples of instances for a single app:
- Azure AD-US (US tenant)
- Azure AD EU (EU region)
- Azure AD Germany (German tenant)
Zluri discovers instances automatically when you connect an app through a direct integration or SSO. Each discovered instance appears separately in the Instances tab of the app page.
View all instances
Navigate to Applications > Instances in the left navigation to see all discovered instances across every connected application in your organization.
The global instances table displays the following columns.
| Column | Description |
|---|---|
| Instance Name | The name of the discovered instance |
| Application | The application this instance belongs to |
| Owner | The assigned owner of the instance |
| Owner Email | The owner's email address |
| Active Accounts | Count of active accounts in that instance |
| Instance Sources | The integration source badge |
Select an instance name to open its detail page.
Row-level actions (Edit Instance, Merge Instance, View Instance, Archive Instance) are only available from the per-app Instances tab. Navigate to the app page and select Instances from the sidebar to take actions on a specific instance.
View instances for an app
Navigate to the app page and select Instances from the sidebar to see all instances for that specific app.
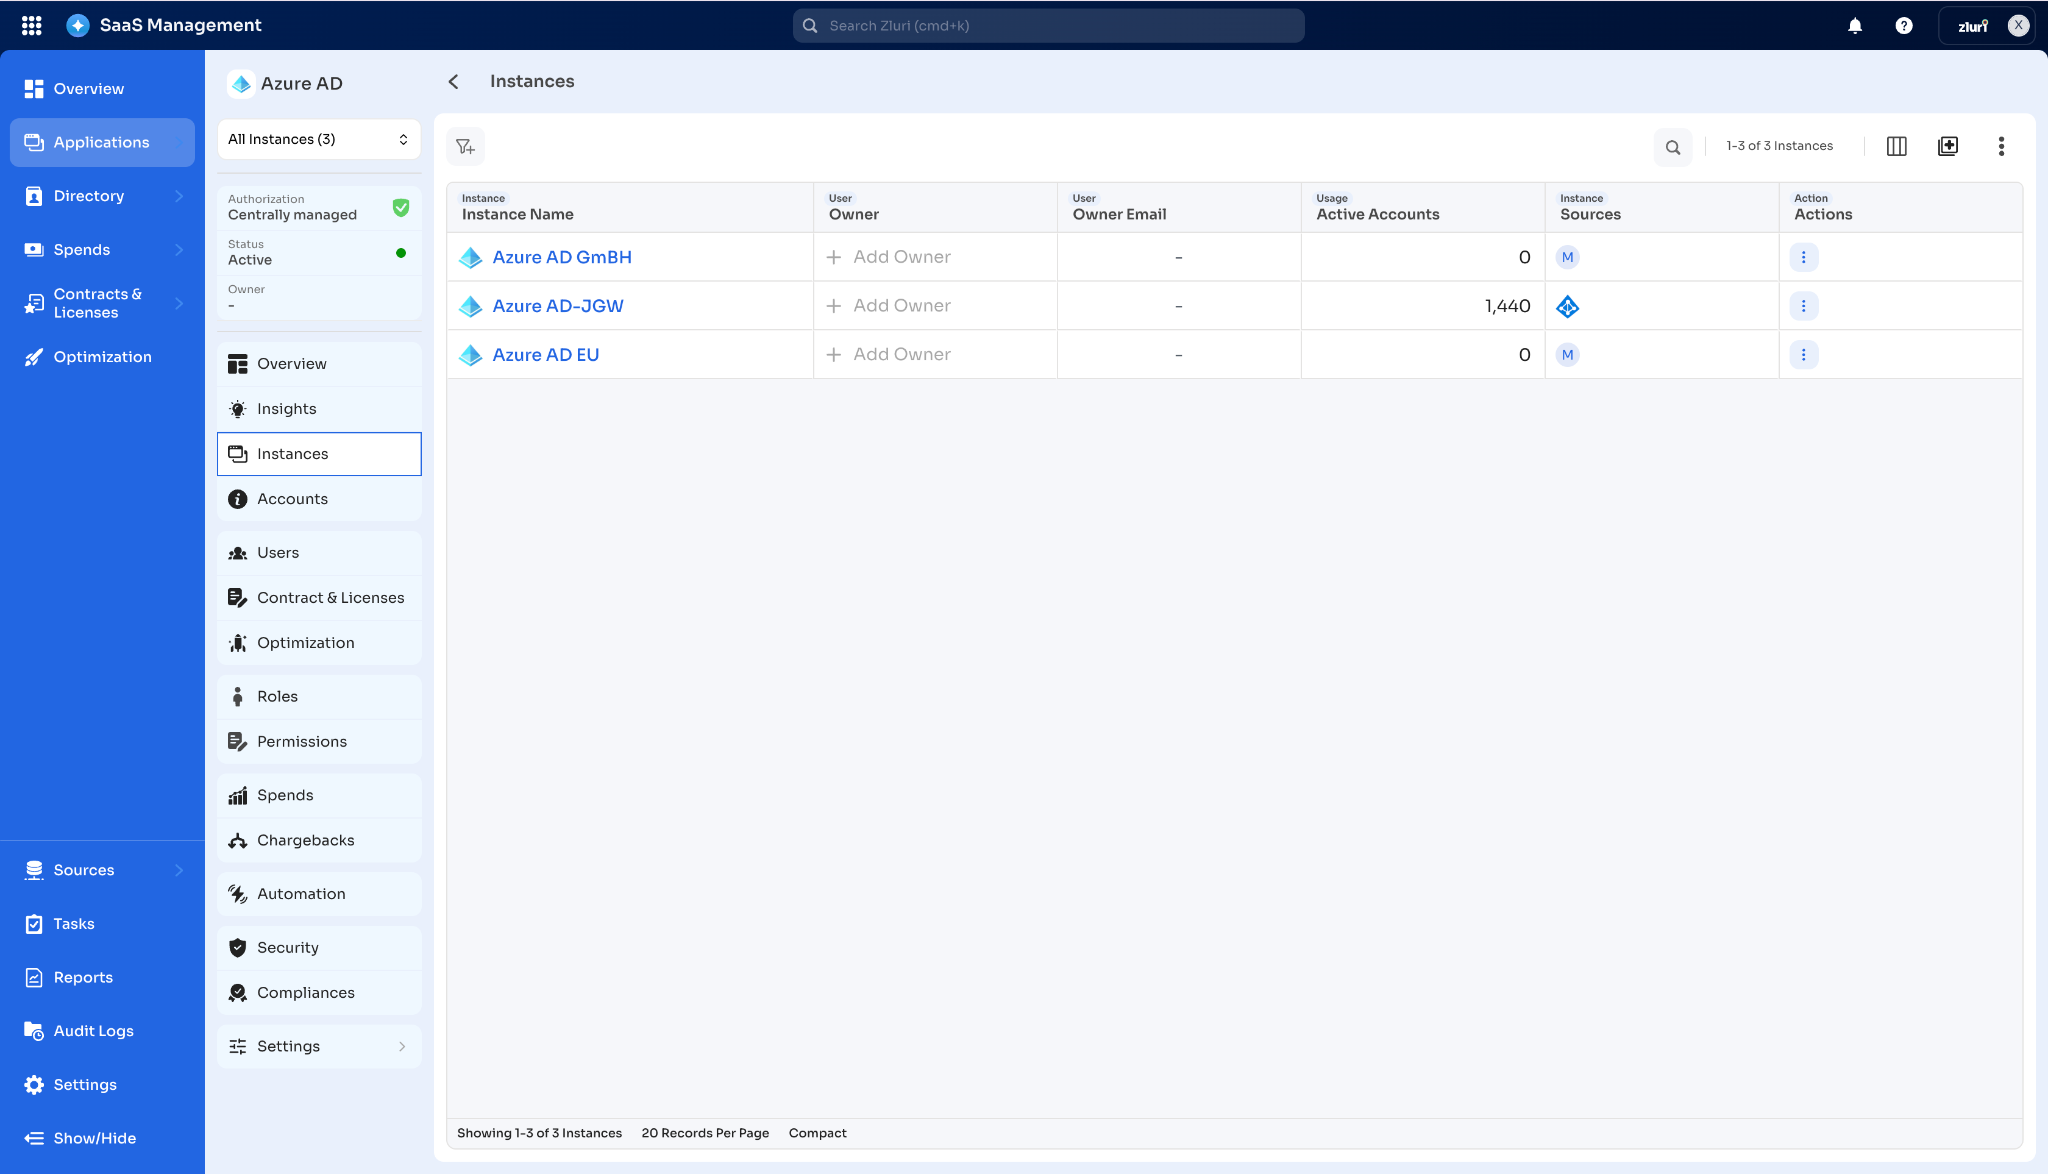
The instances table displays the following columns.
| Column | Description |
|---|---|
| Instance Name | The name of the discovered instance |
| Owner | The assigned owner of the instance |
| Owner Email | The owner's email address |
| Active Accounts | Count of active accounts in that instance |
| Instance Sources | The SSO or direct integration source badge |
| Actions | Three-dot menu with options: Merge Instance, Edit Instance, View Instance, Archive Instance |
Use the All Instances dropdown at the top left to see the total instance count and switch between viewing all instances or a specific one.
View instance details
Select an instance name from the global or per-app instances table to open its detail page. From the per-app Instances tab, you can also select View Instance from the row Actions menu. Summary cards at the top display Active Accounts, Inactive Accounts, and Total Accounts.
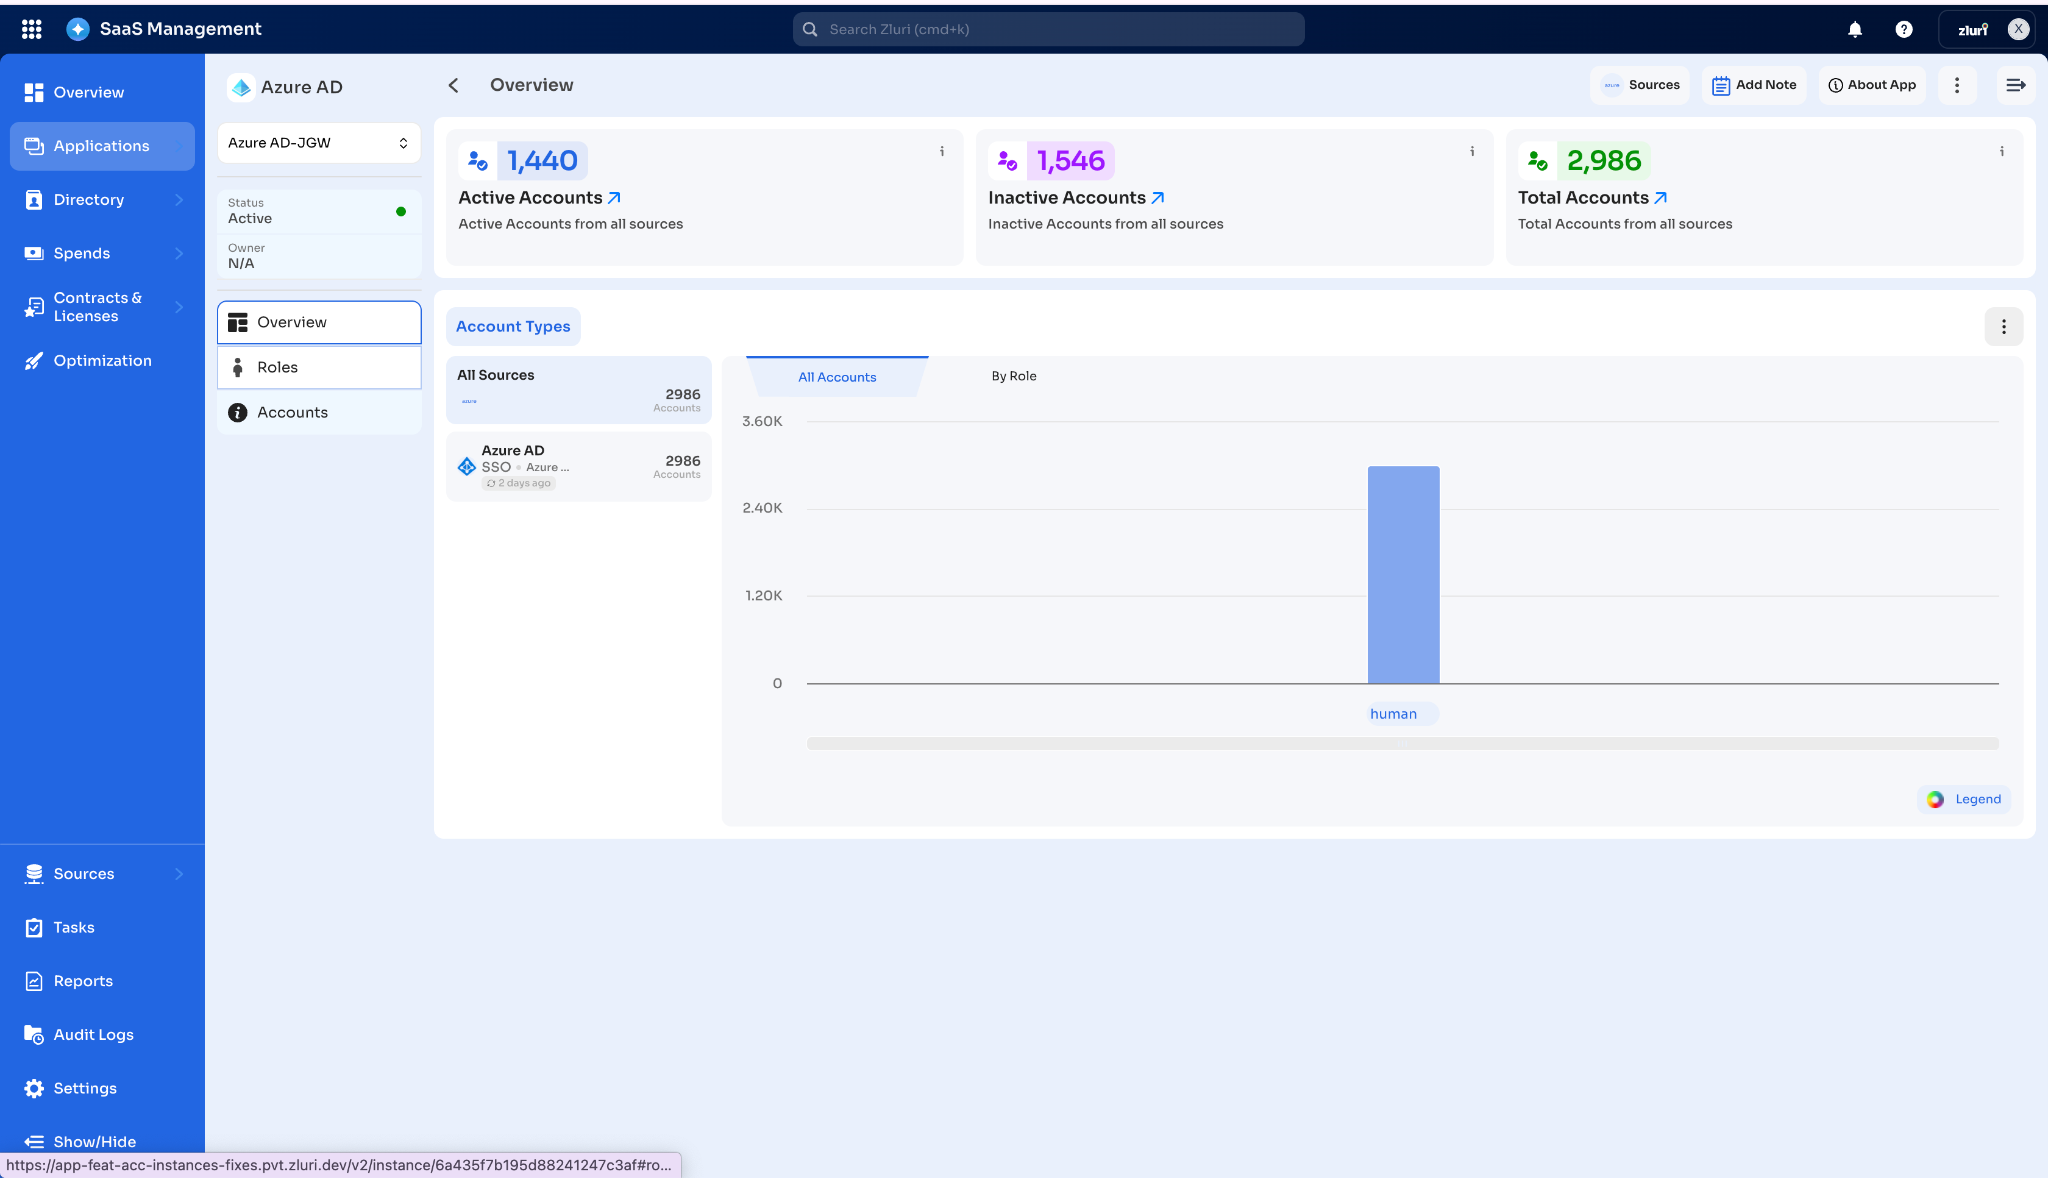
The instance detail page has three sidebar tabs.
| Tab | What it shows |
|---|---|
| Overview | Account summary cards, account types breakdown by source, and account listings filtered by All Accounts or By Role |
| Roles | Roles assigned within this instance |
| Accounts | Full account list for this instance |
Overview tab
The Account Types section groups accounts by source. Each source entry shows the source name, source type badge, sync status, and account count. Select All Accounts or By Role to switch how the account list below it is filtered.
The Instance Details panel shows a read-only summary of the instance's current status, tags, and ownership: Instance Status, Tags, Primary Owner, IT Owner, and Finance Owner.
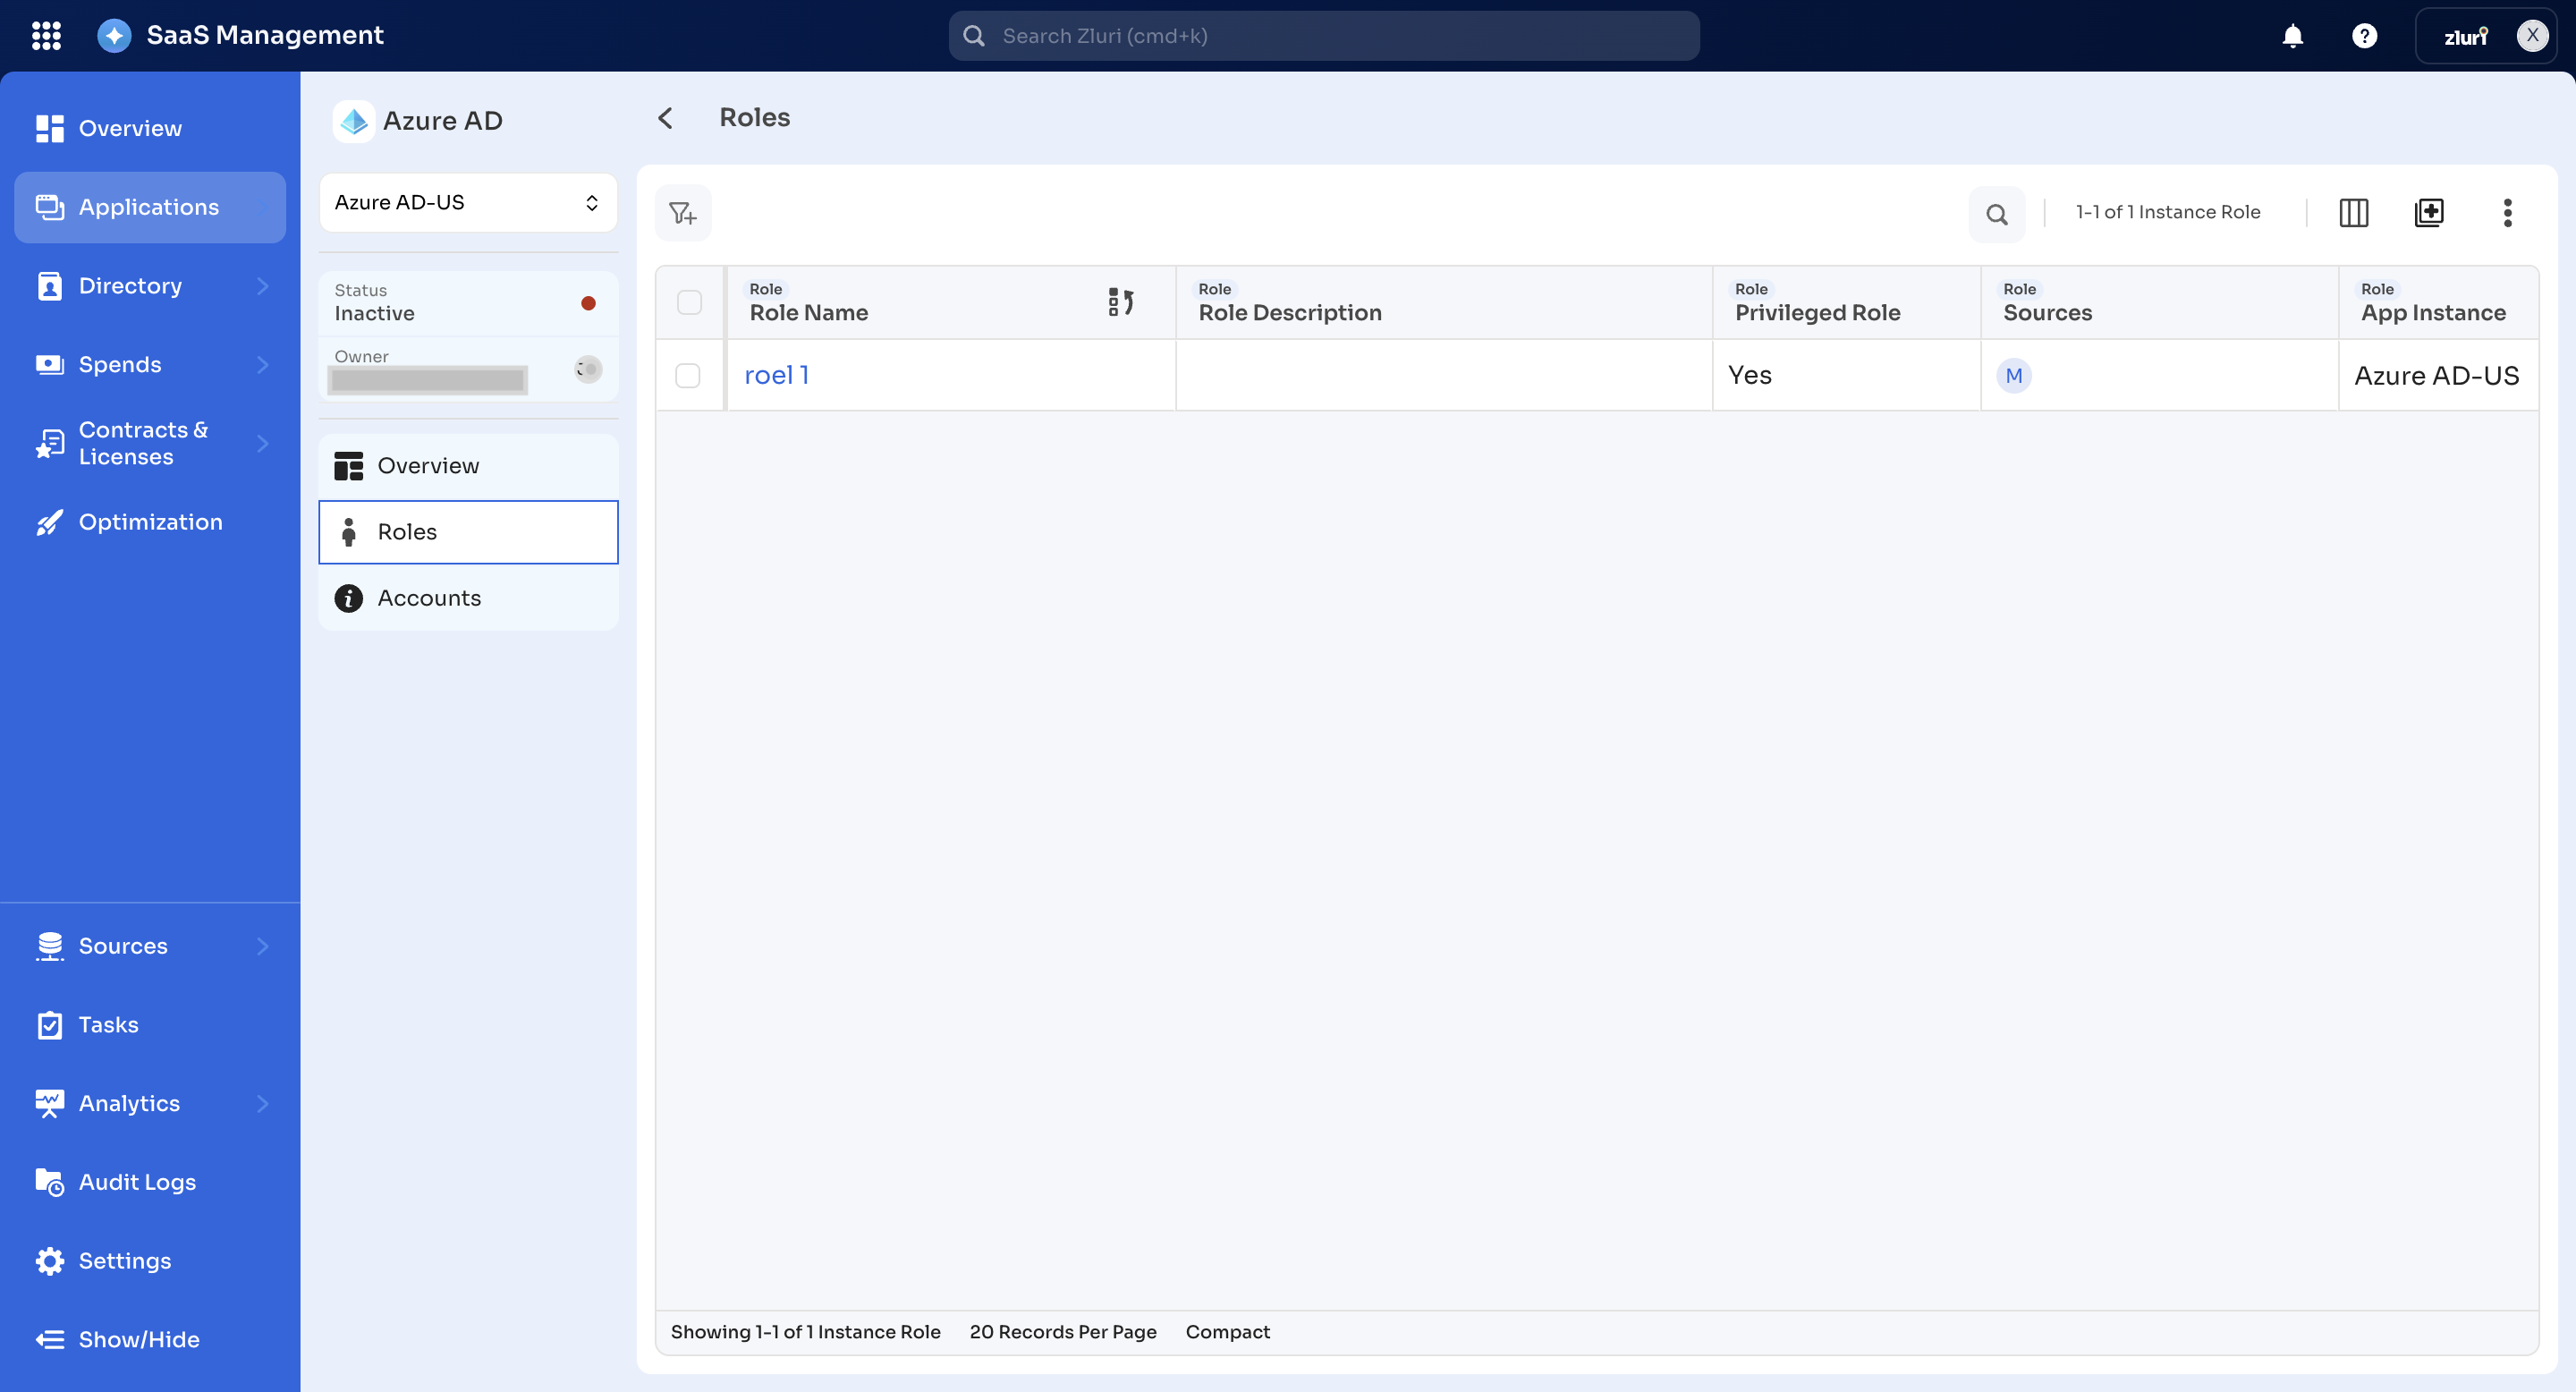
Roles tab
The Roles tab lists all roles assigned within this instance. The following columns appear in the roles table.
| Column | Description |
|---|---|
| Role Name | The name of the role |
| Role Description | A description of the role, if one is set |
| Privileged Role | Whether the role carries elevated privileges: Yes or No |
| Sources | The integration source badge for this role |
| App Instance | The instance this role belongs to |
Accounts tab
The Accounts tab shows the full account list scoped to this instance. The following columns appear in the accounts table.
| Column | Description |
|---|---|
| Account Name | The account's display name, including service account and system identity names |
| Account Email | The email address associated with the account |
| Account Role | The role assigned to the account, or + Add Role if none is set |
| Account Licenses | Licenses tied to the account |
| Application Instance | The instance this account belongs to |
| Sources | The integration source badge |
Edit an instance
Navigate to the app page and select Instances from the sidebar. Select the three-dot menu next to an instance and select Edit Instance to open the Edit Instance side sheet.
The side sheet has two sections: Instance Details for required fields and Additional Details for optional fields.
Steps
- Select the three-dot menu (Actions) next to the instance you want to edit.
- Select Edit Instance.
- Update the Instance Name field. This field is mandatory.
- Select an Owner from the dropdown, or leave it unassigned.
- Expand Additional Details to set optional fields: IT Owner, Finance Owner, and Tags.
- Select Save.
Merge instances
Navigate to the app page and select Instances from the sidebar to start a merge.
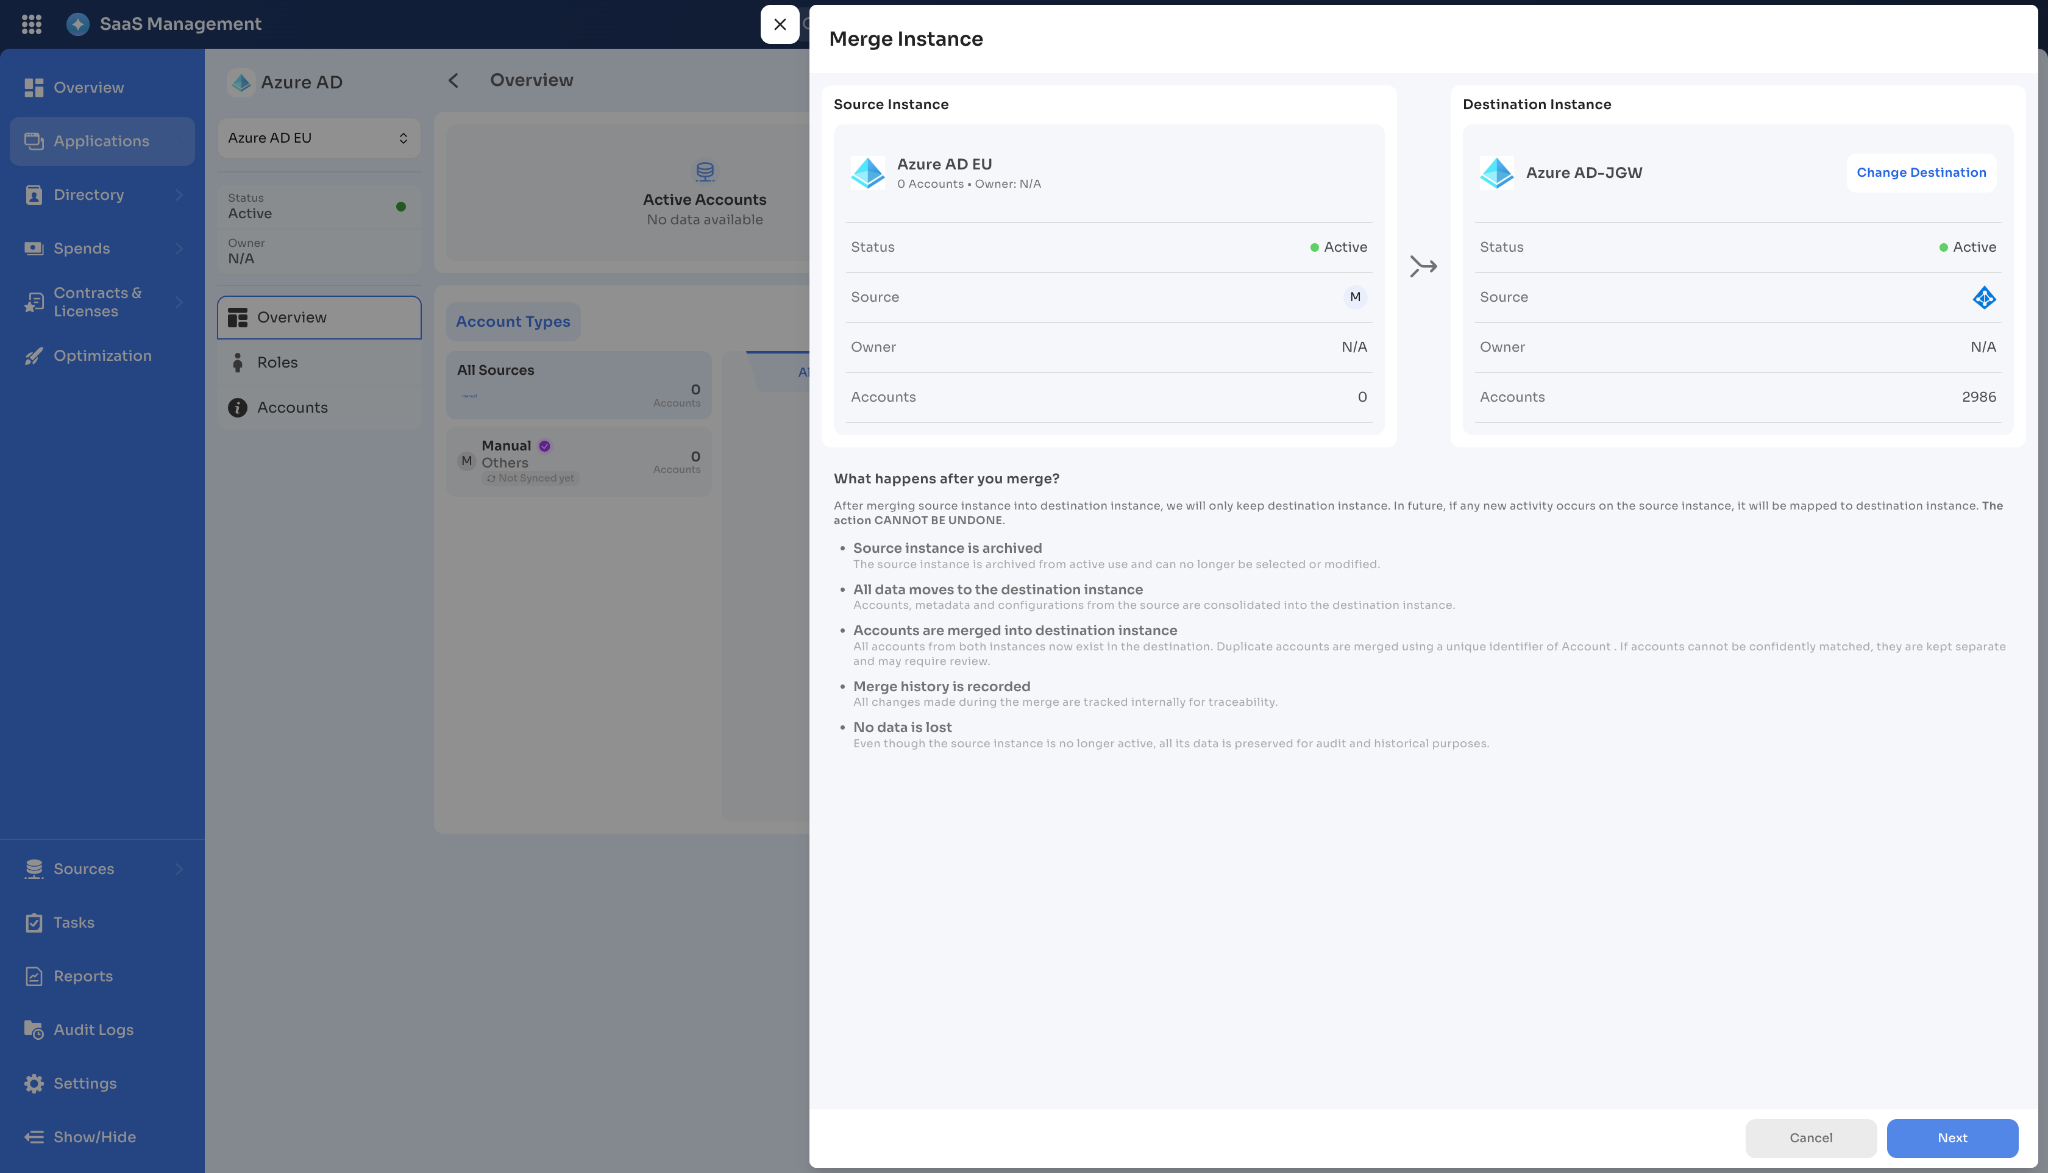
Merging consolidates a source instance into a destination instance. All accounts, metadata, and configurations from the source move to the destination. The destination instance retains its own metadata: name, status, and owner.
You cannot undo a merge. Review the source and destination carefully before confirming. No data is lost. Zluri preserves the source instance's data for audit and historical purposes.
The Merge Instance modal shows the source instance pre-selected on the left and a searchable list of available destination instances on the right. The arrow between the two panels indicates the direction of the merge: the source merges into the selected destination.
Select the destination and confirm
Steps
- Select the three-dot menu (Actions) next to the instance you want to merge into another.
- Select Merge Instance.
- Review the Source Instance card on the left. This is the instance that merges into the destination and is archived after the merge.
- Search for and select the destination instance from the list on the right.
- Select Next to proceed.
- Confirm the merge.
After the merge completes, Zluri sends a notification to confirm the merge.
Select View Merged Instance to open the destination instance, or select Go to Application to return to the app page.
After the merge completes, the following outcomes apply.
| Outcome | Detail |
|---|---|
| Source instance archived | The source instance leaves active use and Zluri no longer allows actions on it |
| All data moves to the destination instance | Accounts, metadata, and configurations from the source consolidate into the destination |
| Accounts merged | Zluri merges duplicate accounts using a unique account identifier. Accounts Zluri cannot confidently match remain separate and may require review |
| Merge history recorded | Zluri tracks all changes during the merge for traceability |
| No data lost | The source instance's data stays preserved for audit and historical purposes |
Archive an instance
Navigate to the app page and select Instances from the sidebar. Archiving removes an instance from the active list. Zluri no longer allows any actions on archived instances.
Steps
- Select the three-dot menu (Actions) next to the instance you want to archive.
- Select Archive Instance.
- Confirm the archive action.
Constraints
The following constraints apply to instances.
- Zluri discovers instances through direct integrations and SSOs. Apps connected through agents or other discovery methods do not surface instance data.
- Zluri does not support optimization or license counting at the instance level. License management continues at the app and user level.
- Merging instances is irreversible. Review the source and destination carefully before confirming.
Updated 3 months ago