
Building A Playbook
Navigate the builder canvas
The builder has three areas: a collapsible left ribbon, the canvas in the center, and a configuration panel that opens on the right when a node is selected.
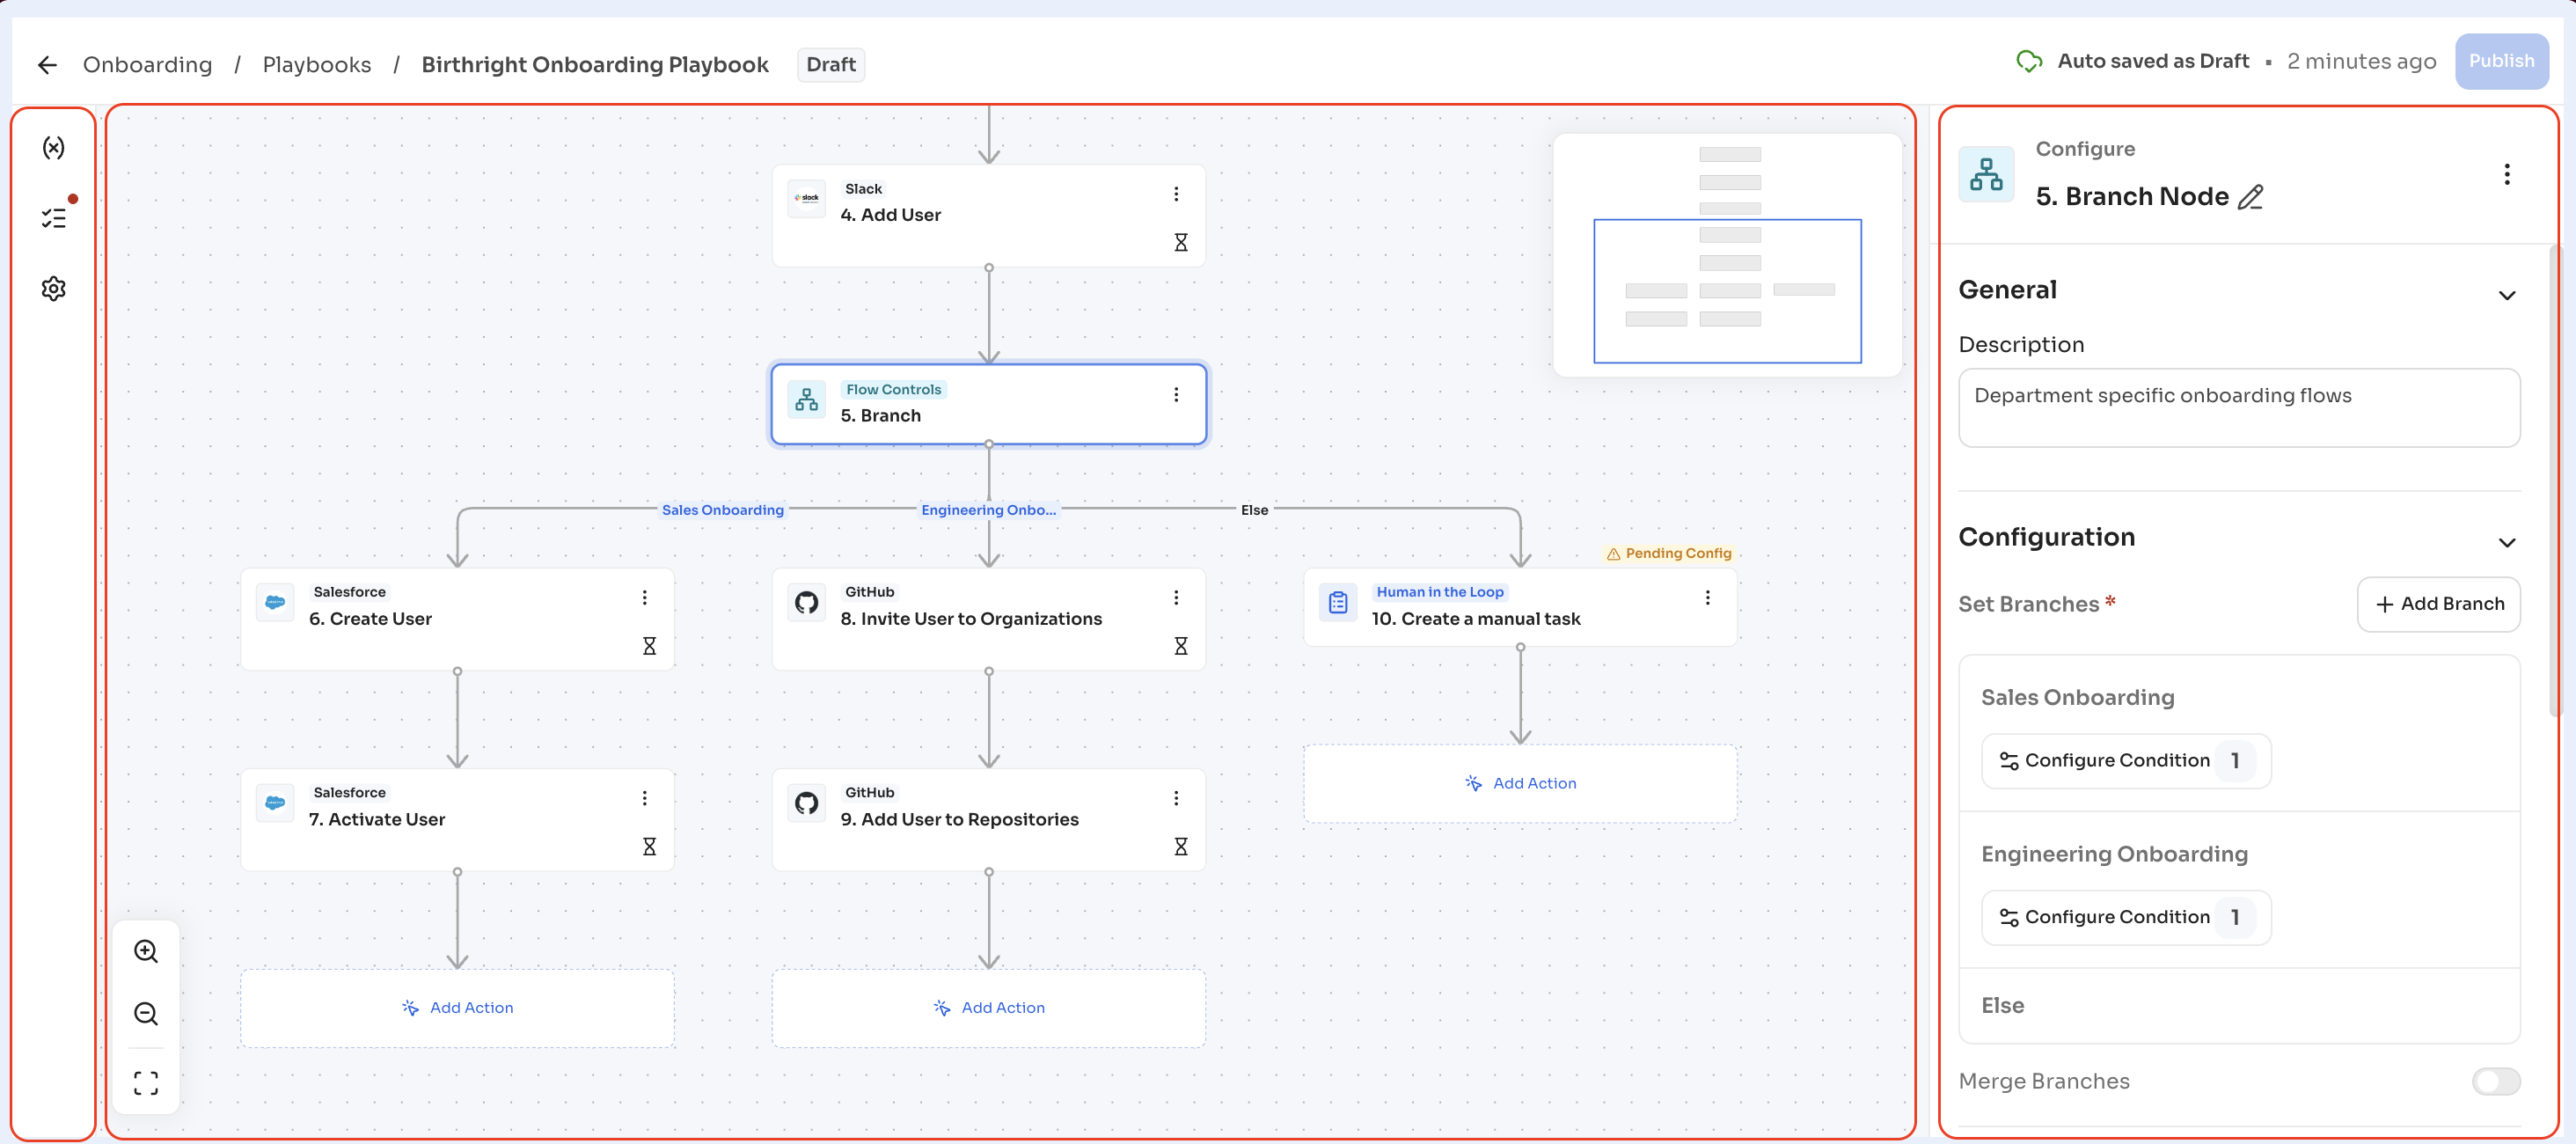
Steps
- Open a playbook to load its graph on the canvas.
- Drag the canvas background to pan around a large playbook.
- Select the zoom controls to zoom in, zoom out, or fit the whole playbook to the canvas. The current zoom percentage appears next to the controls.
- Select any node to open its configuration panel on the right.
- Select a connector, the small plus button between two nodes, to add a step at that position.
Left ribbon panels
The left ribbon holds four panels that apply to the playbook as a whole.
| Panel | Purpose |
|---|---|
| Variables | Browse every variable available to this playbook in a searchable tree view. |
| Checklist | View a list of actions that need attention. |
| Settings | Adjust playbook settings and access help documentation links. |
Rearrange nodes
Nodes move by dragging. Rearranging works across the whole playbook, including moving a node from one branch into another or out of a branch entirely.
Steps
- Drag a node from its current position.
- Drop it at the connector where it belongs. Zluri reorders the playbook and redraws the connections automatically.
The branch node itself stays in place. Reorder the branches inside it instead of moving the node. See Add and configure branches.
Add an action to a playbook
Adding a step starts from a connector on the canvas. A single search covers both applications and actions, so users find an action by typing either the application name or the action name.
Steps
- Select the plus connector at the position where the new step belongs.
- Type an application name, an action name, or both in the search field. Searching for “add user azure” returns matching actions from Azure AD and other relevant actions from other applications as well.
- Select an application in the left navigation of the search panel to narrow results to that application only.
- Select a category in the left navigation to narrow results by action type. The categories are Workflow actions, Human in the loop, Flow Controls, and Internal Actions. Application and category filters work together, so both apply at the same time.
- Select an action to add it to the canvas. Zluri inserts the node at the connector position and opens its configuration panel.
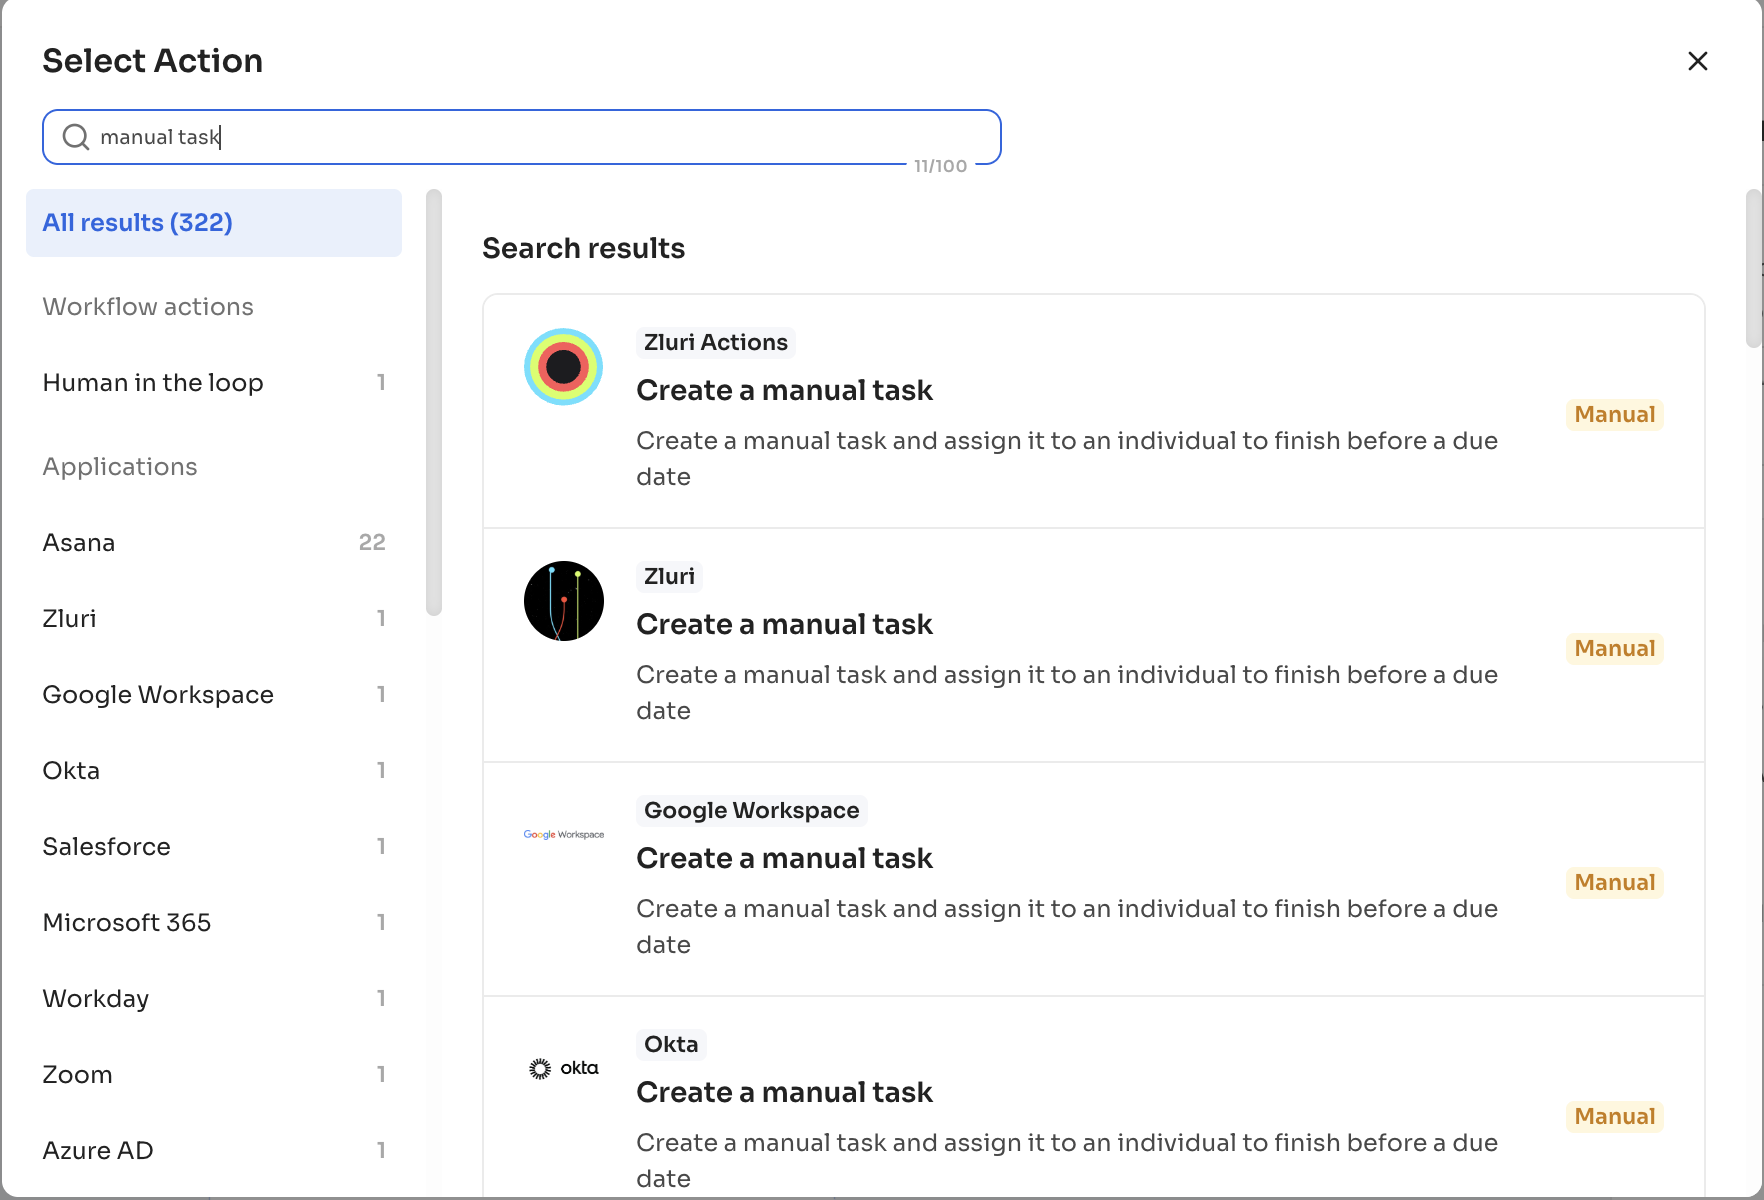
Search covers applications present in the tenant, both integrated and discovered applications.
Configure an action
Selecting a node opens its configuration panel on the right. The panel shows the action’s own input fields, plus the controls that apply to every action.
Steps
- Select the node on the canvas to open its configuration panel.
- Select the action name in the panel header to replace the default name with a custom label. The new name appears on the node.
- Enter a description to explain what the step does. The description appears on the node alongside the name.
- Select an instance for applications configured with more than one connected environment, such as two Slack workspaces or two Okta tenants. The node shows the instance connection status.
- Fill in the action’s input fields. Field types include text, long text, single select, multi-select, number, true or false, and date and time.
- Turn on Wait until completion to hold the playbook until this action finishes. Actions that start and end in one API call always wait until completion, including most automated application actions, sending custom mails, and making HTTP requests.
- Turn on Break on error to stop the playbook if this action fails, which prevents later steps from running against a half-finished state.
Zluri saves every change as it’s made. There is no separate save step.
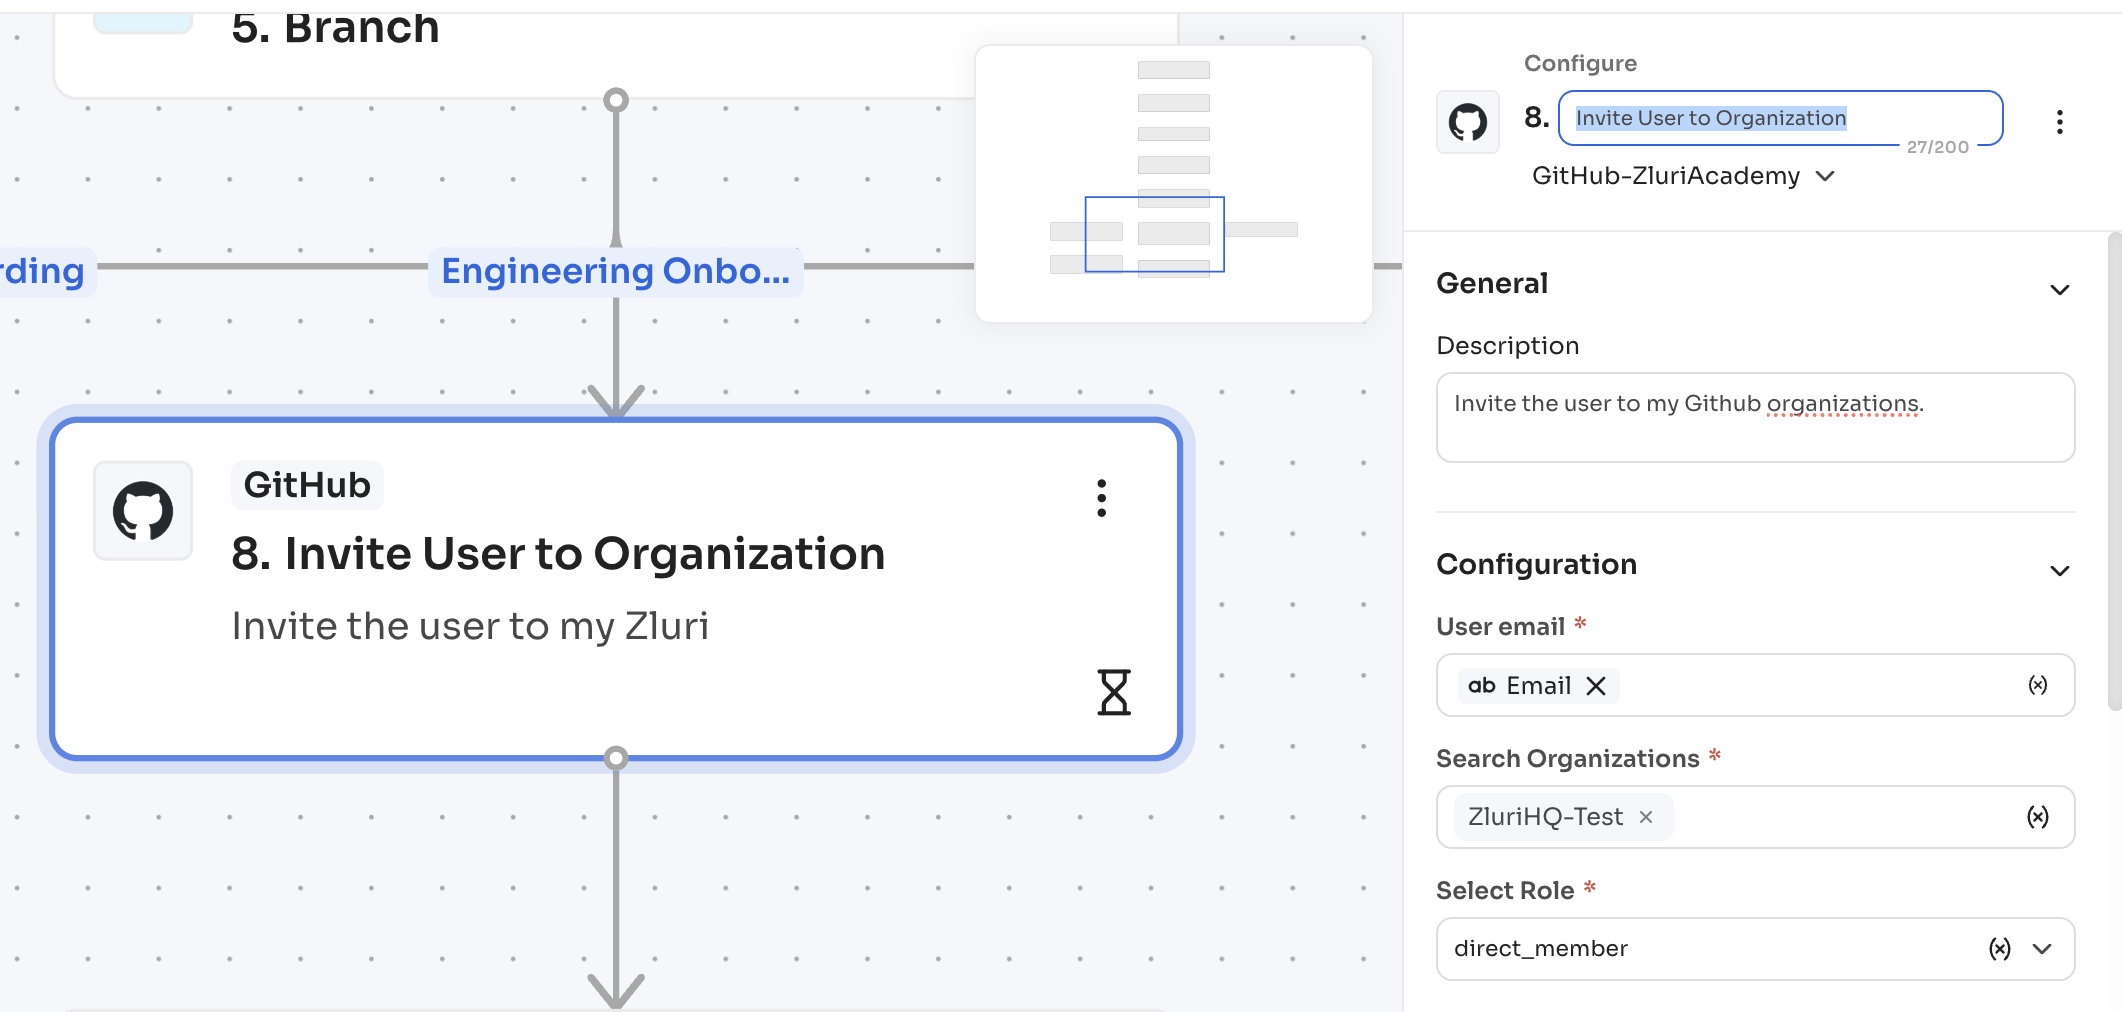
Configure conditions, approvals, and delays on an action
Individual actions carry their own conditions, approvals, and delays alongside the branch-level conditions on the canvas. Use these when a single step needs its own rule rather than a whole path.
| Control | What it does |
|---|---|
| Condition | Runs this action only when the attribute rules match. Rules use user and application attributes, including custom fields, composed with AND/OR logic, and reference variables as well as static values. |
| Approval | Holds this action until a designated approver responds. Assign a specific user and notify them by email. |
| Delay | Holds this action for a set period before it runs. Set the wait in weeks, days, hours, or minutes. |
Steps
- Select the node to open its configuration panel.
- Open the condition, approval, or delay control for that action.
- Enter the rule, the approver, or the wait period.
- Return to the canvas. The node shows a summary of the configuration.
Use variables in action inputs
Variables pass dynamic values into an action instead of fixed values. Every input field of every action accepts variables, including the fields of built-in integration actions such as the group to add a user to or the role to assign.
| Source | What it provides |
|---|---|
| User attributes | The user the playbook runs on, including name, email, department, role, manager, designation, and status. |
| Application attributes | The application in context, including status, name, owner, and financial owner. |
| Custom fields | Attributes the organization defined on user records. |
| Tested action responses | Values returned by an action tested earlier in the playbook. |
| External variables | Values that come from where the playbook lives, such as the access request that triggered an access request playbook, or any custom variables created for that playbook’s use. |
Steps
- Select the field where the value belongs.
- Select the Variables icon beside the field to open the variable picker.
- Expand a group in the tree view, or search to filter across every available variable.
- Select a variable to insert it at the cursor position. Zluri writes the variable into the field using a double curly brace token such as
{USER.EMAIL}.
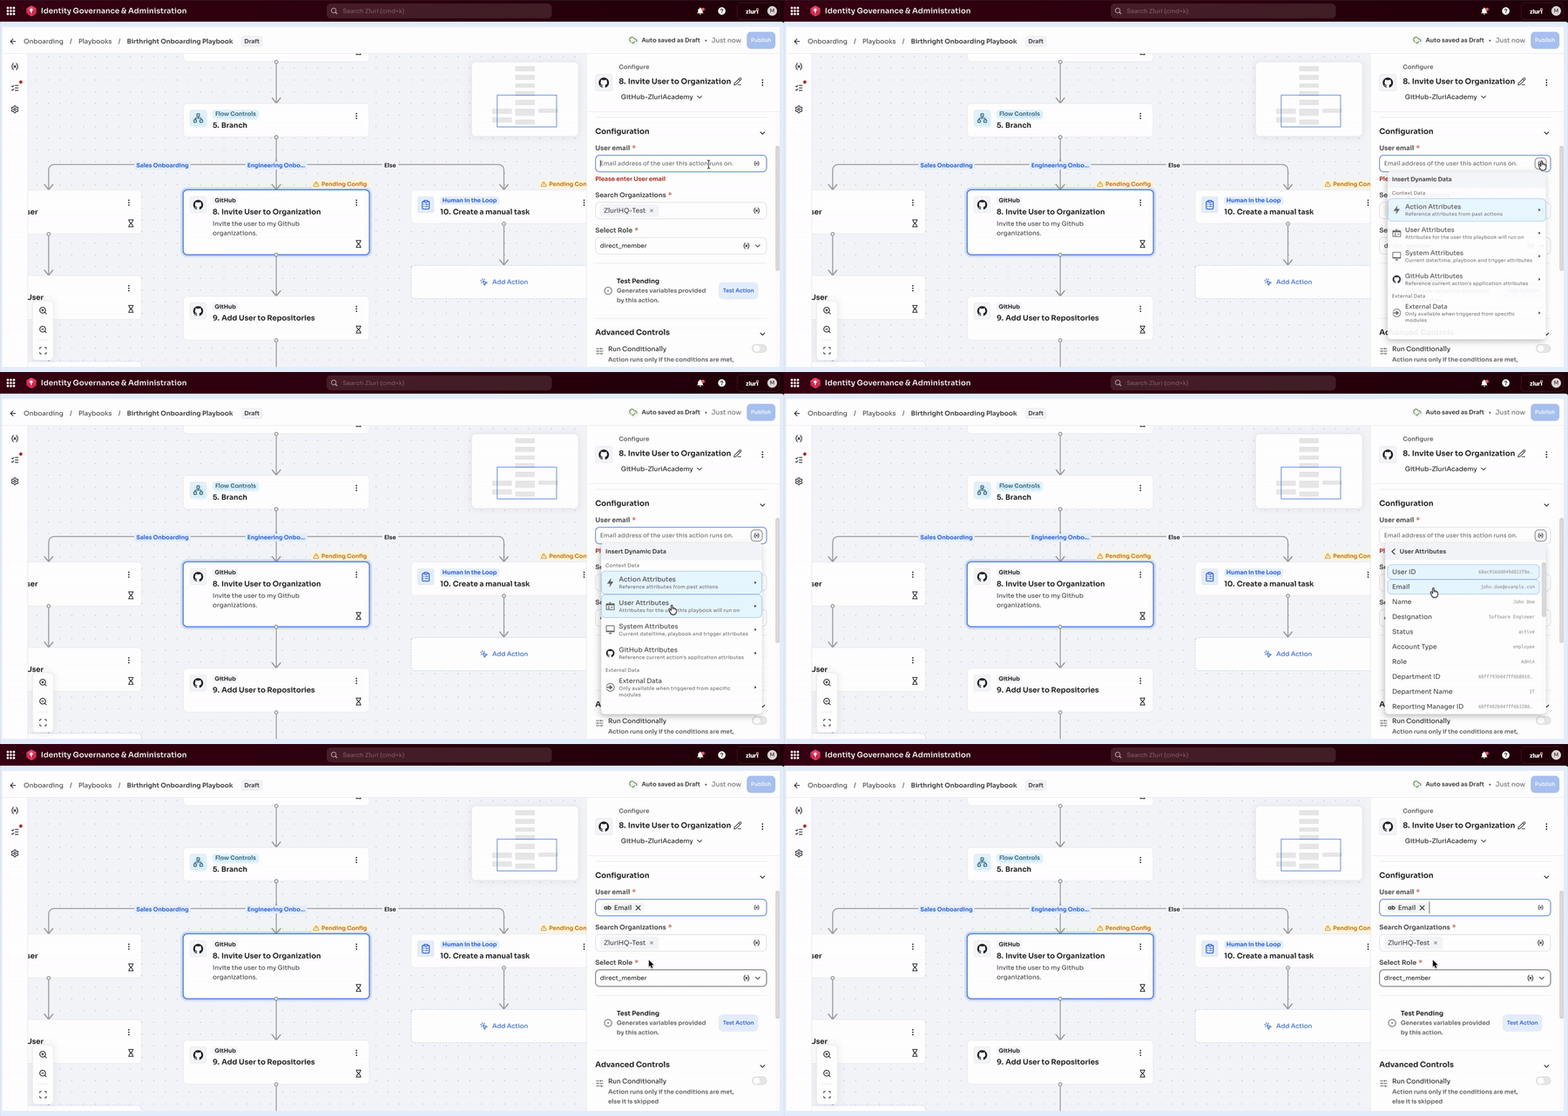
Custom fields follow the same token pattern, for example {{user.custom_field.name}}.
Test an action
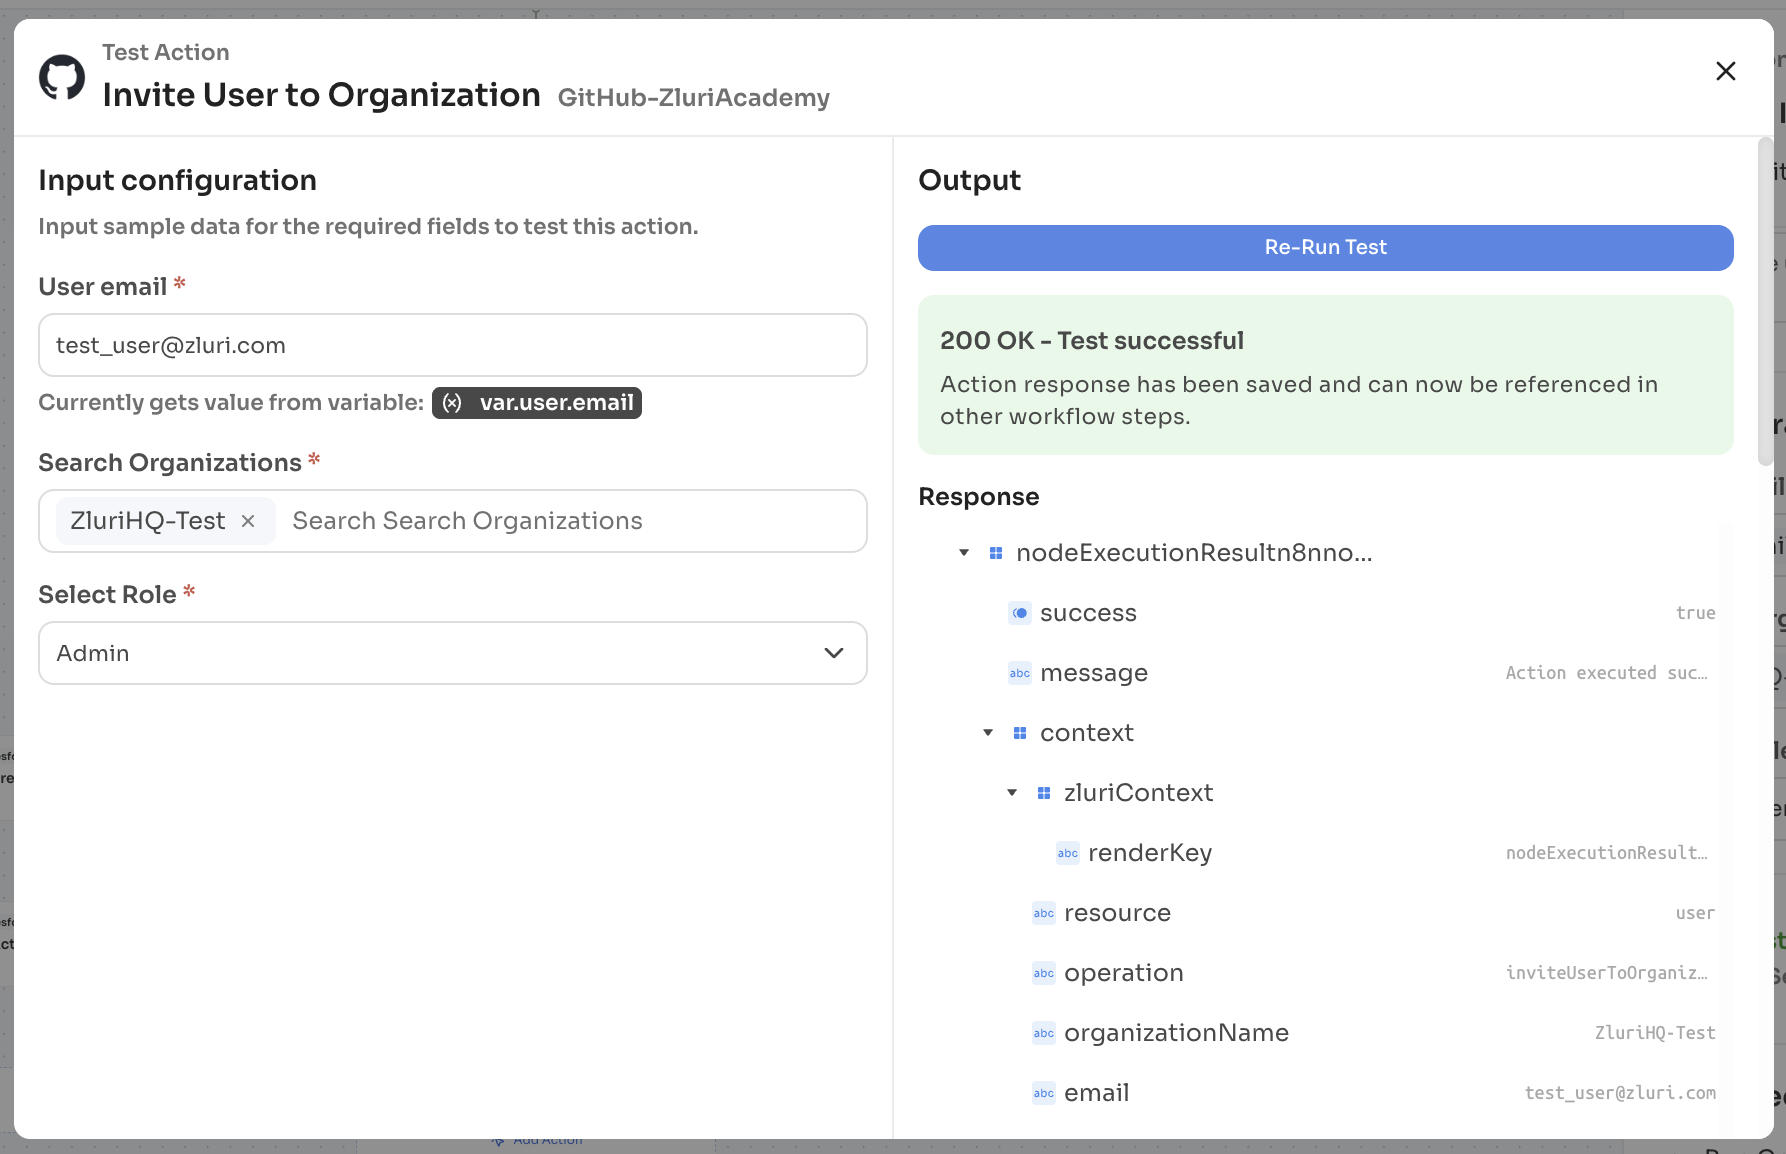
Testing runs a single action on its own so the configuration is confirmed before publishing the playbook. Testing also produces the action’s response, which later actions then reference as variables. Every action supports testing except the branch node.
Steps
- Select the node to open its configuration panel.
- Select an instance to test against, such as a demo tenant, so the test does not touch production data.
- Fill in the action’s input fields, if required.
- Select Test to run the action.
- Review the response Zluri returns.
- Open a later action in the playbook and use the variable picker to insert a value from the tested action’s response.
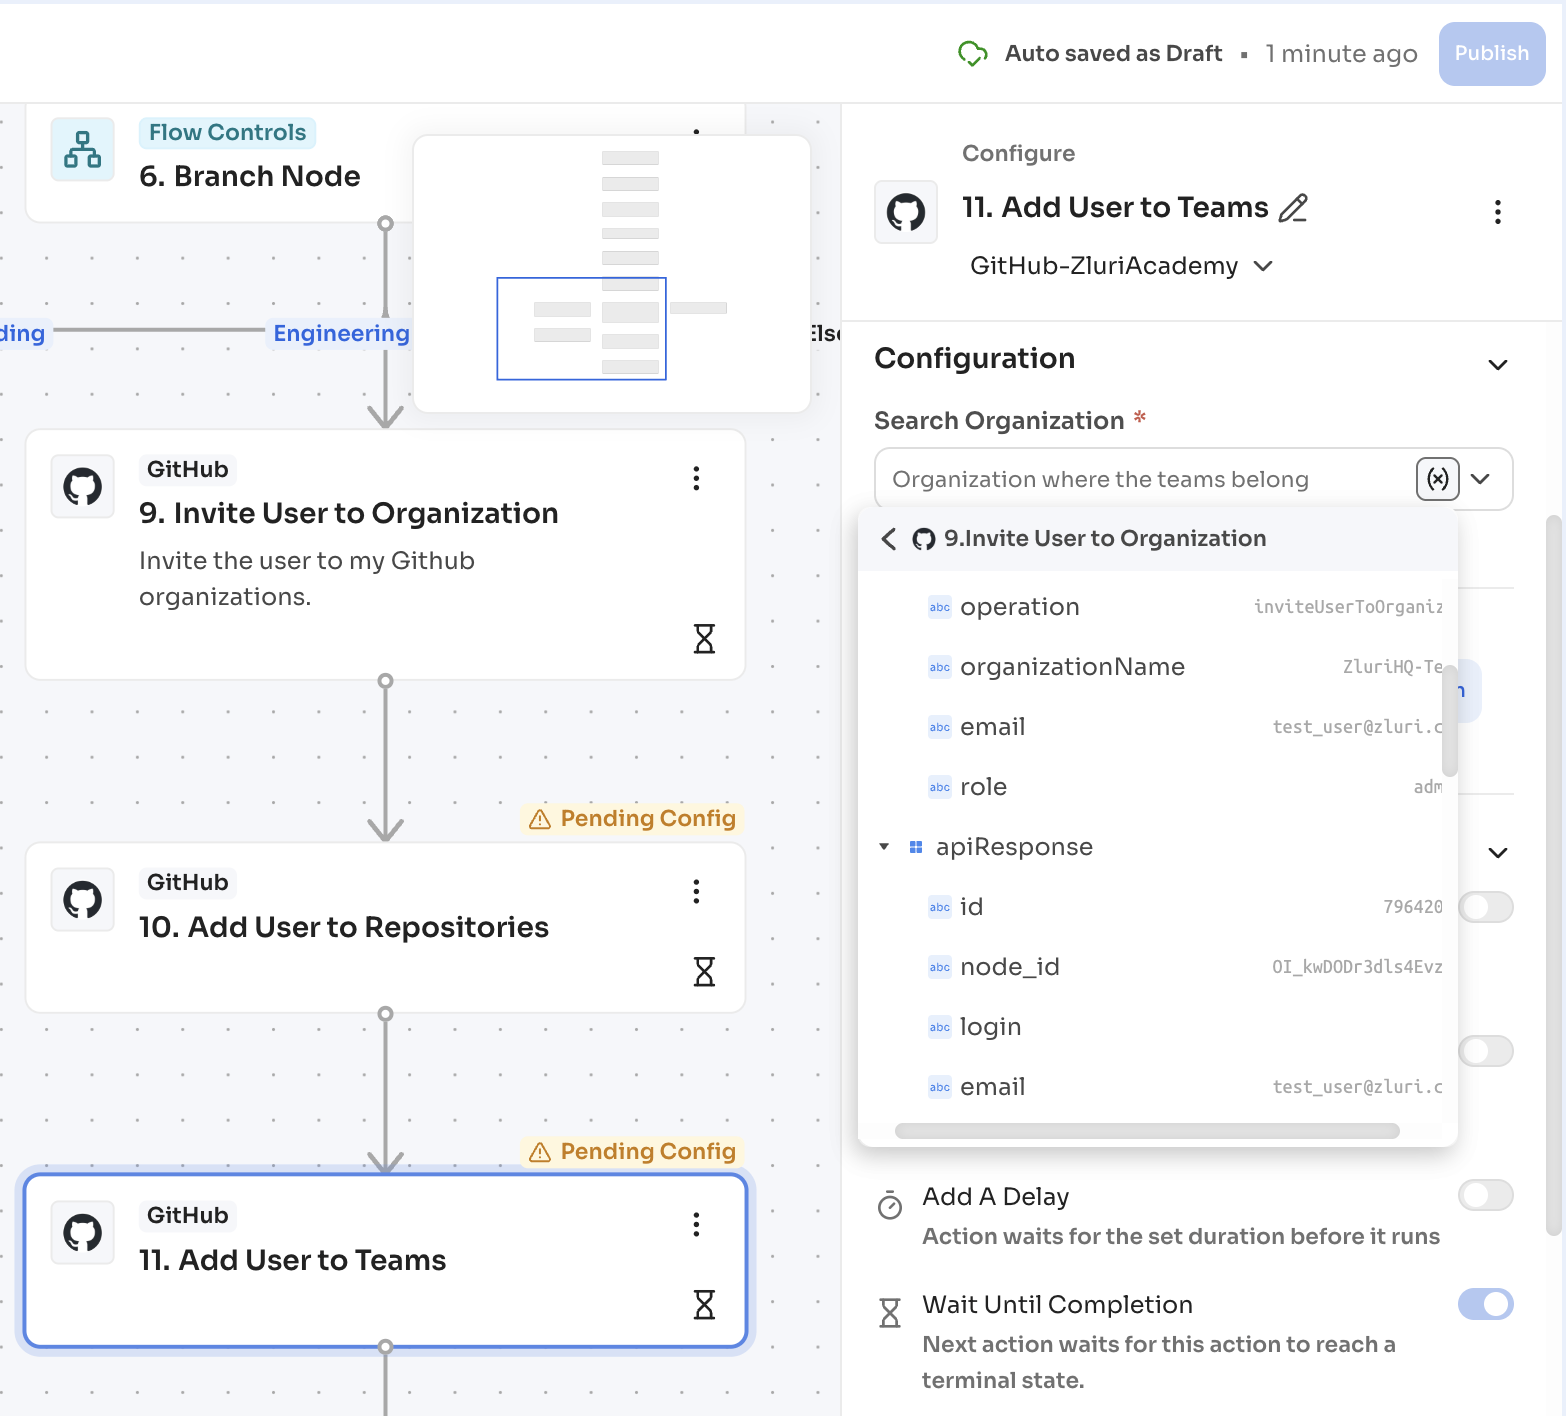
A tested action’s response stays available as a variable across playbooks, not only in the playbook where it was tested.
Use granular actions for more control
Several Zluri actions perform more than one operation behind the scenes. Adding a user to an Okta group takes the user’s email address, looks up that user’s Okta ID, and then calls Okta with the ID. The workflow builder keeps these composite actions and also exposes the individual operations as separate actions, so a playbook either lets Zluri handle the lookup or performs each step explicitly.
Use the composite action for a straightforward setup where Zluri resolves the identifiers automatically. Use the granular actions when a playbook needs the intermediate value, needs to branch on it, or needs to pass an identifier that does not come from the user’s email address.
Steps
- Select the plus connector where the lookup belongs.
- Search for the lookup action, for example a search or get action for the application, and add it.
- Test the lookup action to produce its response.
- Select the plus connector below it and add the action that performs the operation.
- Use the variable picker to pass the identifier from the lookup action’s response into the second action’s input field.
Resolve pending configuration before publishing
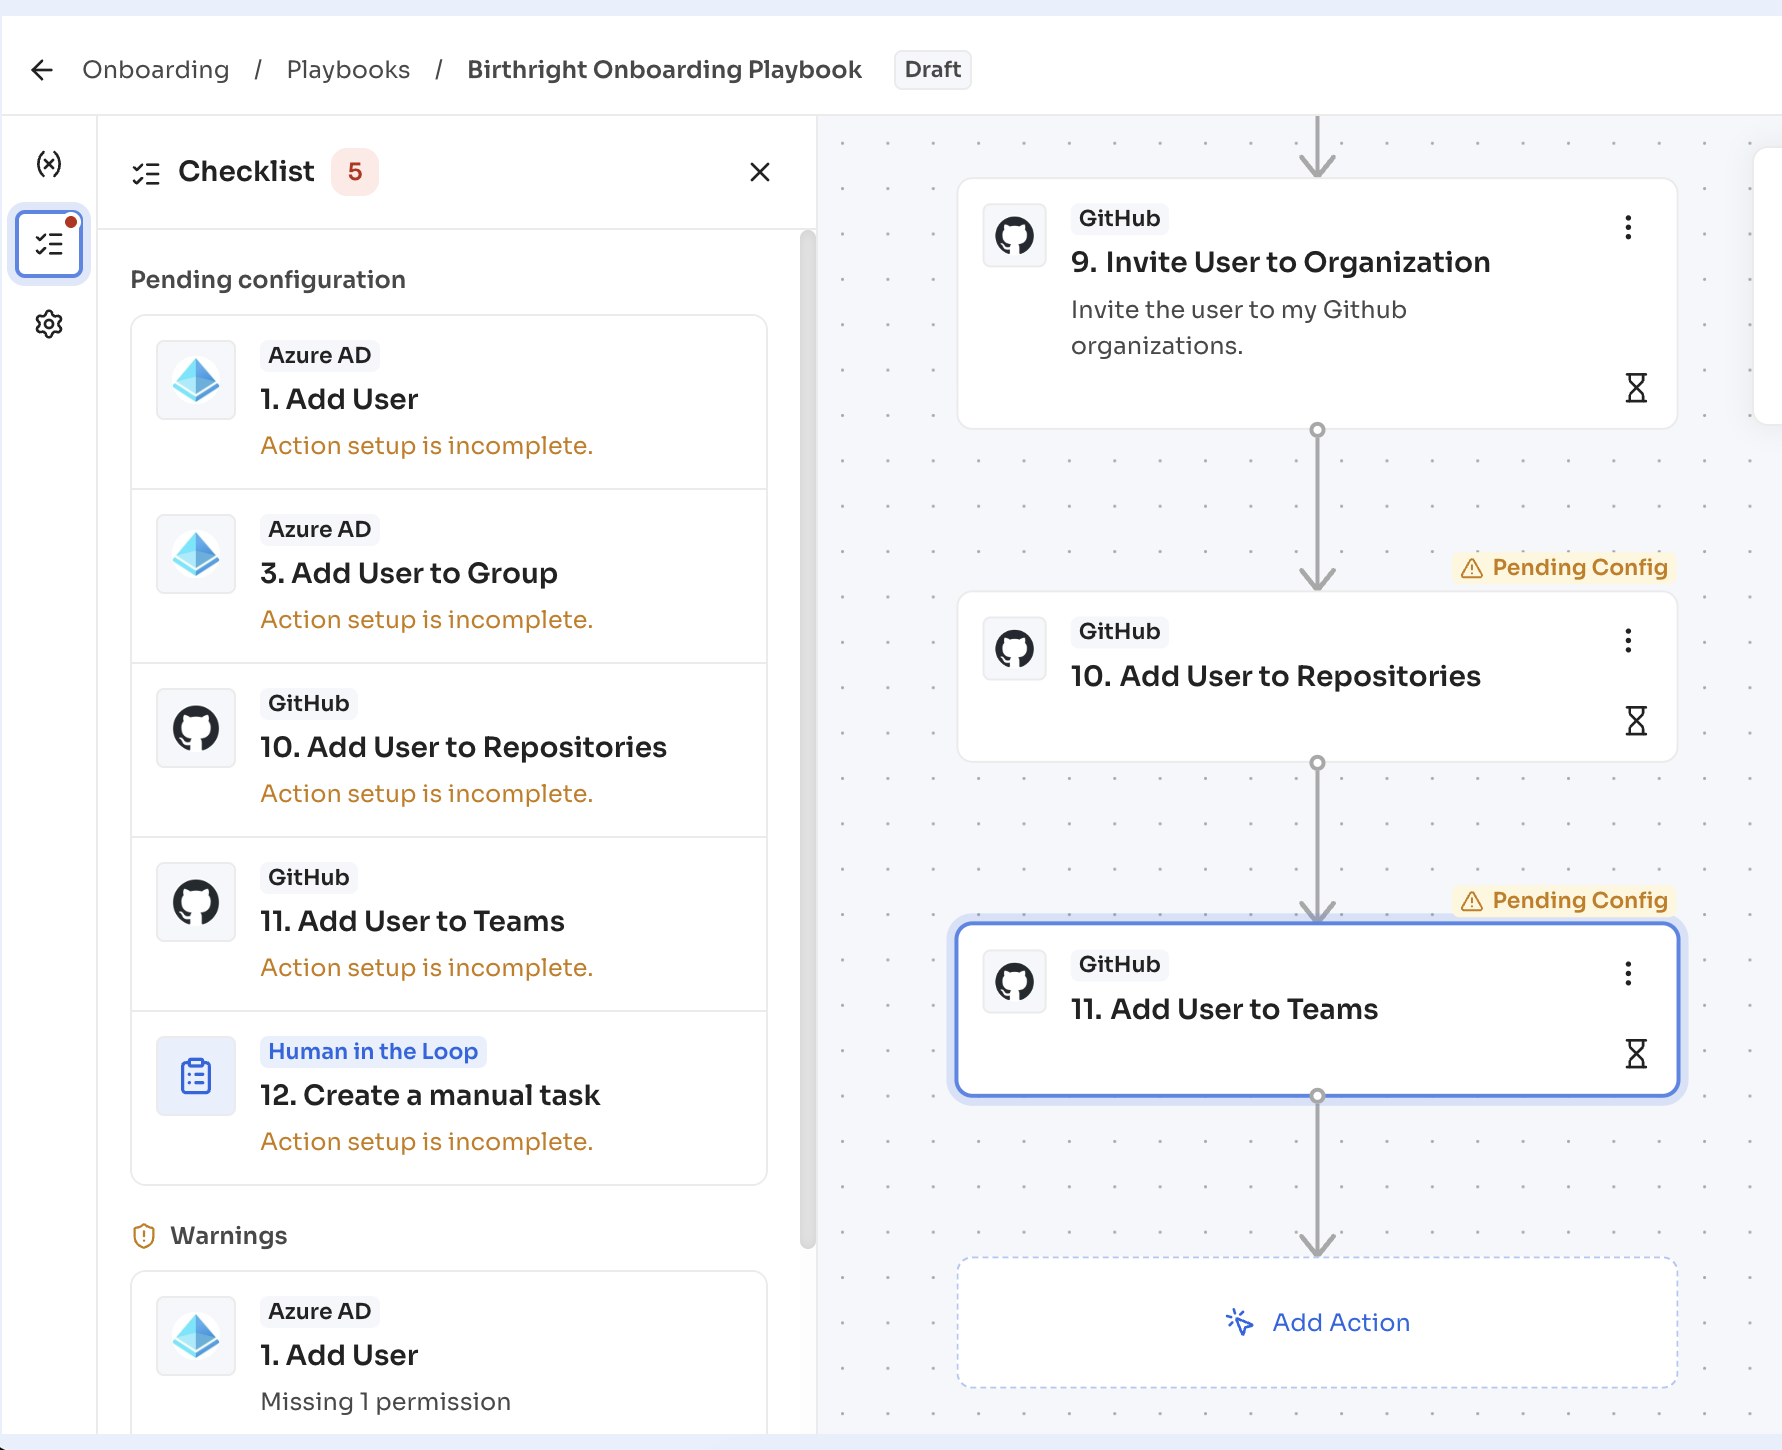
Zluri marks any action with missing or invalid configuration and collects every one of them in a single checklist, so a long playbook does not require checking each step by hand.
Steps
- Look for the indicator on the builder header. It appears whenever at least one action needs attention.
- Select the indicator to open the checklist of every incomplete or misconfigured action.
- Select an item in the checklist. Zluri opens that node’s configuration panel.
- Complete the missing input or correct the invalid value.
- Repeat until the checklist is empty.
- Select Publish.
Zluri blocks publishing while any item remains on the checklist.
View a playbook without editing
The playbook viewer shows a playbook’s complete configuration on the same canvas as the builder, in a read-only state. Use it to review or explain a setup without risking an accidental change.
Steps
- Open the playbook.
- Review the graph and select any node to inspect its configuration.
- Select the option to edit when a change is needed, which opens the same playbook in the builder.
Updated about 3 hours ago