
Backup - How to Connect
Connect Zluri with Application Database
The JDBC connector links Zluri to a RDBMS database that runs inside your network — for example a PostgreSQL, MySQL, Oracle, or SQL Server instance that Zluri cannot reach directly over the internet. You install a lightweight agent on a server in your network, point it at your database, and Zluri reads the data the agent exposes to bring users, roles, and permissions into Zluri.
Setup has two sides. On the agent (a local dashboard that runs on your server) you create an account, connect the agent to Zluri, and register one or more database connections with the queries you want to expose. In the Zluri platform you pick that agent, choose the database, map each query to a Zluri entity, and validate before the connector goes live.
The order depends on whether you already have an agent. The first time you connect, you start in Zluri to download the agent (Part 1), deploy and set it up in your network (Parts 2–4), then return to Zluri to finish the connector (Parts 5–7). If an agent is already installed and registered, you select it in Part 1 and skip straight to Part 5.
You complete this once per database connection. After setup, Zluri syncs on a schedule with no further action on the agent.
Prerequisites
- Admin access to Zluri.
- Database connection details — host or IP, port, database name, and a database user with read access to the tables you want to sync.
- JDBC driver — the driver (
.jar) for your database type. You upload this to the agent when you add the connection. - Docker 20.10+ and Docker Compose v2 (or v1) installed on a server in your network.
- Hyper-V and WSL 2 should be enabled on Windows.
- See the Docker Desktop installation guides for Windows and Mac.
- Network connectivity — from the Docker host to your database (its host and port) and outbound HTTPS to Zluri's servers.
Network requirements
- Inbound ports: none need to be opened.
- Outbound connectivity: the server must have internet access to install dependencies and to reach Zluri.
Hardware requirements
The recommended and minimum host resources are below.
| Resource | Recommended | Minimum |
|---|---|---|
| CPU | 8 cores | 4 cores (slower performance) |
| RAM | 16 GB | 8 GB (slower performance, possible instability) |
| Storage | 50 GB available | 50 GB available |
Operating system
- Any modern operating system is supported (for example, Windows Server 2022+ or a Linux distribution).
- On Windows Server, Docker Desktop is not supported. Install Docker Engine and use WSL to run Linux containers.
We recommend the Windows build for a Windows operating system. If you use the Docker build on Windows Server, install Docker Engine (not Docker Desktop) and enable WSL 2 to run Linux containers.
Use cases supported
- Sync users (accounts), roles, and permissions from a database into Zluri.
- Connect to databases reachable only from inside your network, with no inbound firewall changes.
- Run multiple queries per database and map each one to the Zluri entity it feeds.
- Keep the connection encrypted with TLS, including uploading your own certificate.
- The agent runs as a container and persists across restarts — it does not depend on an active user session.
Part 1: Choose or download an agent in Zluri
Start in the Zluri platform. Go to Integrations and select New JDBC Connector. The first step is Agent setup, with two options: Select existing agent and Download new agent.
[SCREENSHOT: Agent setup step showing the Select existing agent and Download new agent tabs]
Select an existing agent
Use this option when you have already installed and registered an agent in your network.
Steps
- Select Select existing agent.
- Choose the agent from the dropdown. Each agent is listed by name and the date it was registered.
- Select Continue.
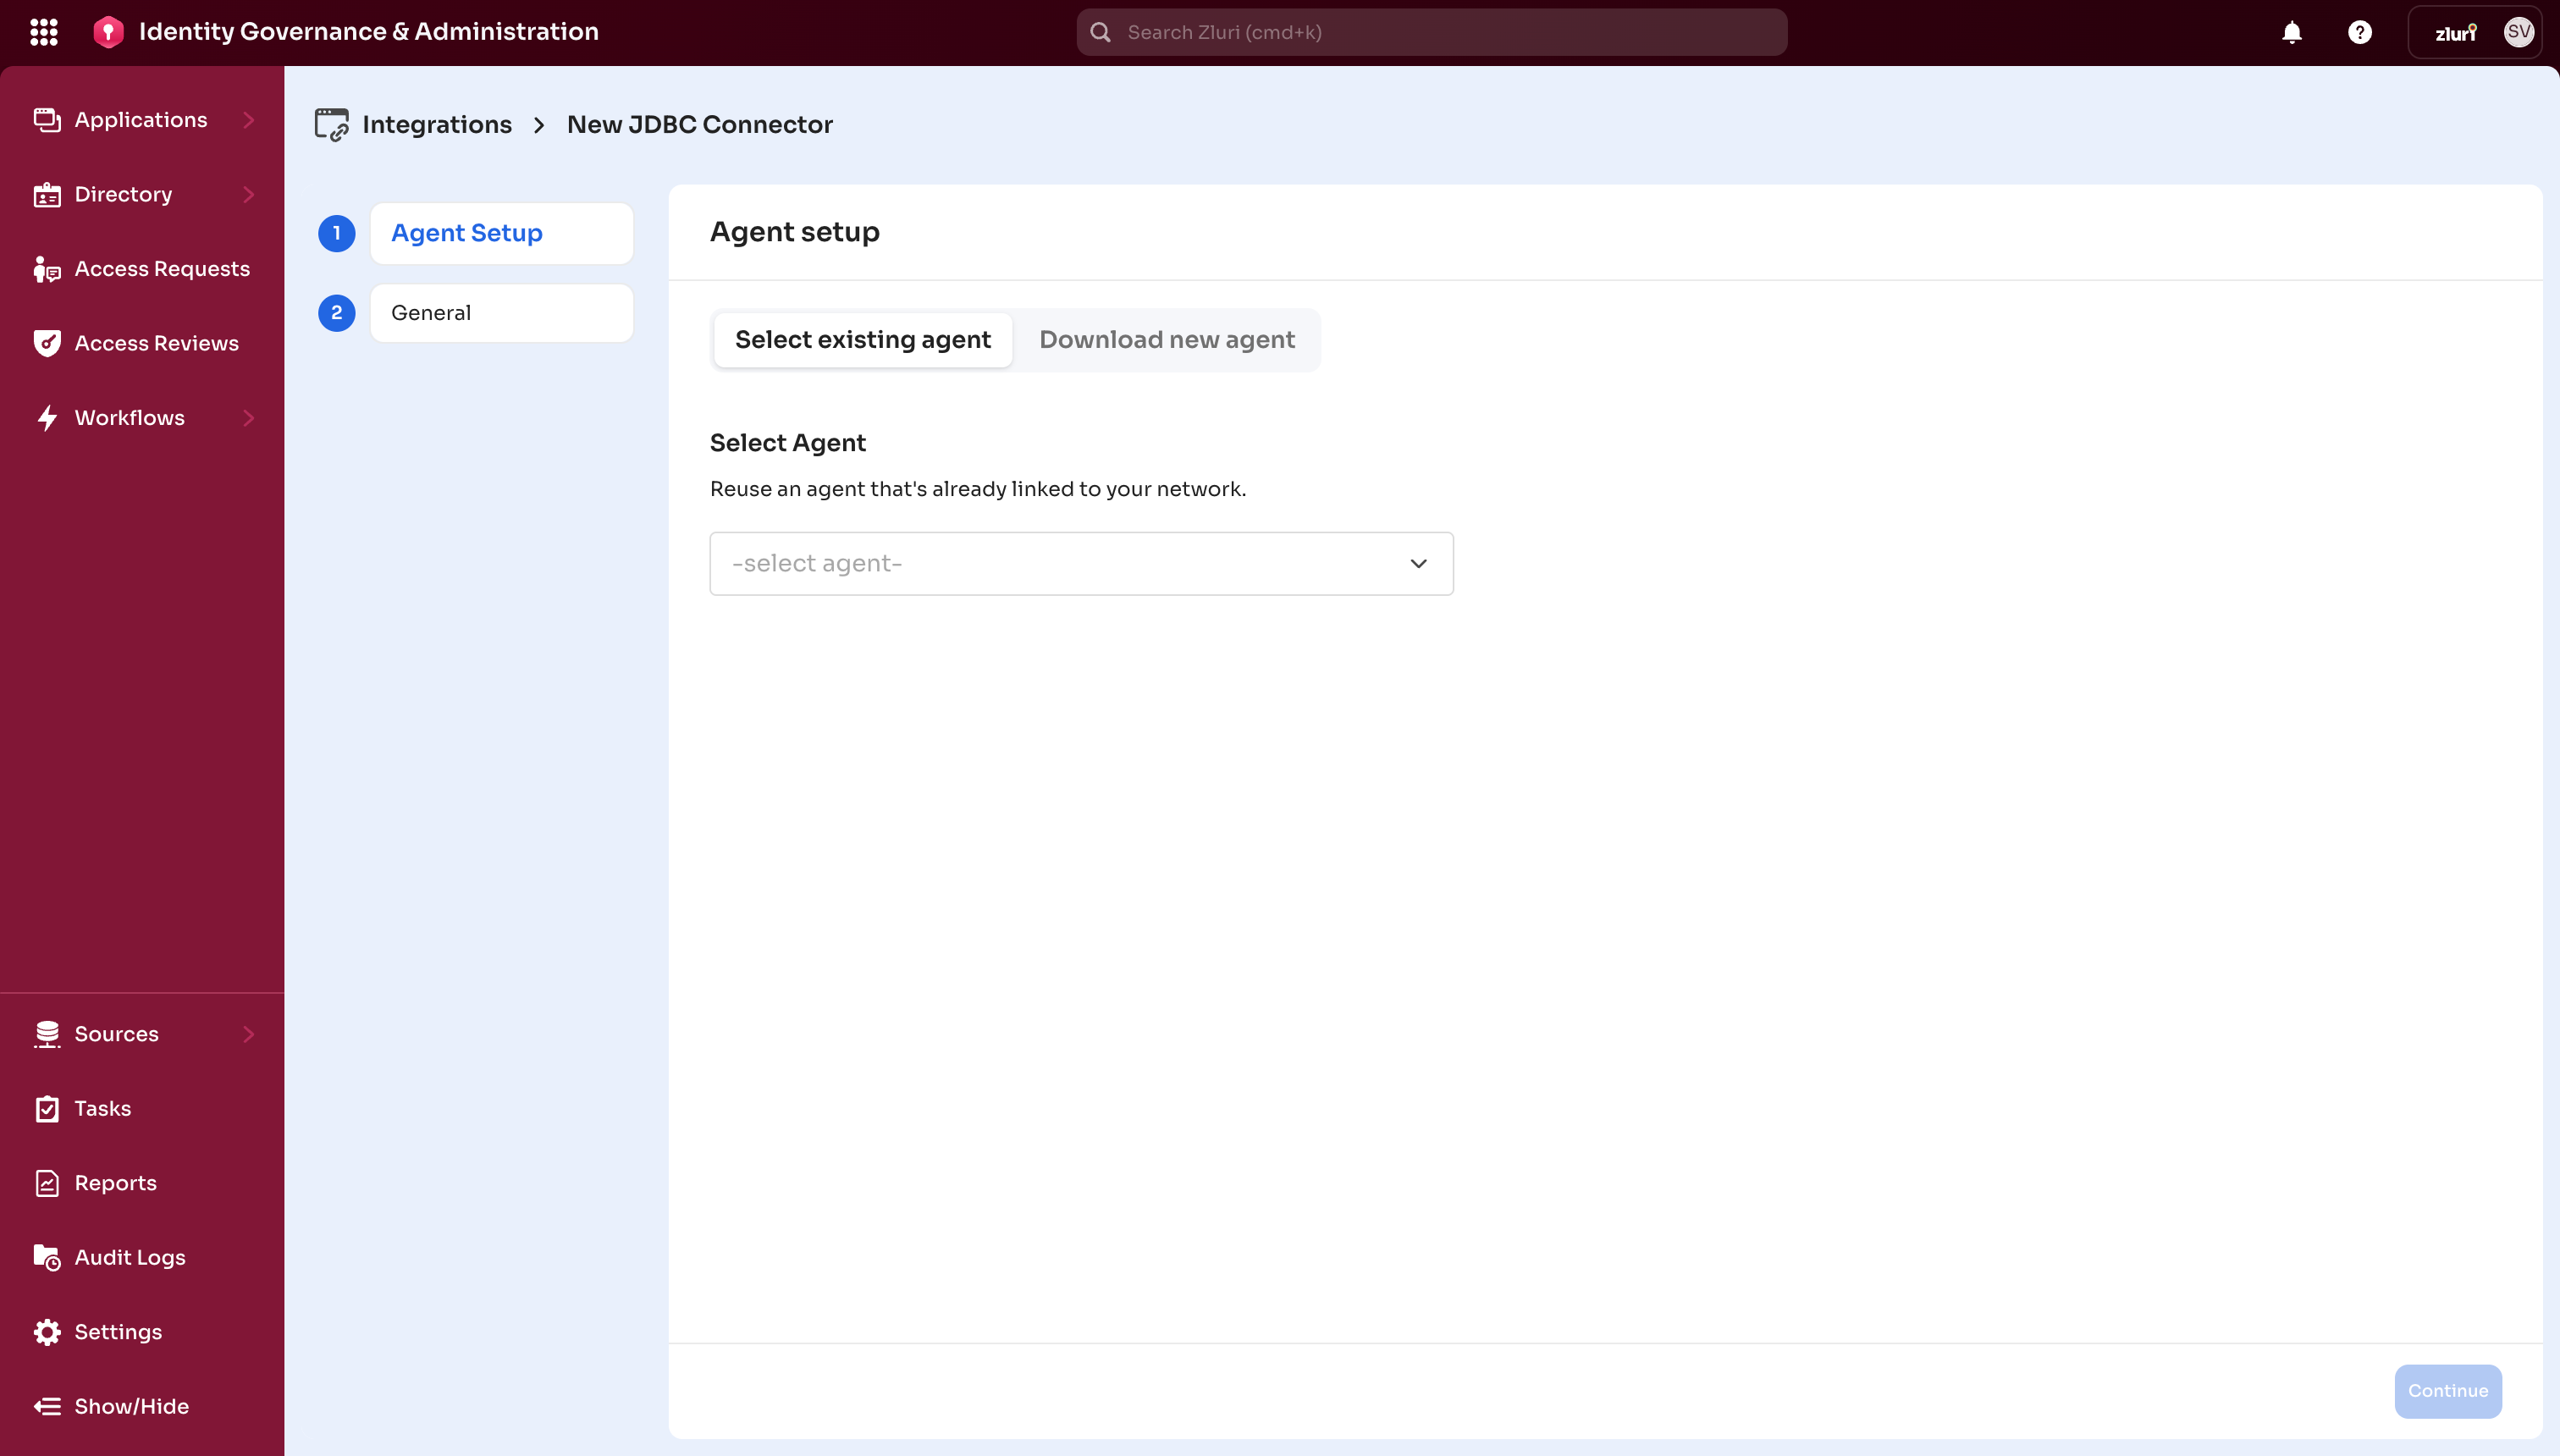
Skip to Part 5 — the agent, database connection, and queries are already set up.
!image.png
Download a new agent
Use this option the first time you connect, when no agent exists yet.
Steps
- Select Download new agent.
- Download the agent package.
- Click On Register Agent. Copy the code and keep it somewhere safe.
Note: The agent installs as a Docker image. [PLACEHOLDER — confirm the final download button label and availability before publish.]
Continue to Part 2 to deploy the agent. Come back to Zluri for Part 5 once the agent is set up.
Part 2: Deploy the agent (Docker)
Complete Parts 2–4 only when you are setting up a new agent. Transfer the downloaded agent package to the server where you want to run it, and unzip it.
Step 1 — Load the Docker image
Open a terminal in the folder containing the unzipped files and load the image.
docker load < zluri-jdbc-connector.tar.gzStep 2 — Start the agent
Start the agent with Docker Compose.
docker compose up -dConfirm the container is running.
docker psPart 3: Create your account and connect the agent
Open a browser and go to the agent's local dashboard.
Default port and host -
For Docker Build: https://localhost:8080/ui or 127.0.0.1:5001.
Note: Your browser shows a certificate warning for the self-signed certificate. Accept the exception to continue.
Step 1 — Sign up
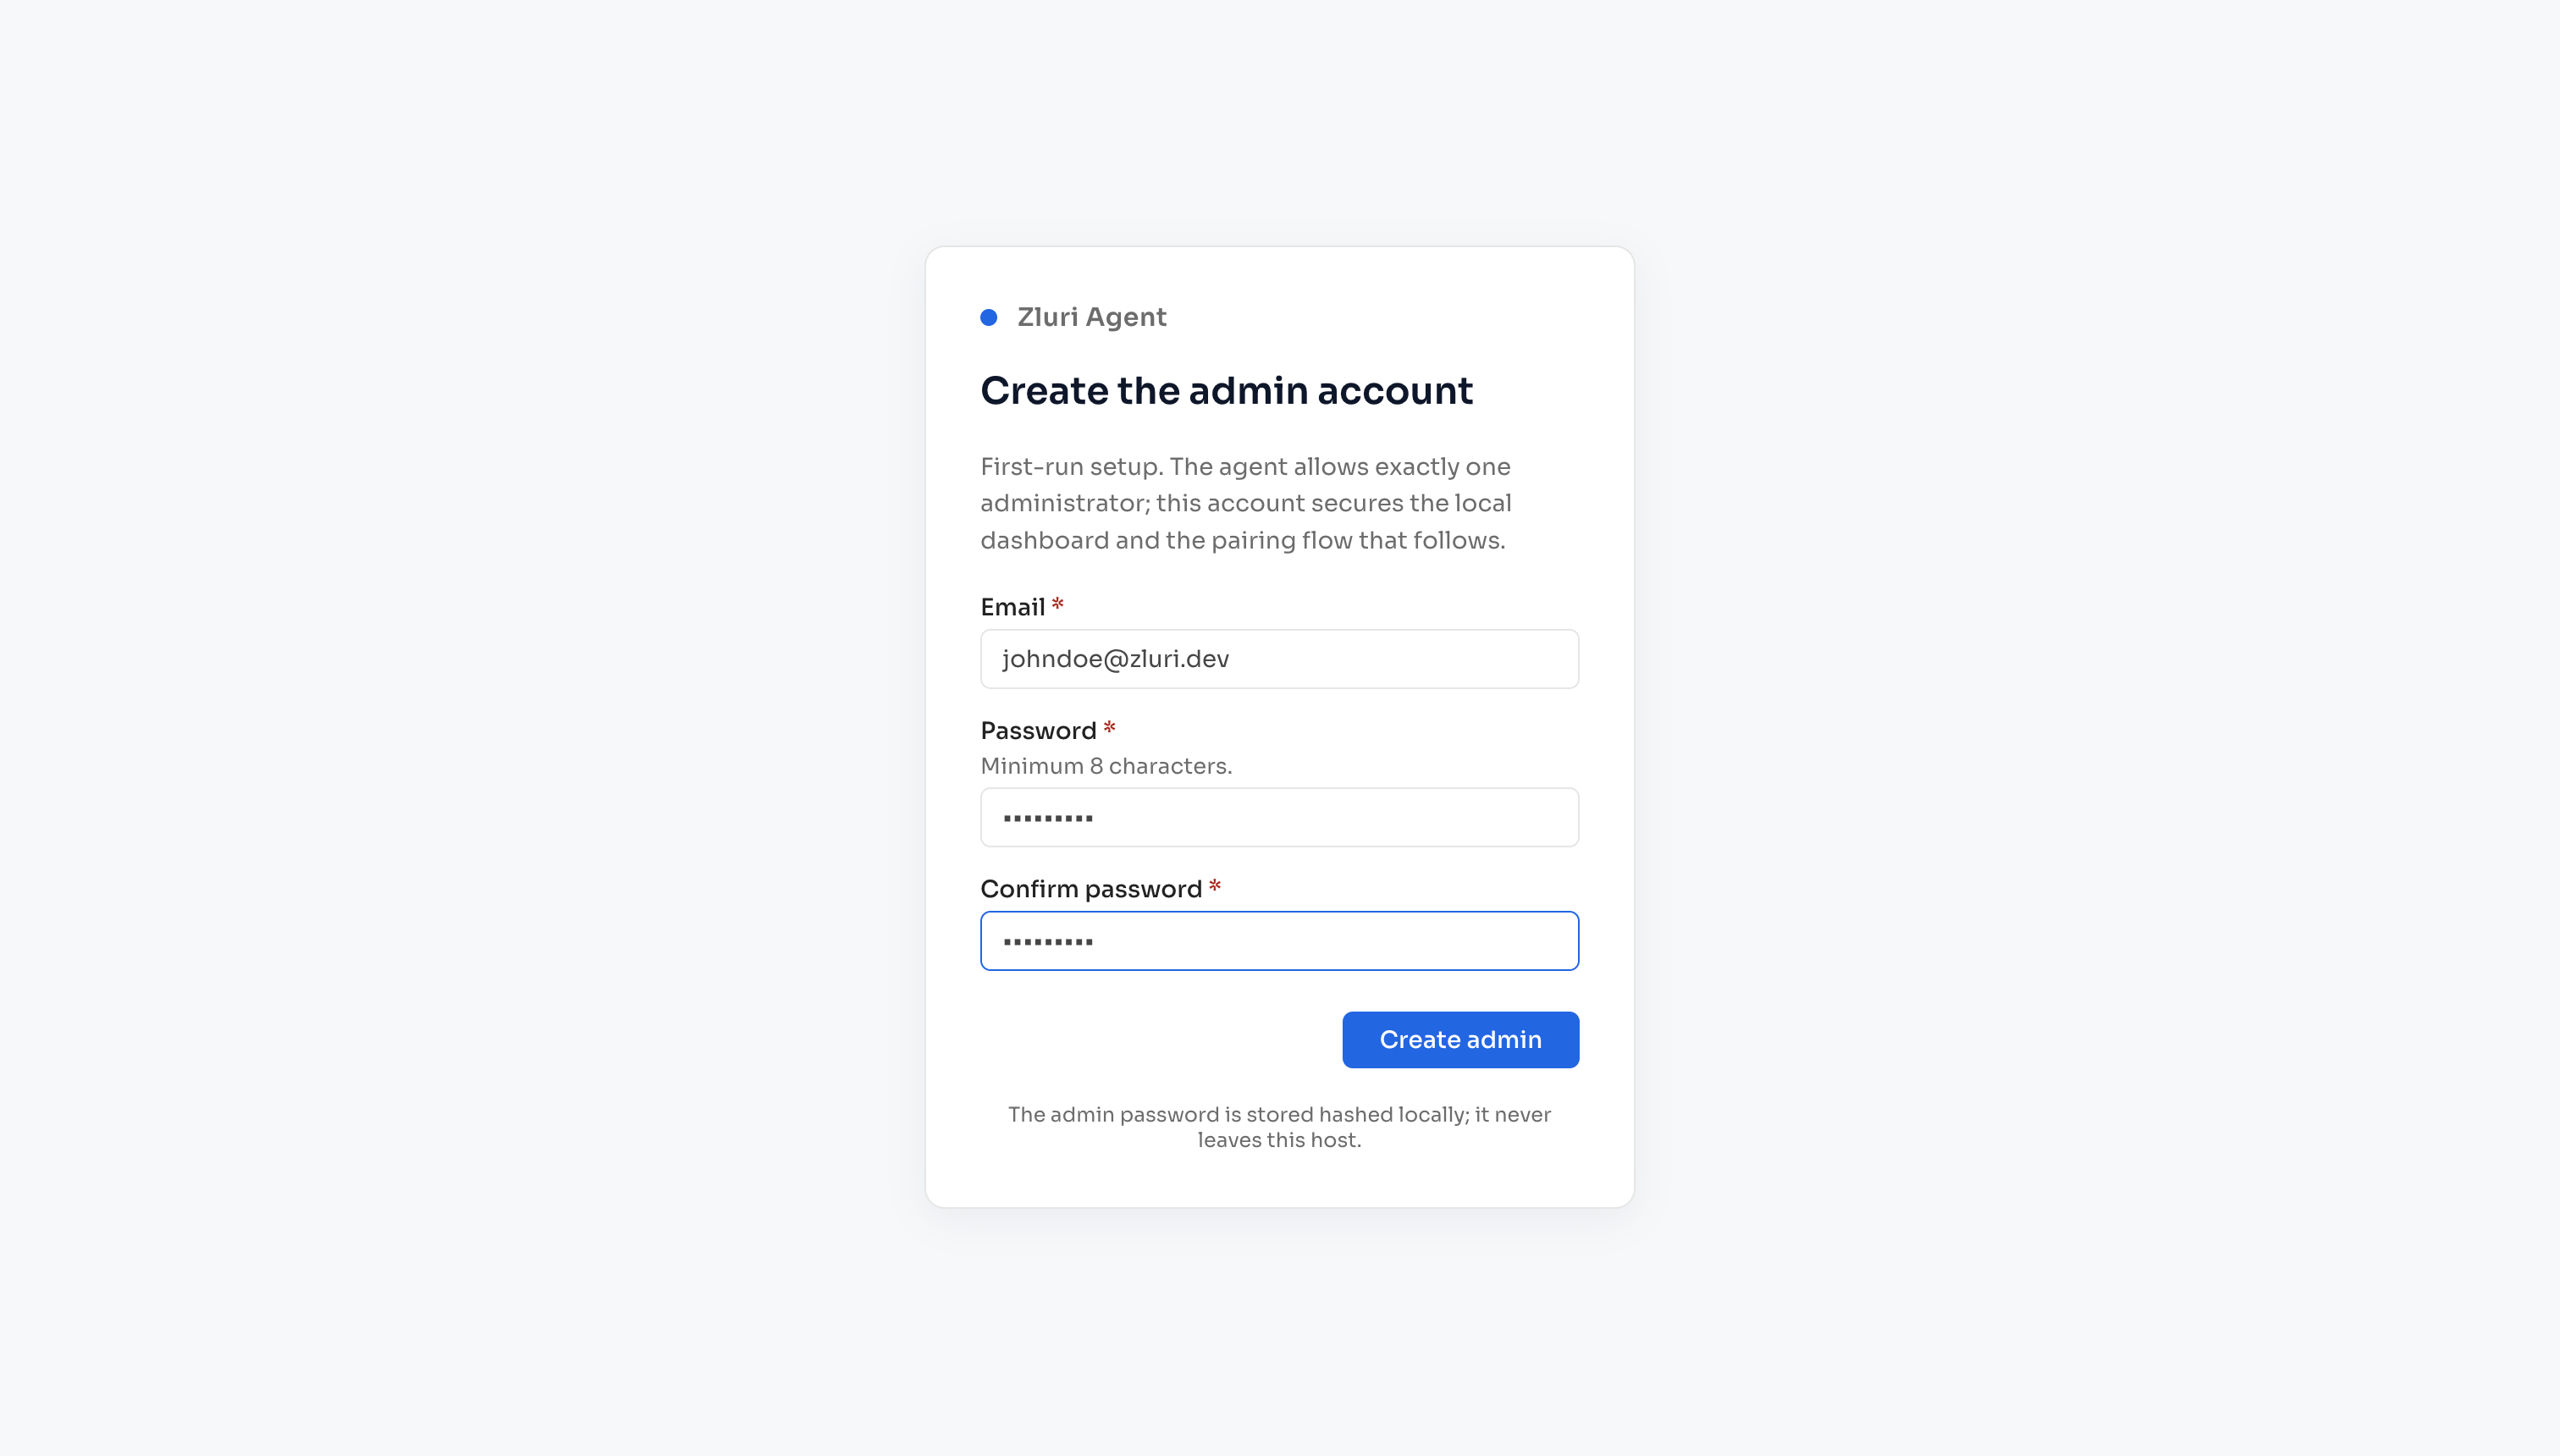
On first access, the agent shows the Sign up page. This creates the admin account for this agent. It's the only account and controls access to the agent.
Steps
- Enter your Email.
- Enter a Password (minimum 8 characters). Select the show/hide icon to check what you typed.
- Re-enter it under Confirm password.
- Select Sign up.
Signing up logs you in automatically and opens the agent dashboard. On later visits, sign in with the same admin account. If you forget the password, select Forgot password? on the sign-in page for the reset command and where to run it — see Reset the agent admin password.
Step 2 — Connect the agent to Zluri
The agent dashboard opens on the Connect to Zluri panel.
Steps
- In the Zluri platform, click on Register Agent, Enter an Agent name and copy the Zluri token for this agent.
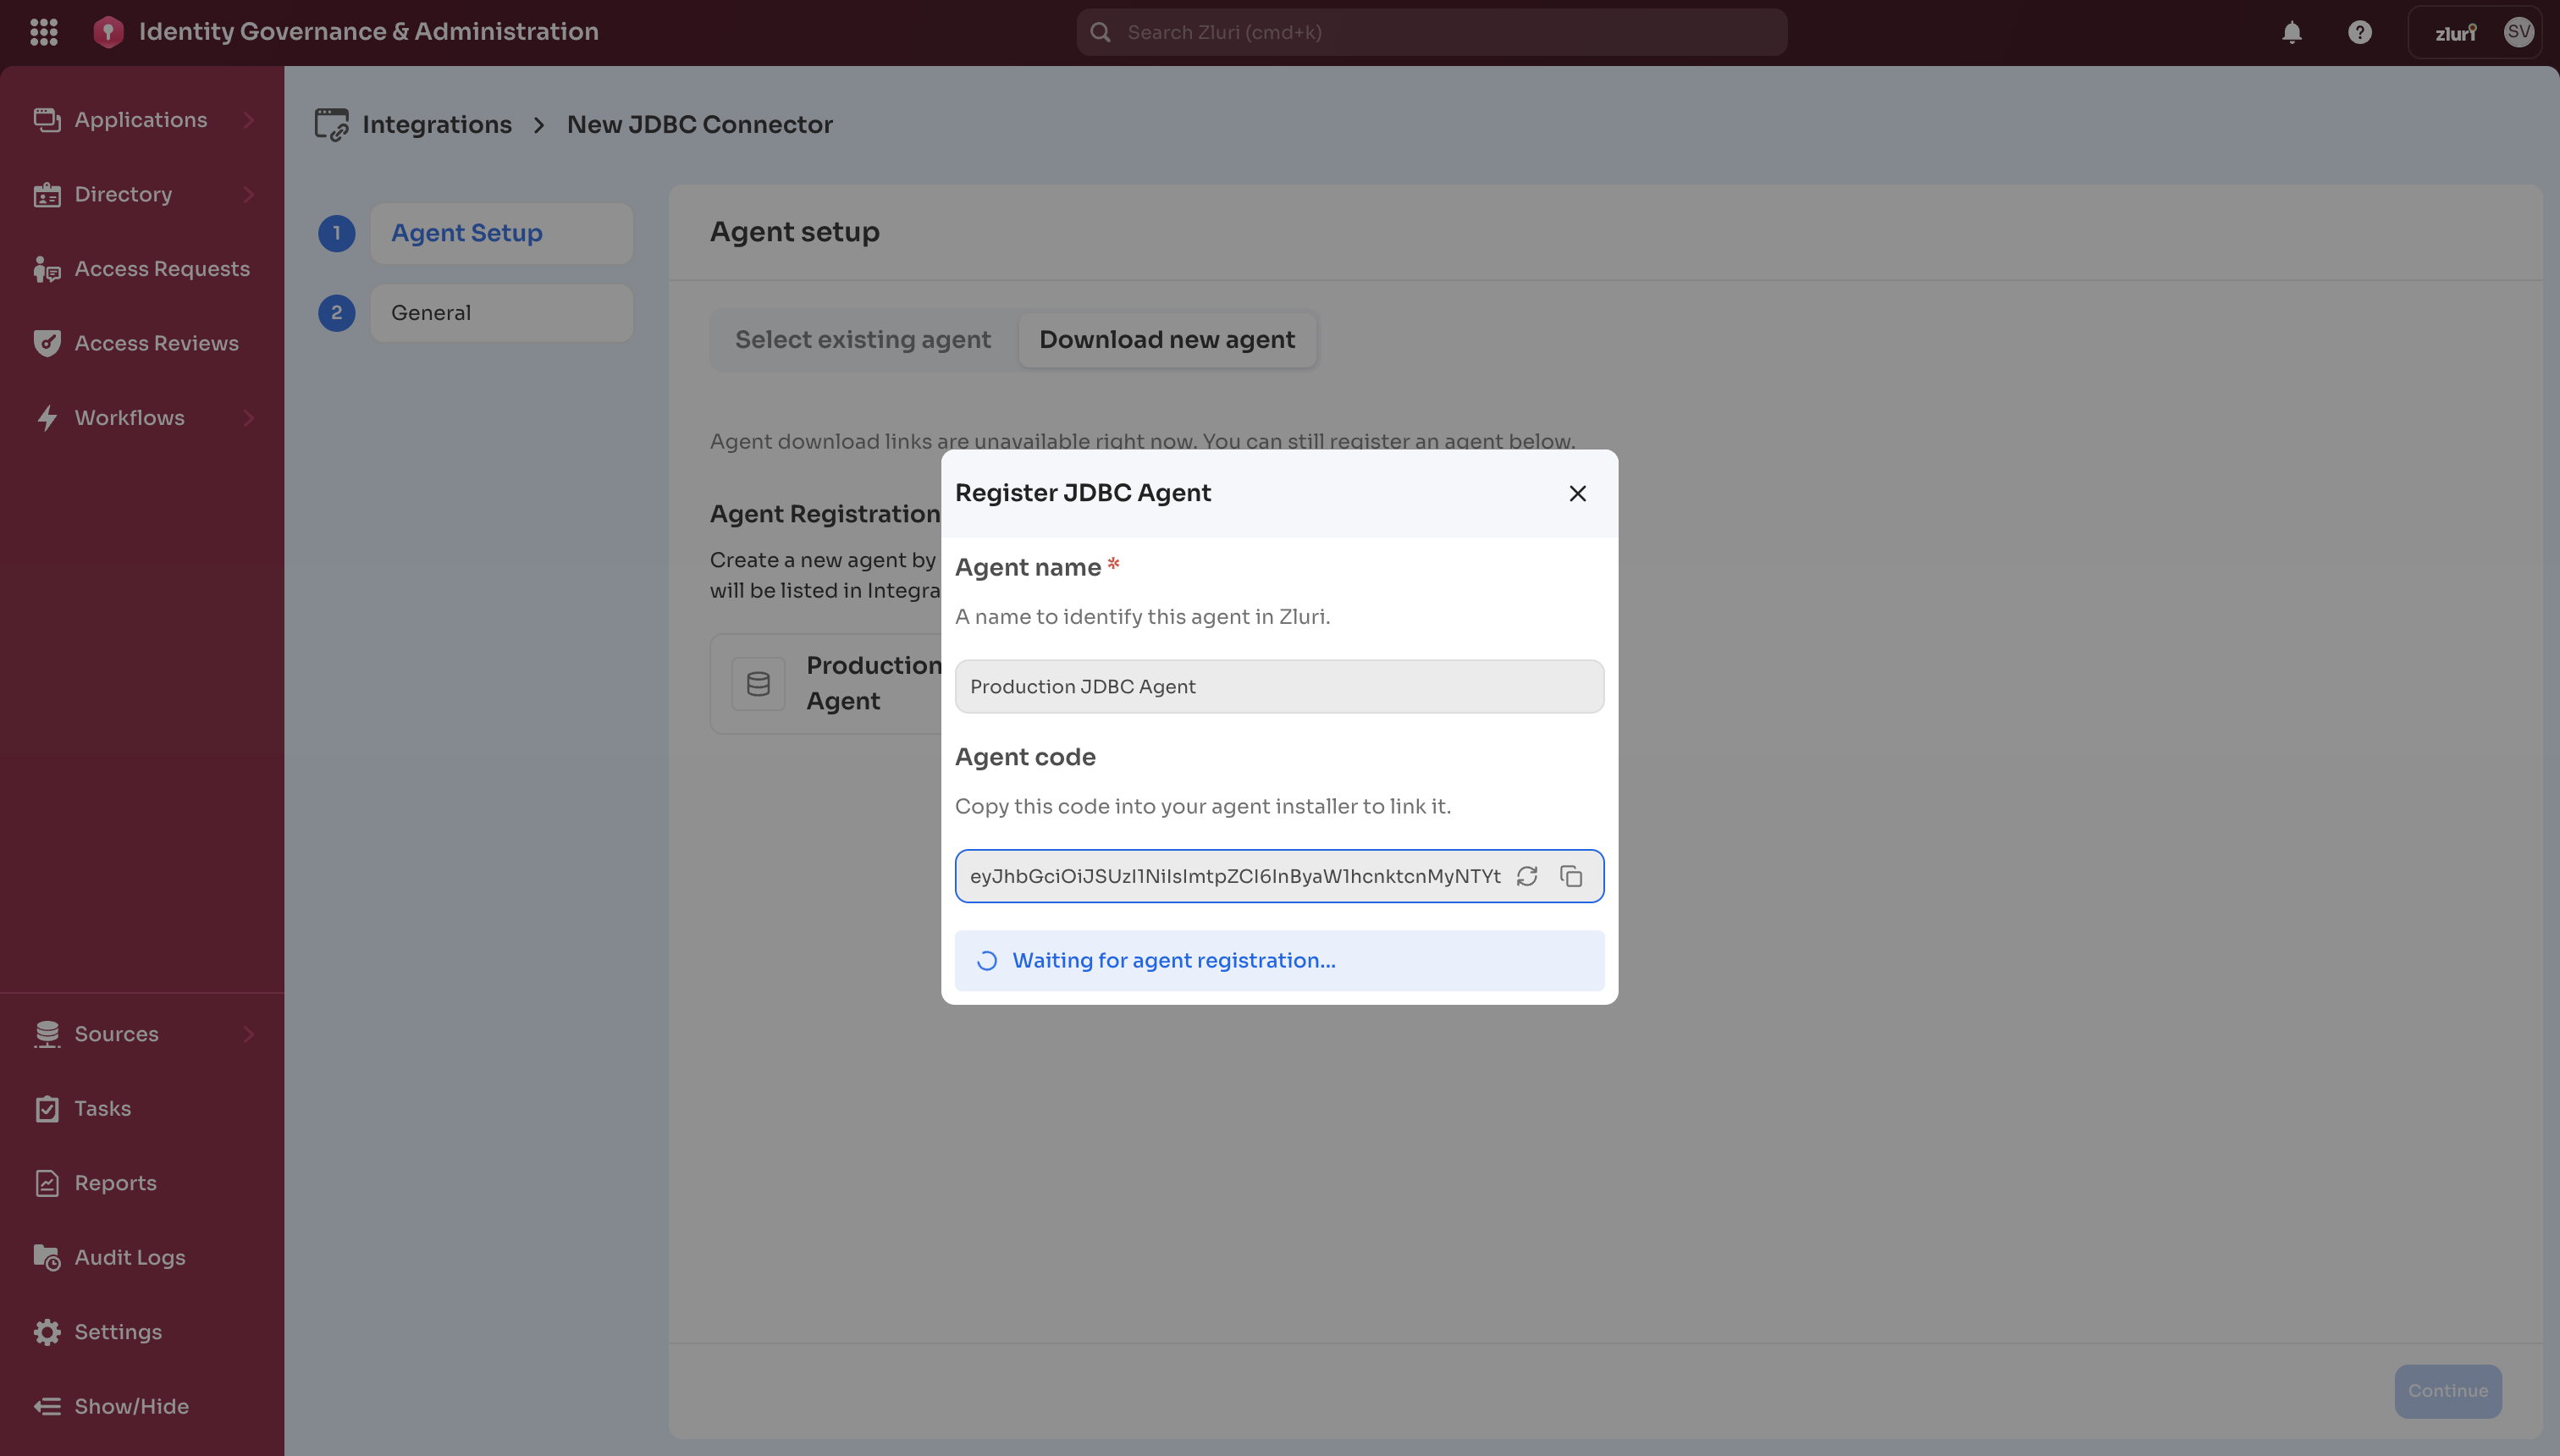
- On the agent, paste it into the token field ("Paste Zluri token here…").
- Select Connect to Zluri.
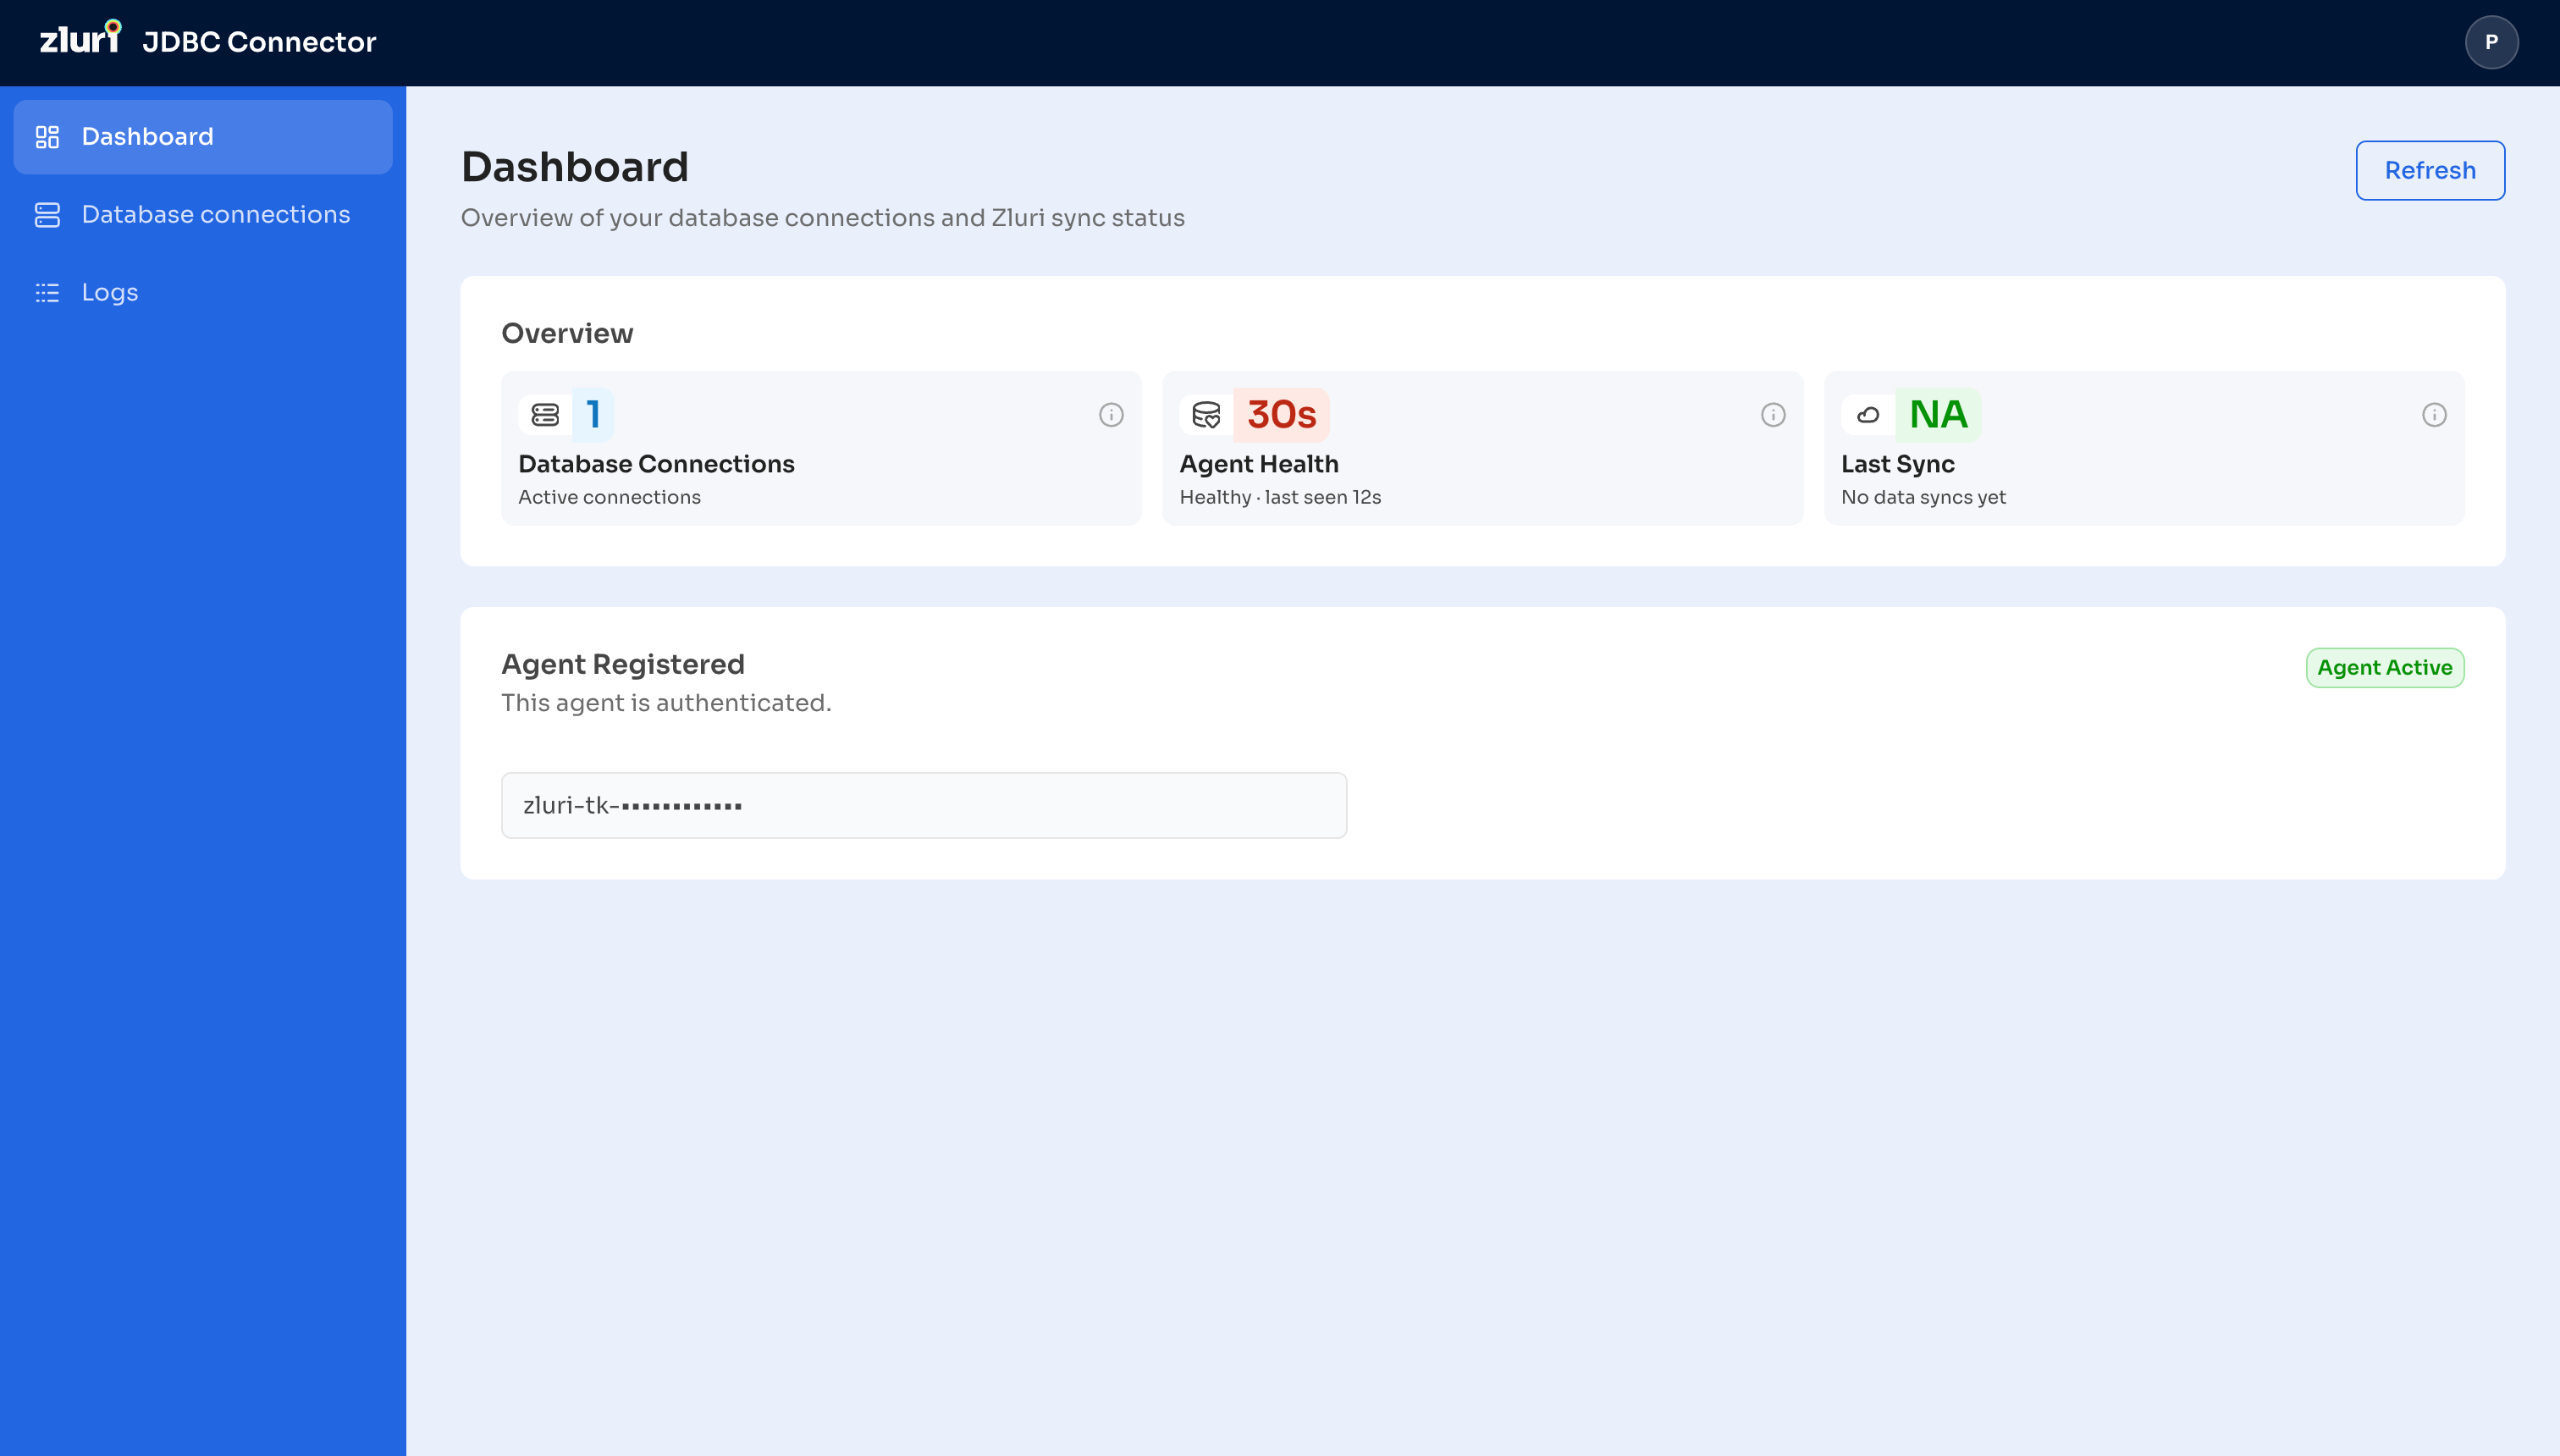
Once connected, the dashboard shows the agent as Active. The Overview cards report the number of database connections, agent health (with the time the agent was last seen), and the last sync. The token is masked for security.
Part 4: Add a database connection
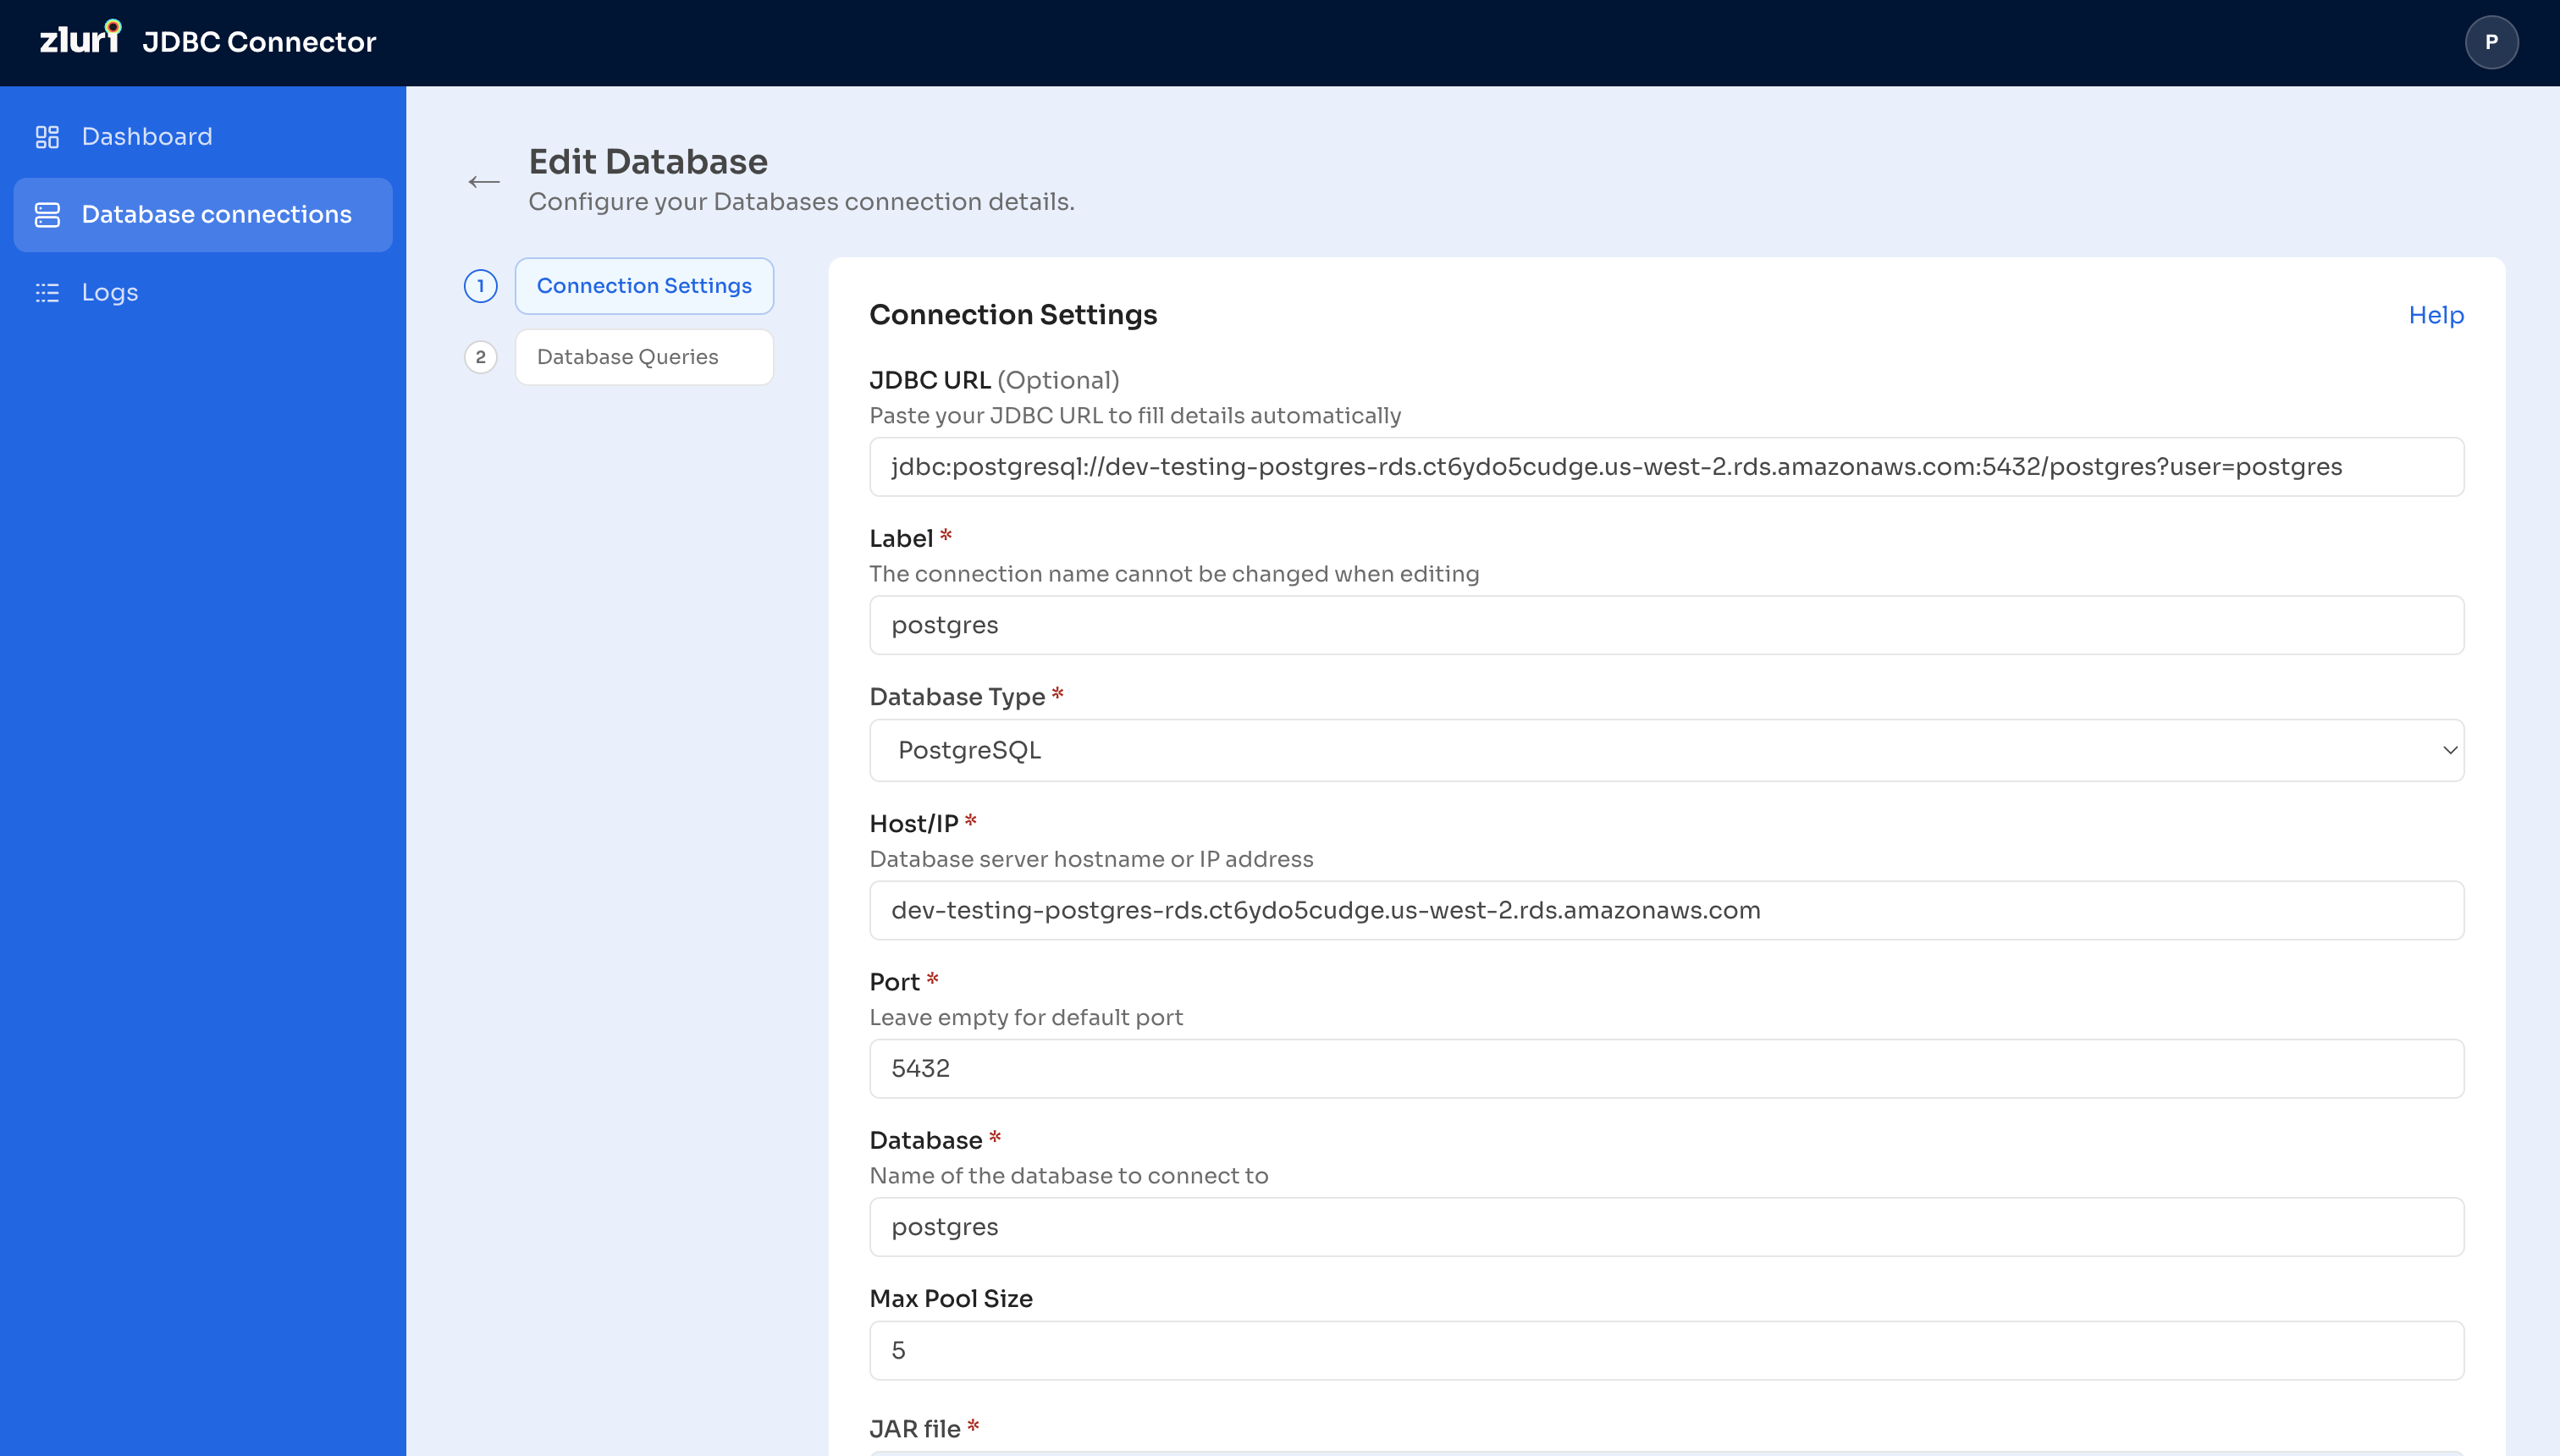
On the agent, select Database connections in the left navigation, then select Add database. Configure the connection across two steps: Connection Settings and Database Queries.
Step 1 — Enter connection settings
The connection settings identify the database and how the agent authenticates to it.
Steps
- (Optional) Paste a JDBC URL to fill the connection details automatically.
- Enter a Label — a friendly name to identify this connection.
- Select the Database Type (for example, PostgreSQL).
- Enter the Host / IP — the database server hostname or IP address.
- Enter the Port. If left empty, the port defaults to the standard port for the selected database type.
- Enter the Database — the name of the database to connect to.
- (Optional) Set the Max Pool Size — the maximum concurrent connections. The default is 5.
- Upload the JAR file — the JDBC driver for your database type. Select Click to upload JAR file.
Under Authentication, enter the Username and Password for the database user. Select the show/hide icon to check the password.
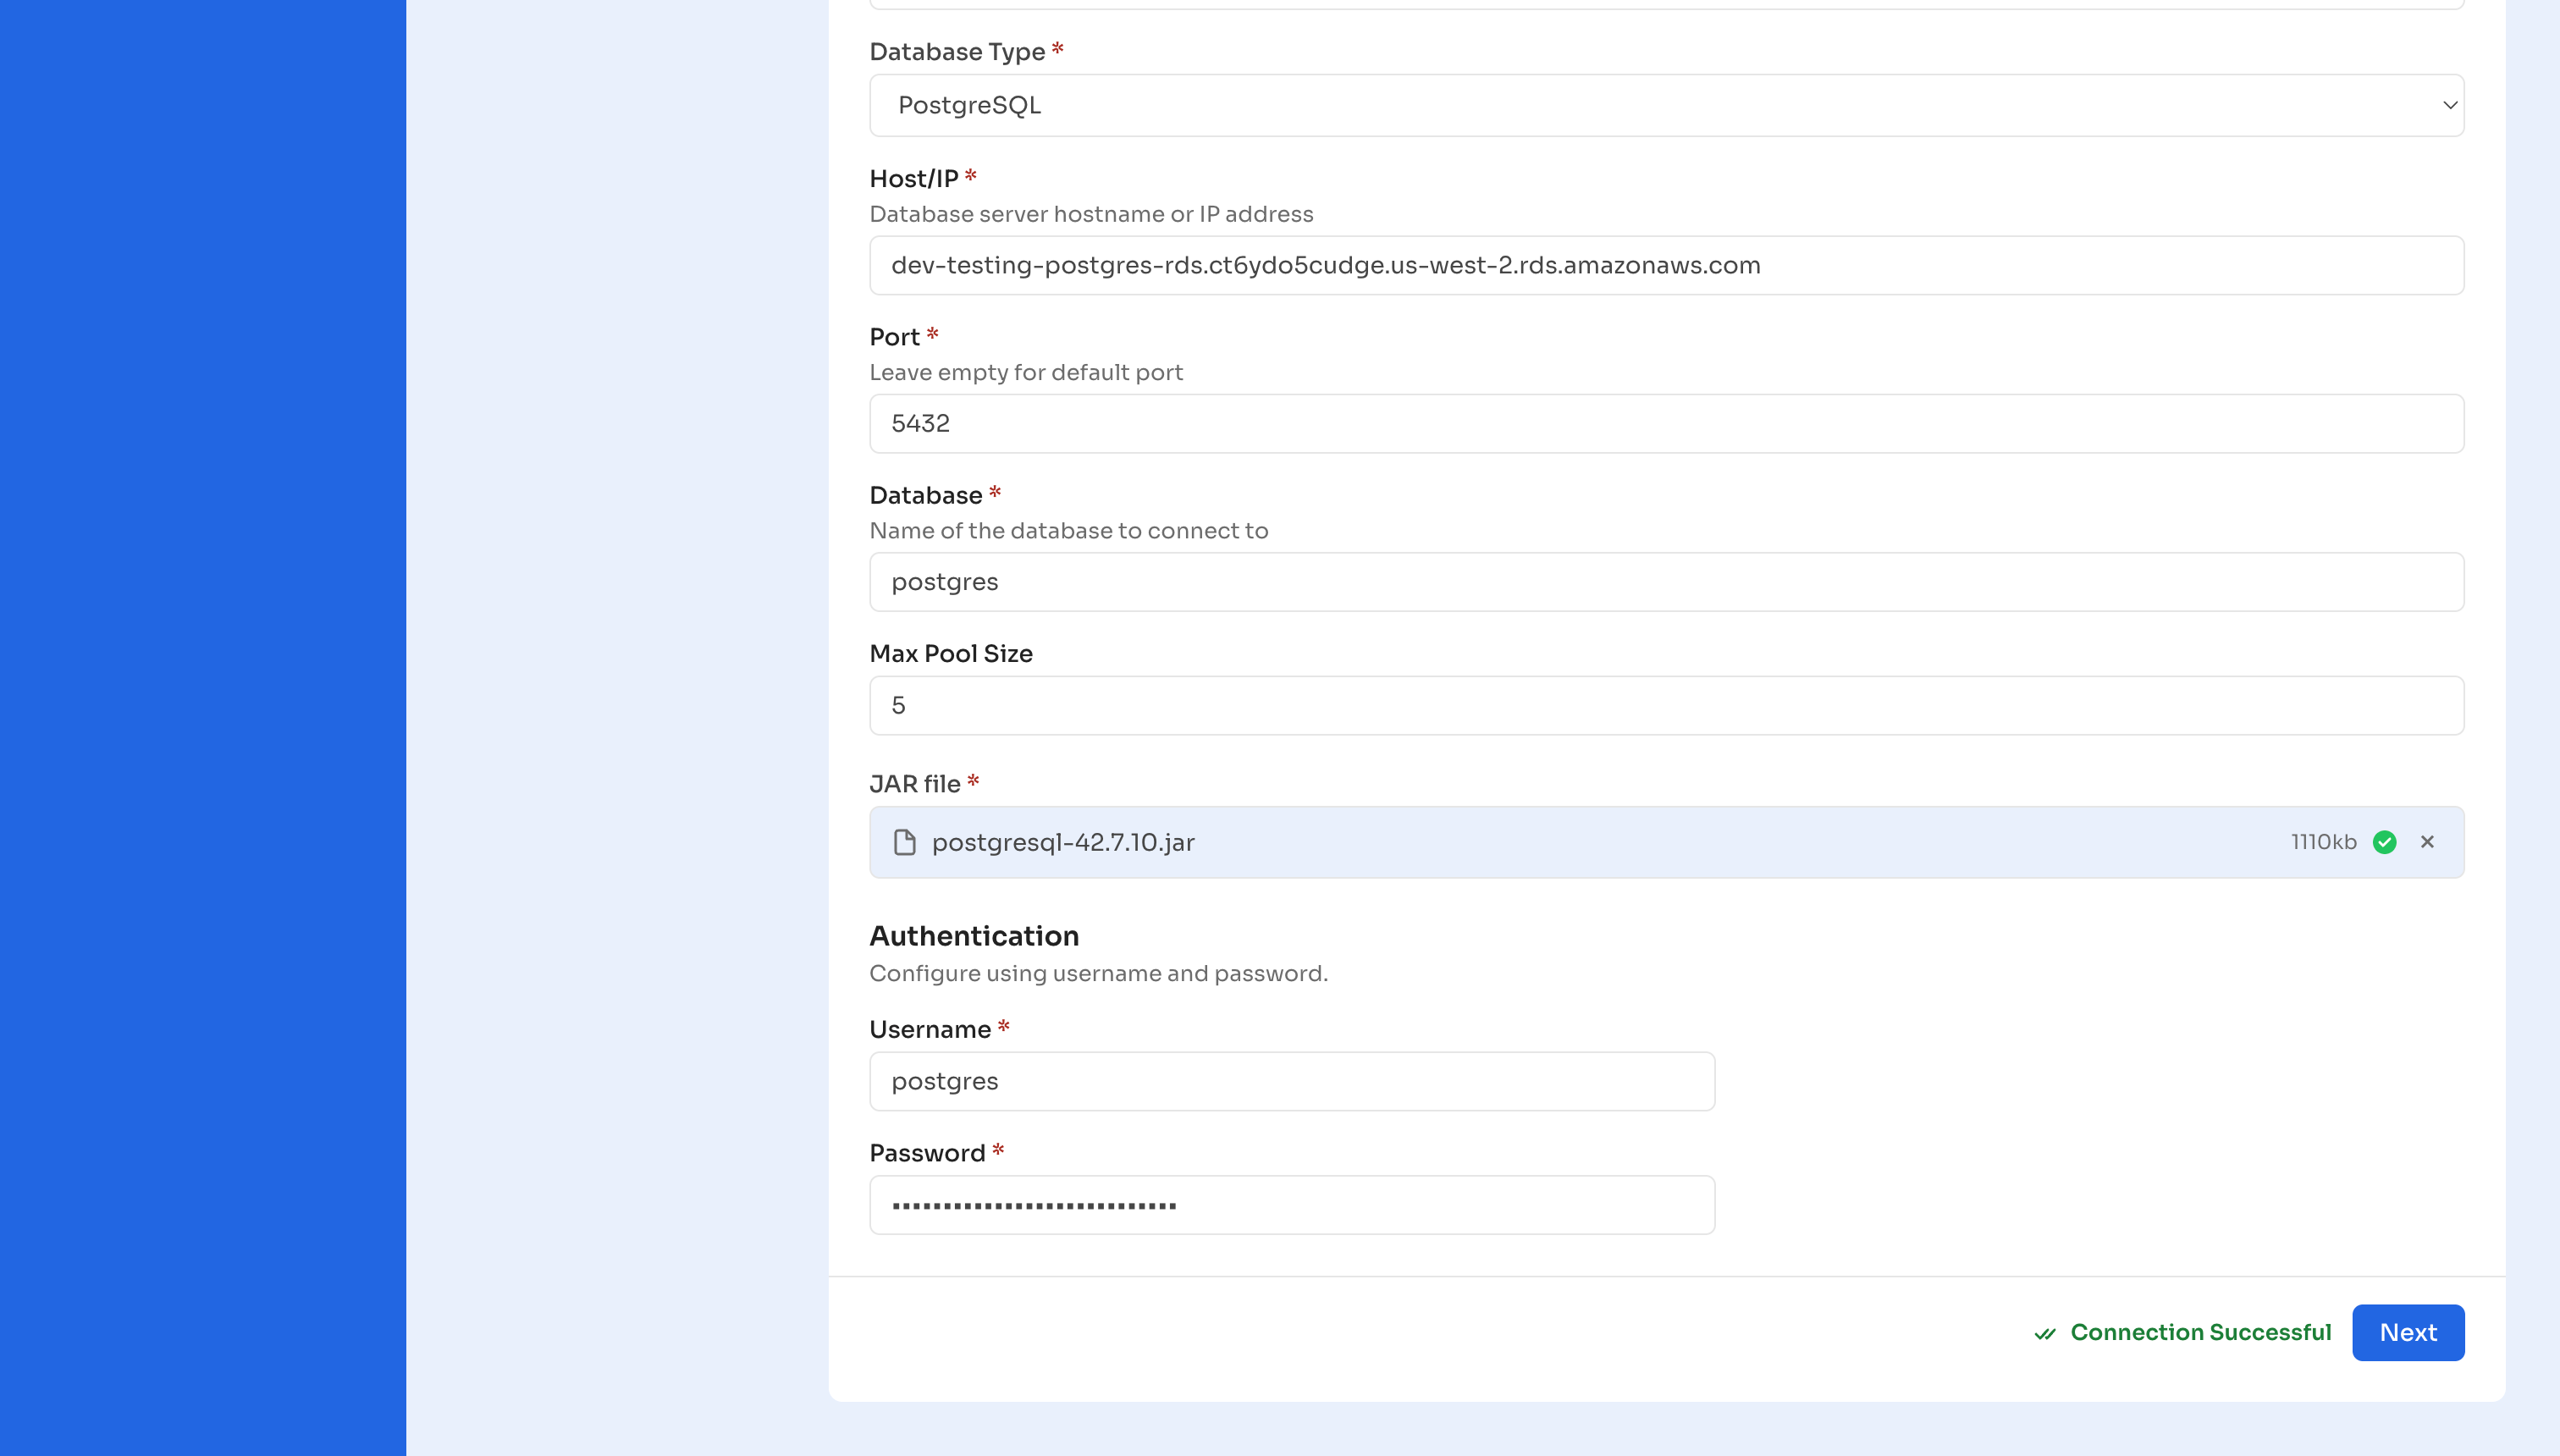
Under Transport security, choose the TLS mode. This encrypts the connection to the database; Zluri recommends enforcing TLS.
The TLS options are described below.
| TLS mode | Meaning |
|---|---|
| Required — enforce TLS | The connection must be encrypted. Recommended. |
| Preferred — TLS if offered | The connection uses TLS when the database offers it, and falls back to plaintext otherwise. |
| Disabled — plaintext | The connection is not encrypted. |
Select Test connection. When the connection succeeds, the page shows Connection Successful. Select Next to continue to queries.
If the connection fails, Zluri shows the reason — for example, Connection failed: Incorrect username or password for "postgres". Correct the details and test again.
Step 2 — Add the queries the database will expose
On the Database Queries step, add the queries this database will expose. You'll map each query to a Zluri entity when you set up the connector in Zluri (Part 5).
The right-hand Database Tables panel lists the tables the agent can see. Search the panel to find a table, and expand a row to view its columns.
Steps
- Select Add query.
- Enter a Query name — this must be unique across all database connections.
- Enter the Query — the SQL statement the agent runs.
- Select Preview to run the query and see the top 100 rows returned.
- Select Save query.
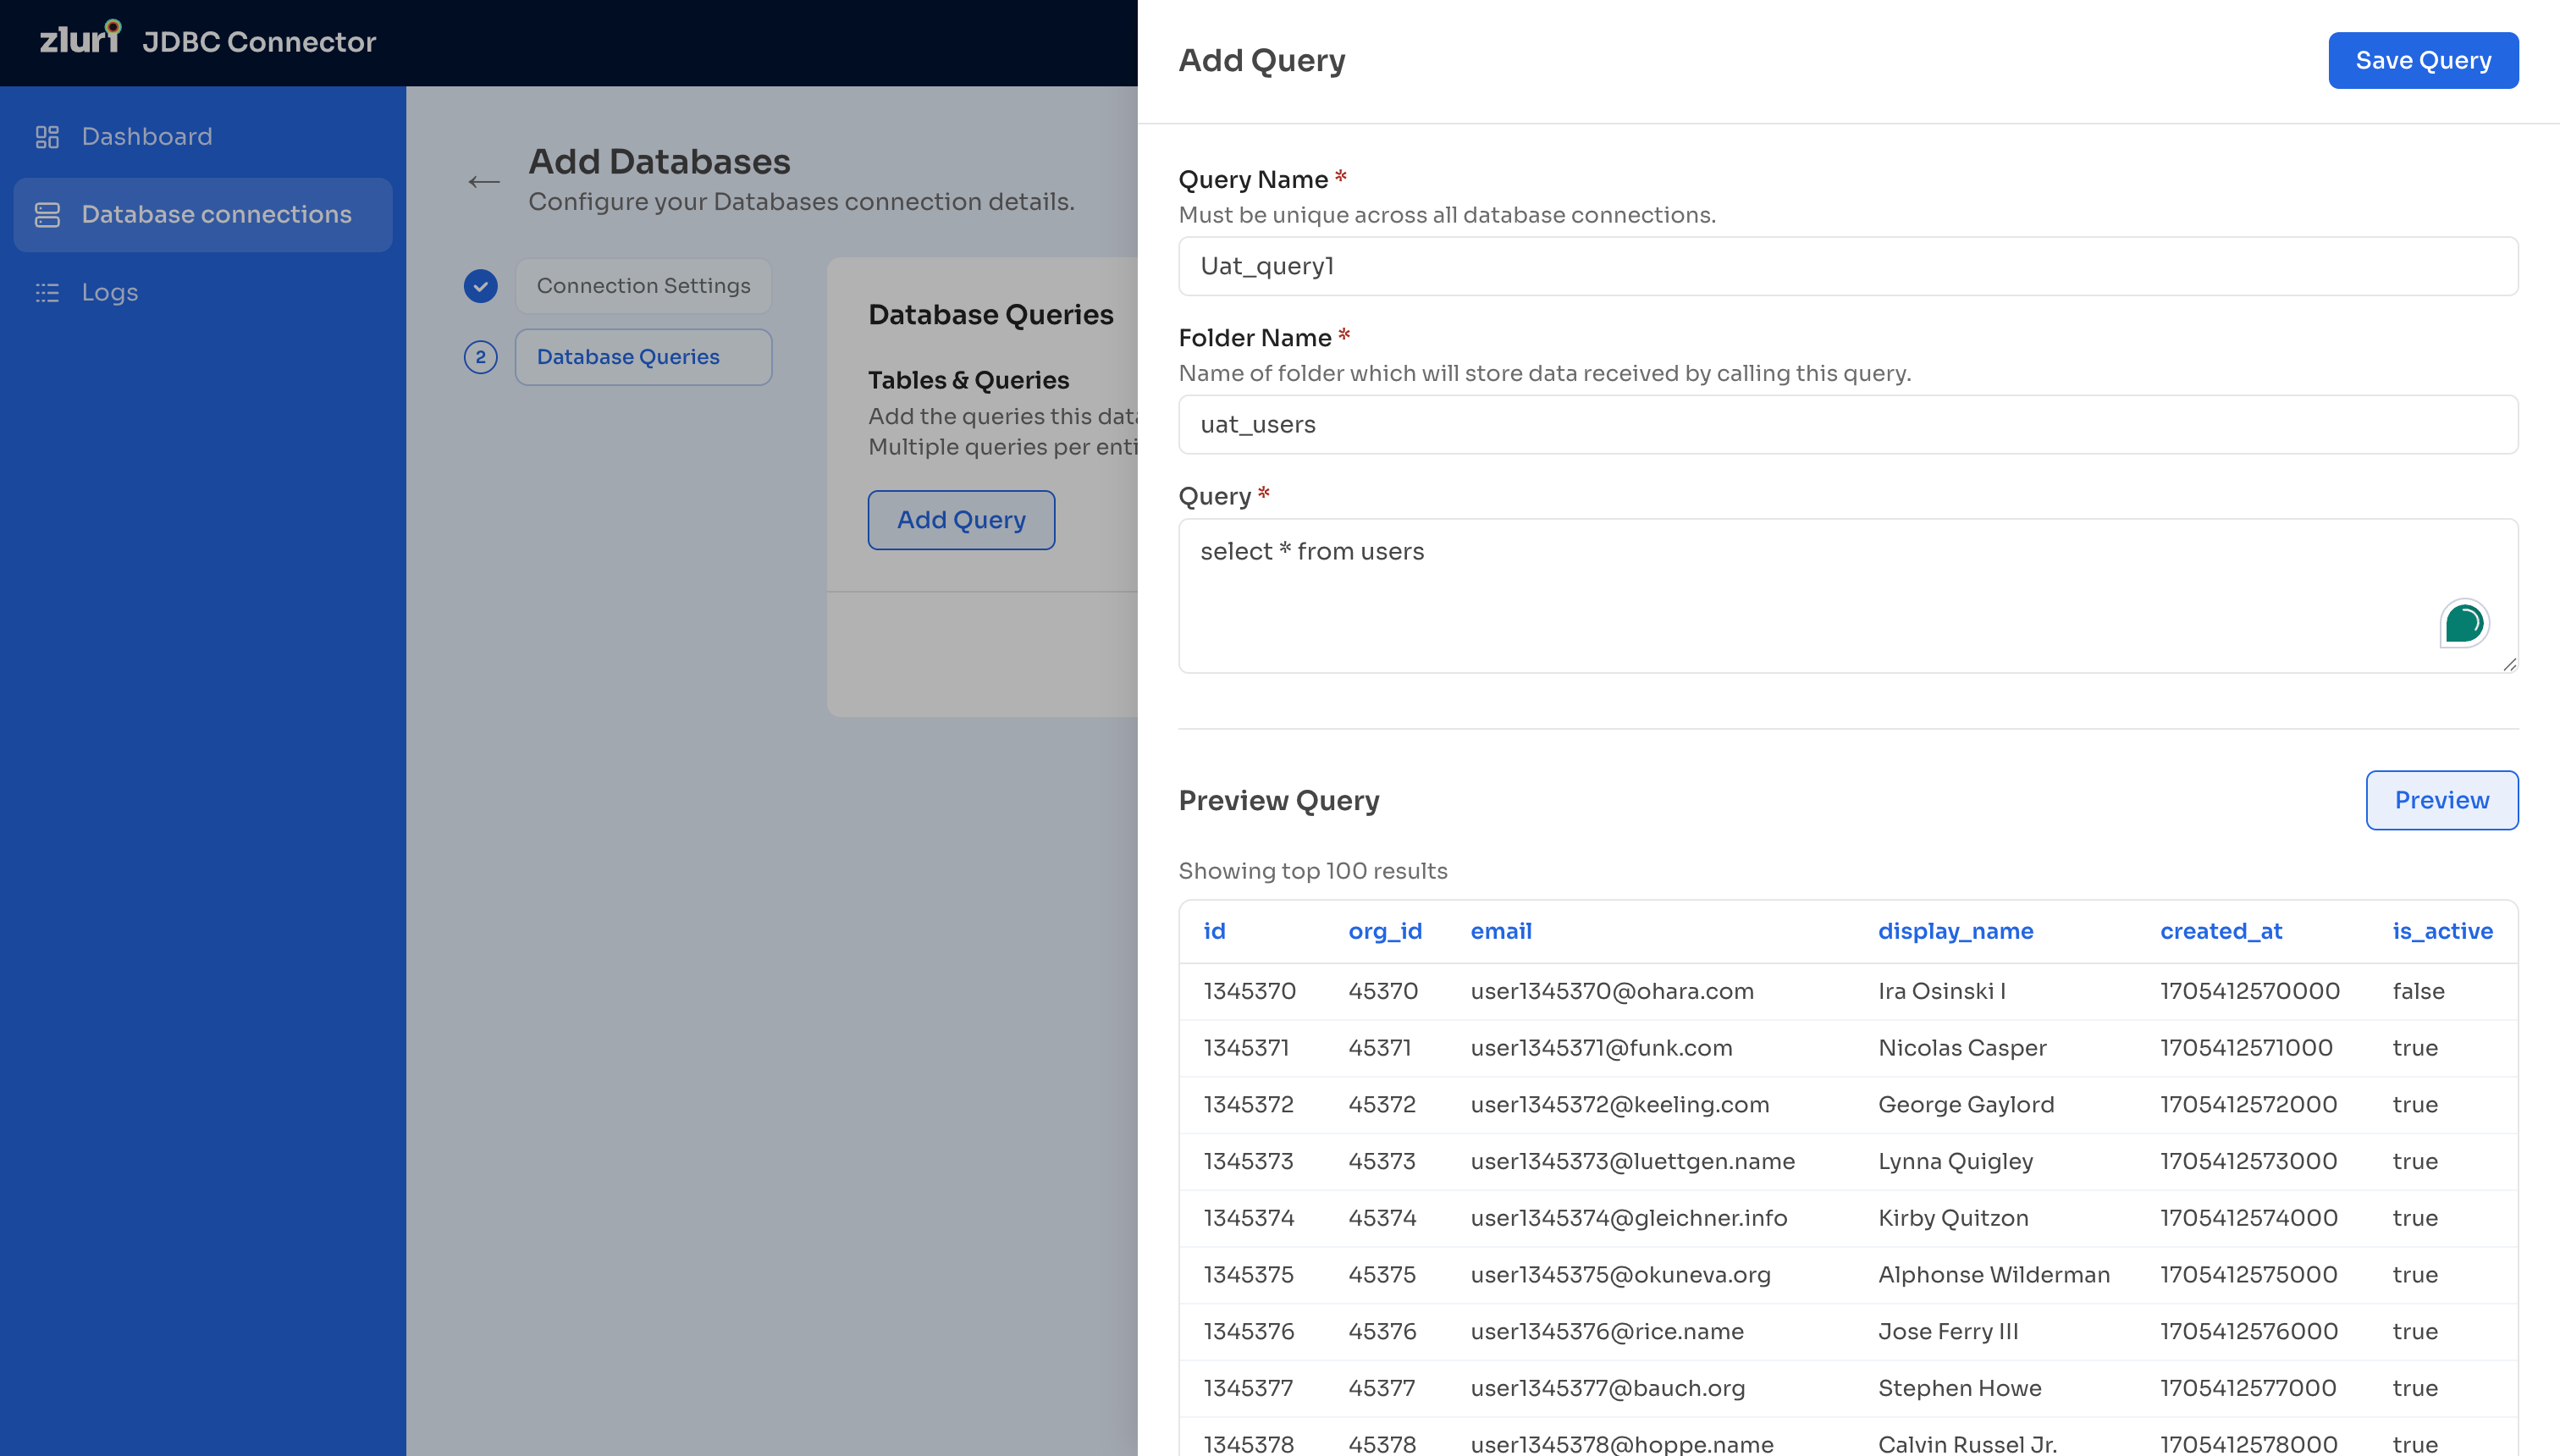
Saved queries appear in the queries list with a Valid status once they pass validation. Use the edit and delete icons to manage a query. Deleting a query asks you to confirm before removing it.
Step 3 — Save the connection
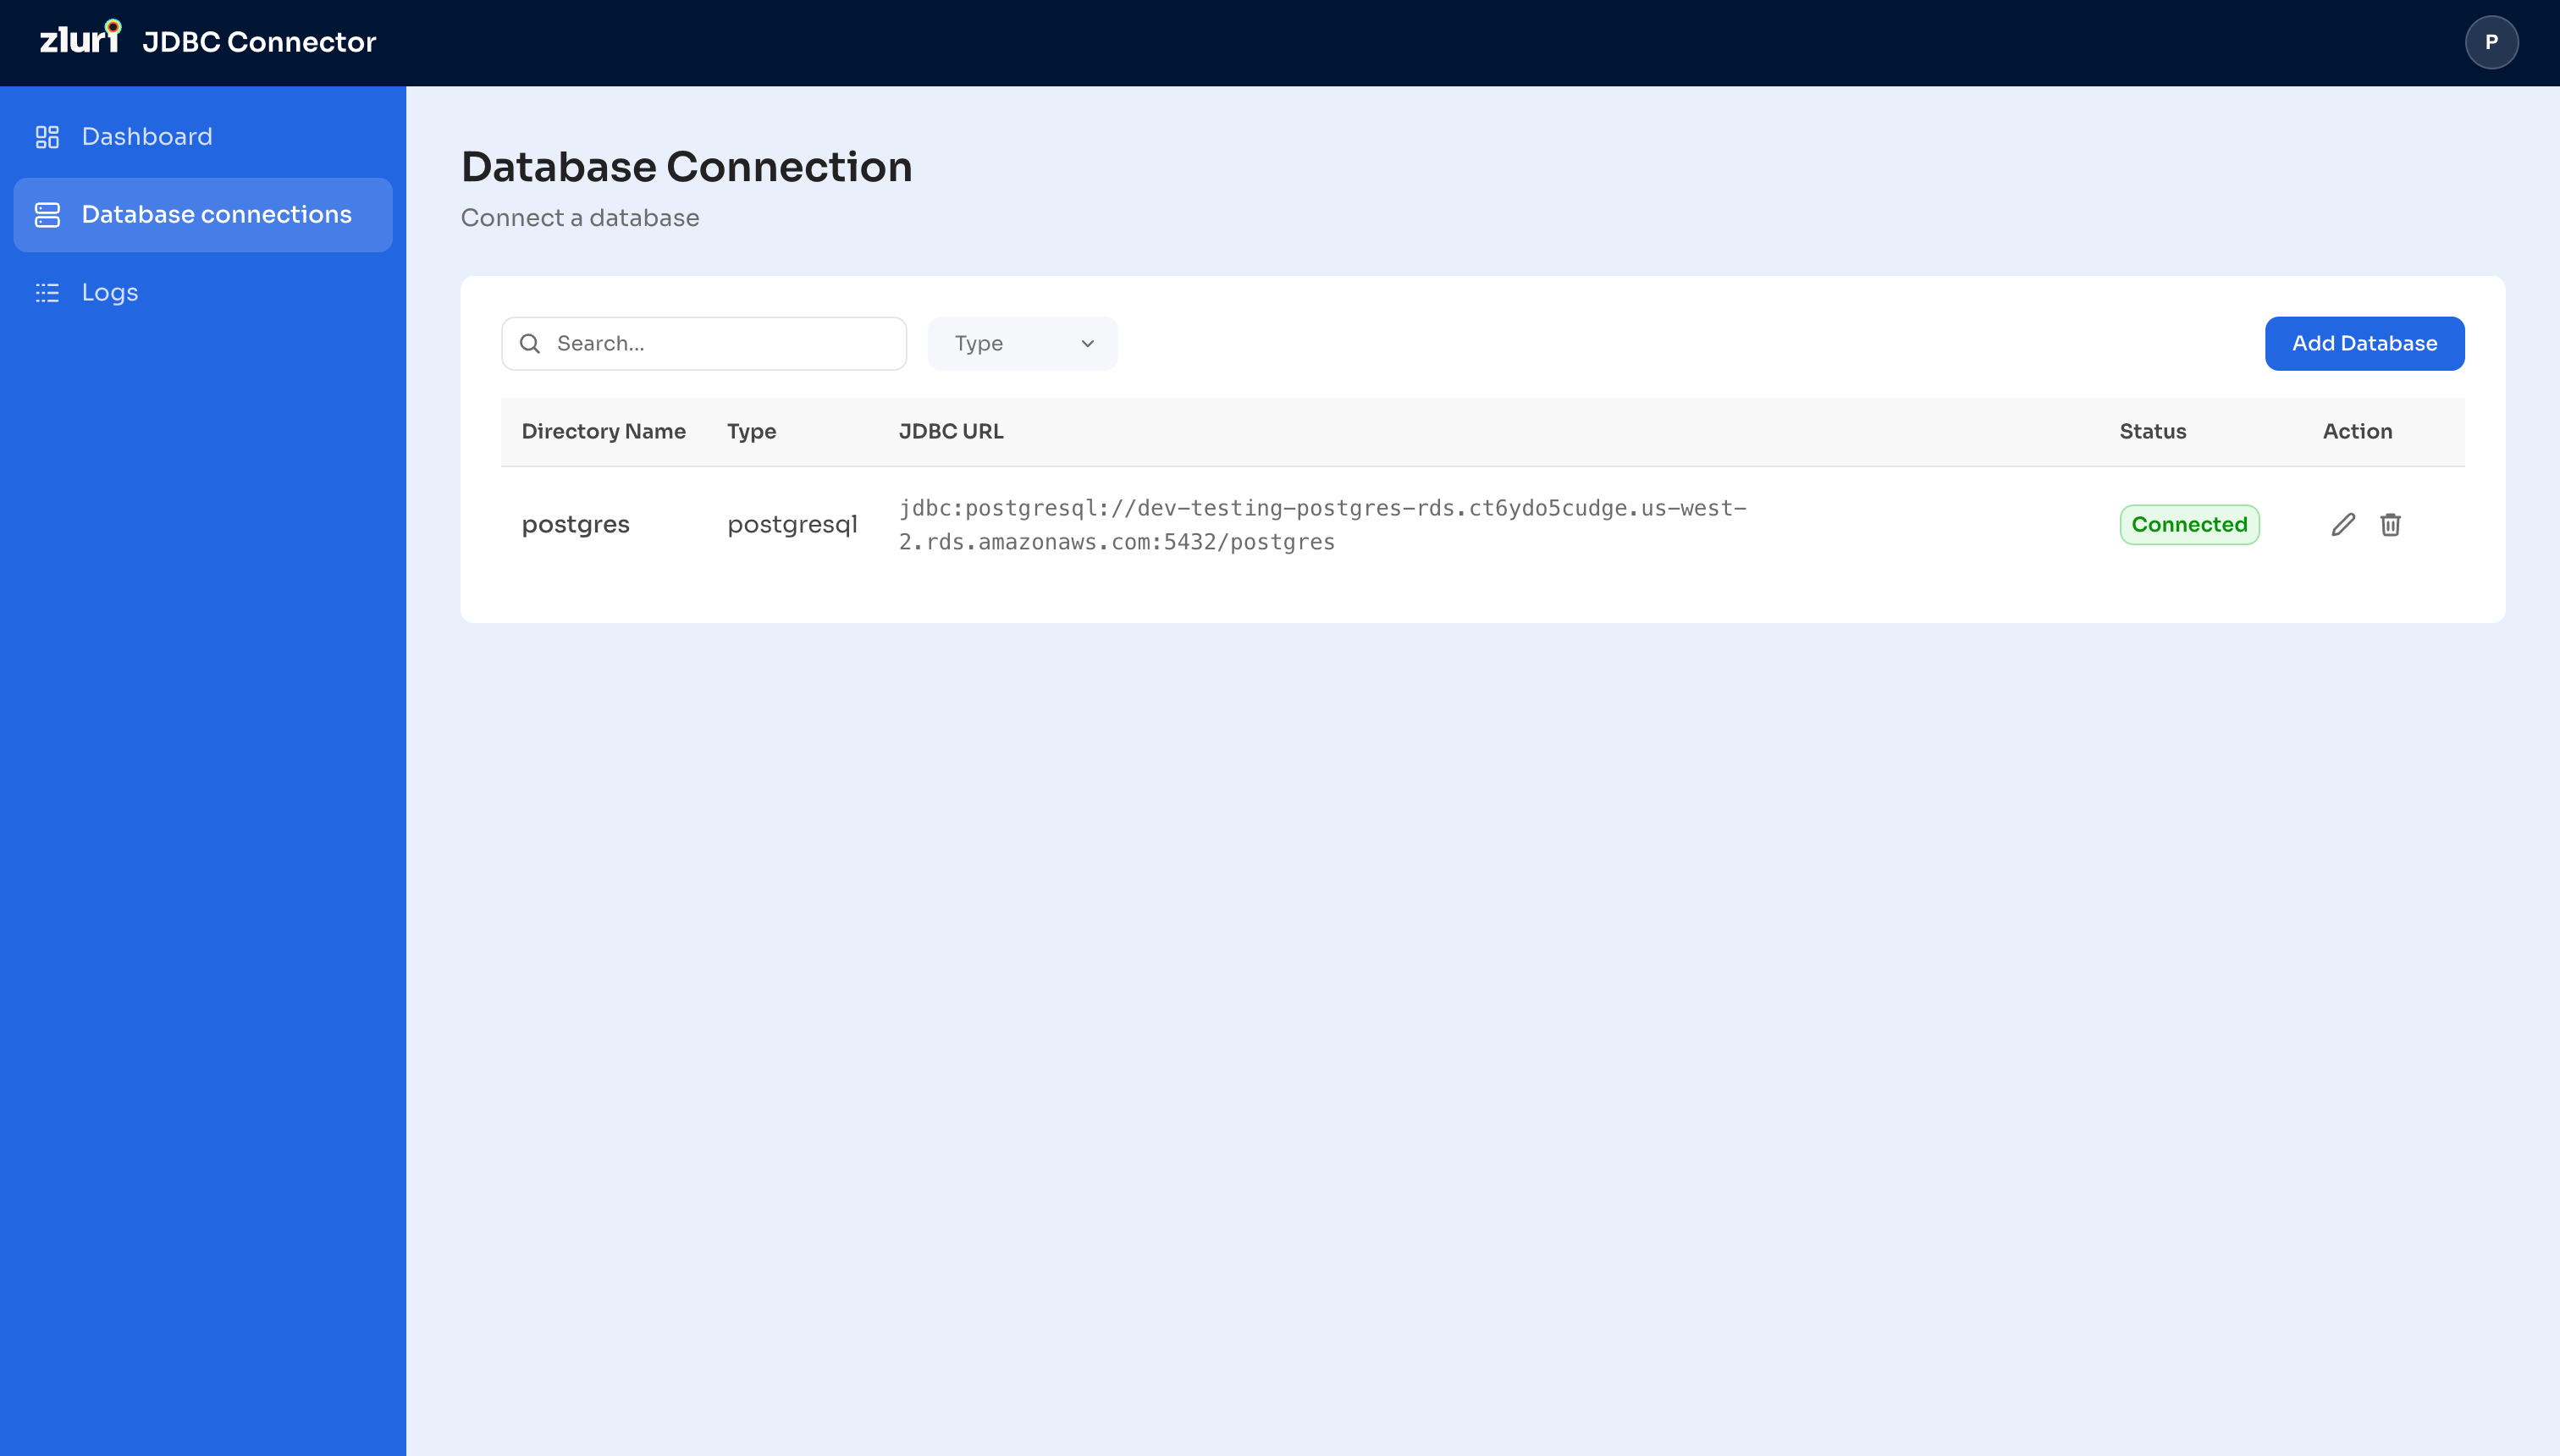
Select Save. The new connection appears in the Database connections list with its label, type, and status. Configuration changes are recorded in the agent's Logs.
Part 5: Configure the connector in Zluri
Return to the Zluri platform and continue in New JDBC Connector. If you left after Part 1, reopen the connector; the agent you set up is now available. This part opens on the General step.
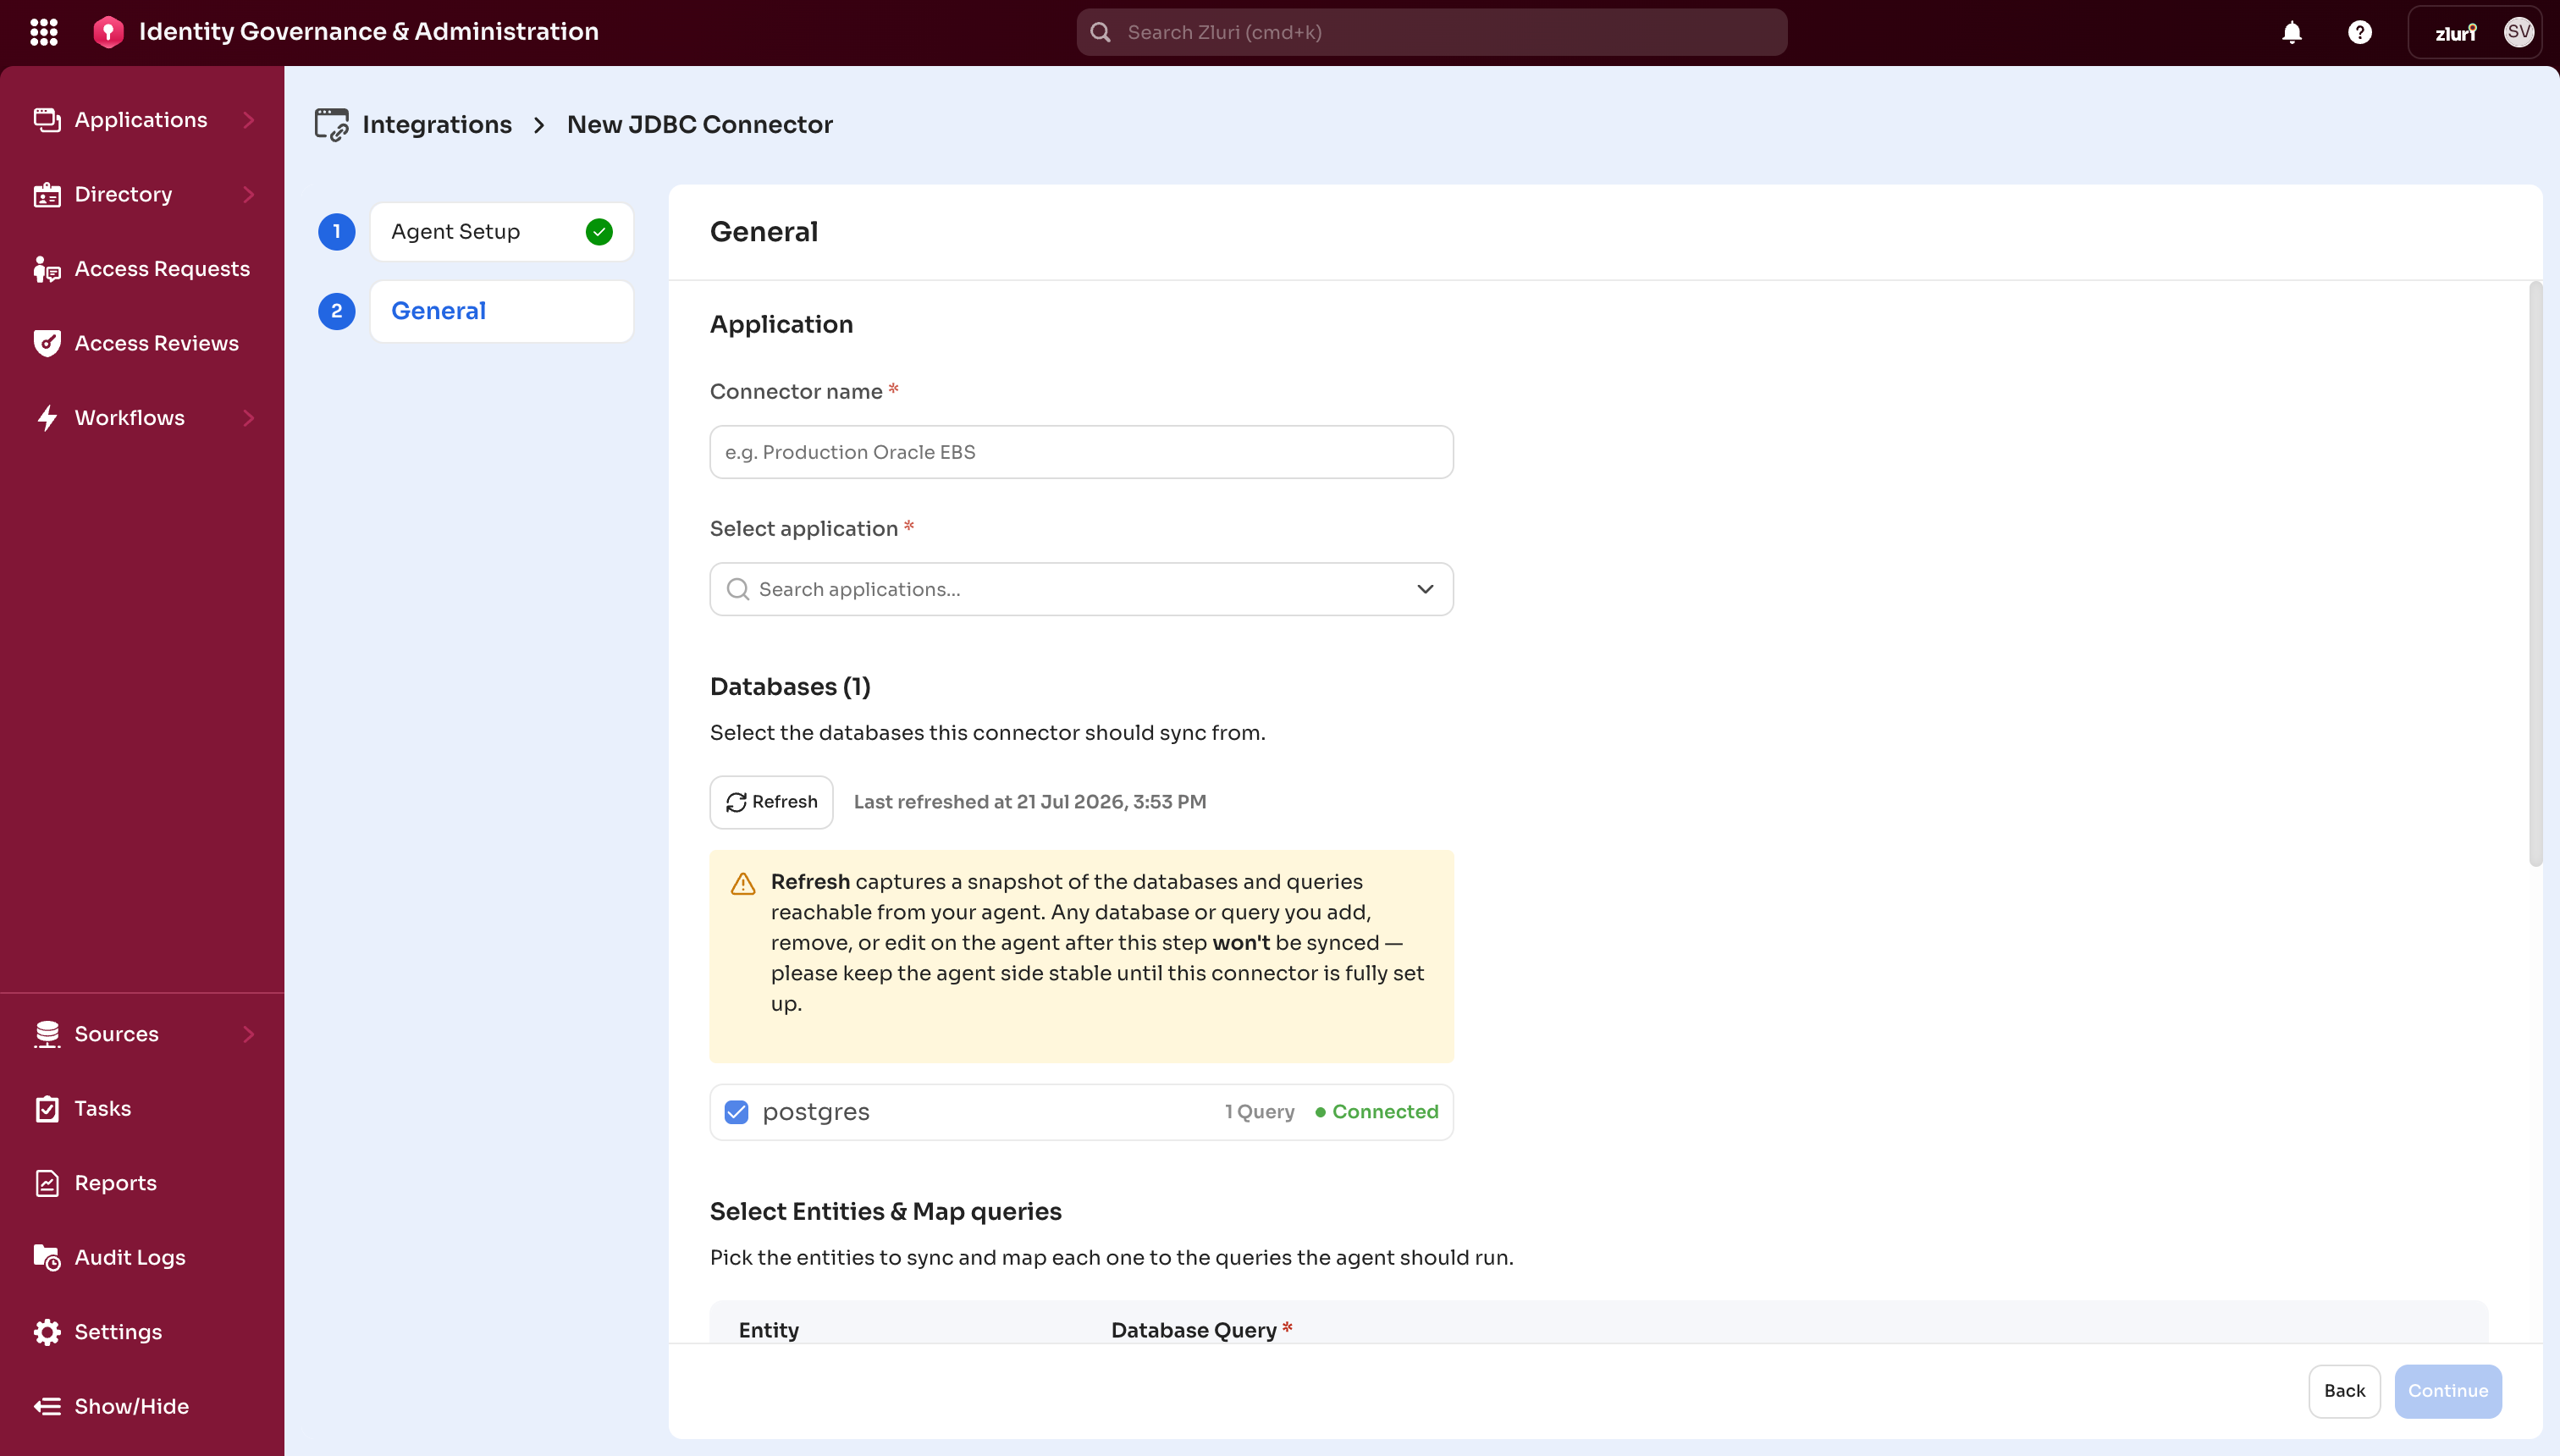
Step 1 — Name the connector and select the application
On the General step, fill in the top section.
Steps
- Enter a Connector name — a name to identify this connector in Zluri (for example, Production Oracle EBS).
- Under Select application, search for and select the application this connector represents.
Step 2 — Select the database and refresh the snapshot
Under Databases, select the database this connector should sync from. The list shows each database the agent has registered, with its query count and connection status.
Select Refresh to capture a current snapshot of the databases and queries reachable from your agent. The page shows when the snapshot was last captured.
Keep the agent stable during setup. Refresh captures a snapshot of the databases and queries reachable from your agent. Any database or query you add, remove, or edit on the agent after this step won't be included in this connector's setup. Keep the agent side stable until this connector is fully set up.
Step 3 — Select entities and map queries
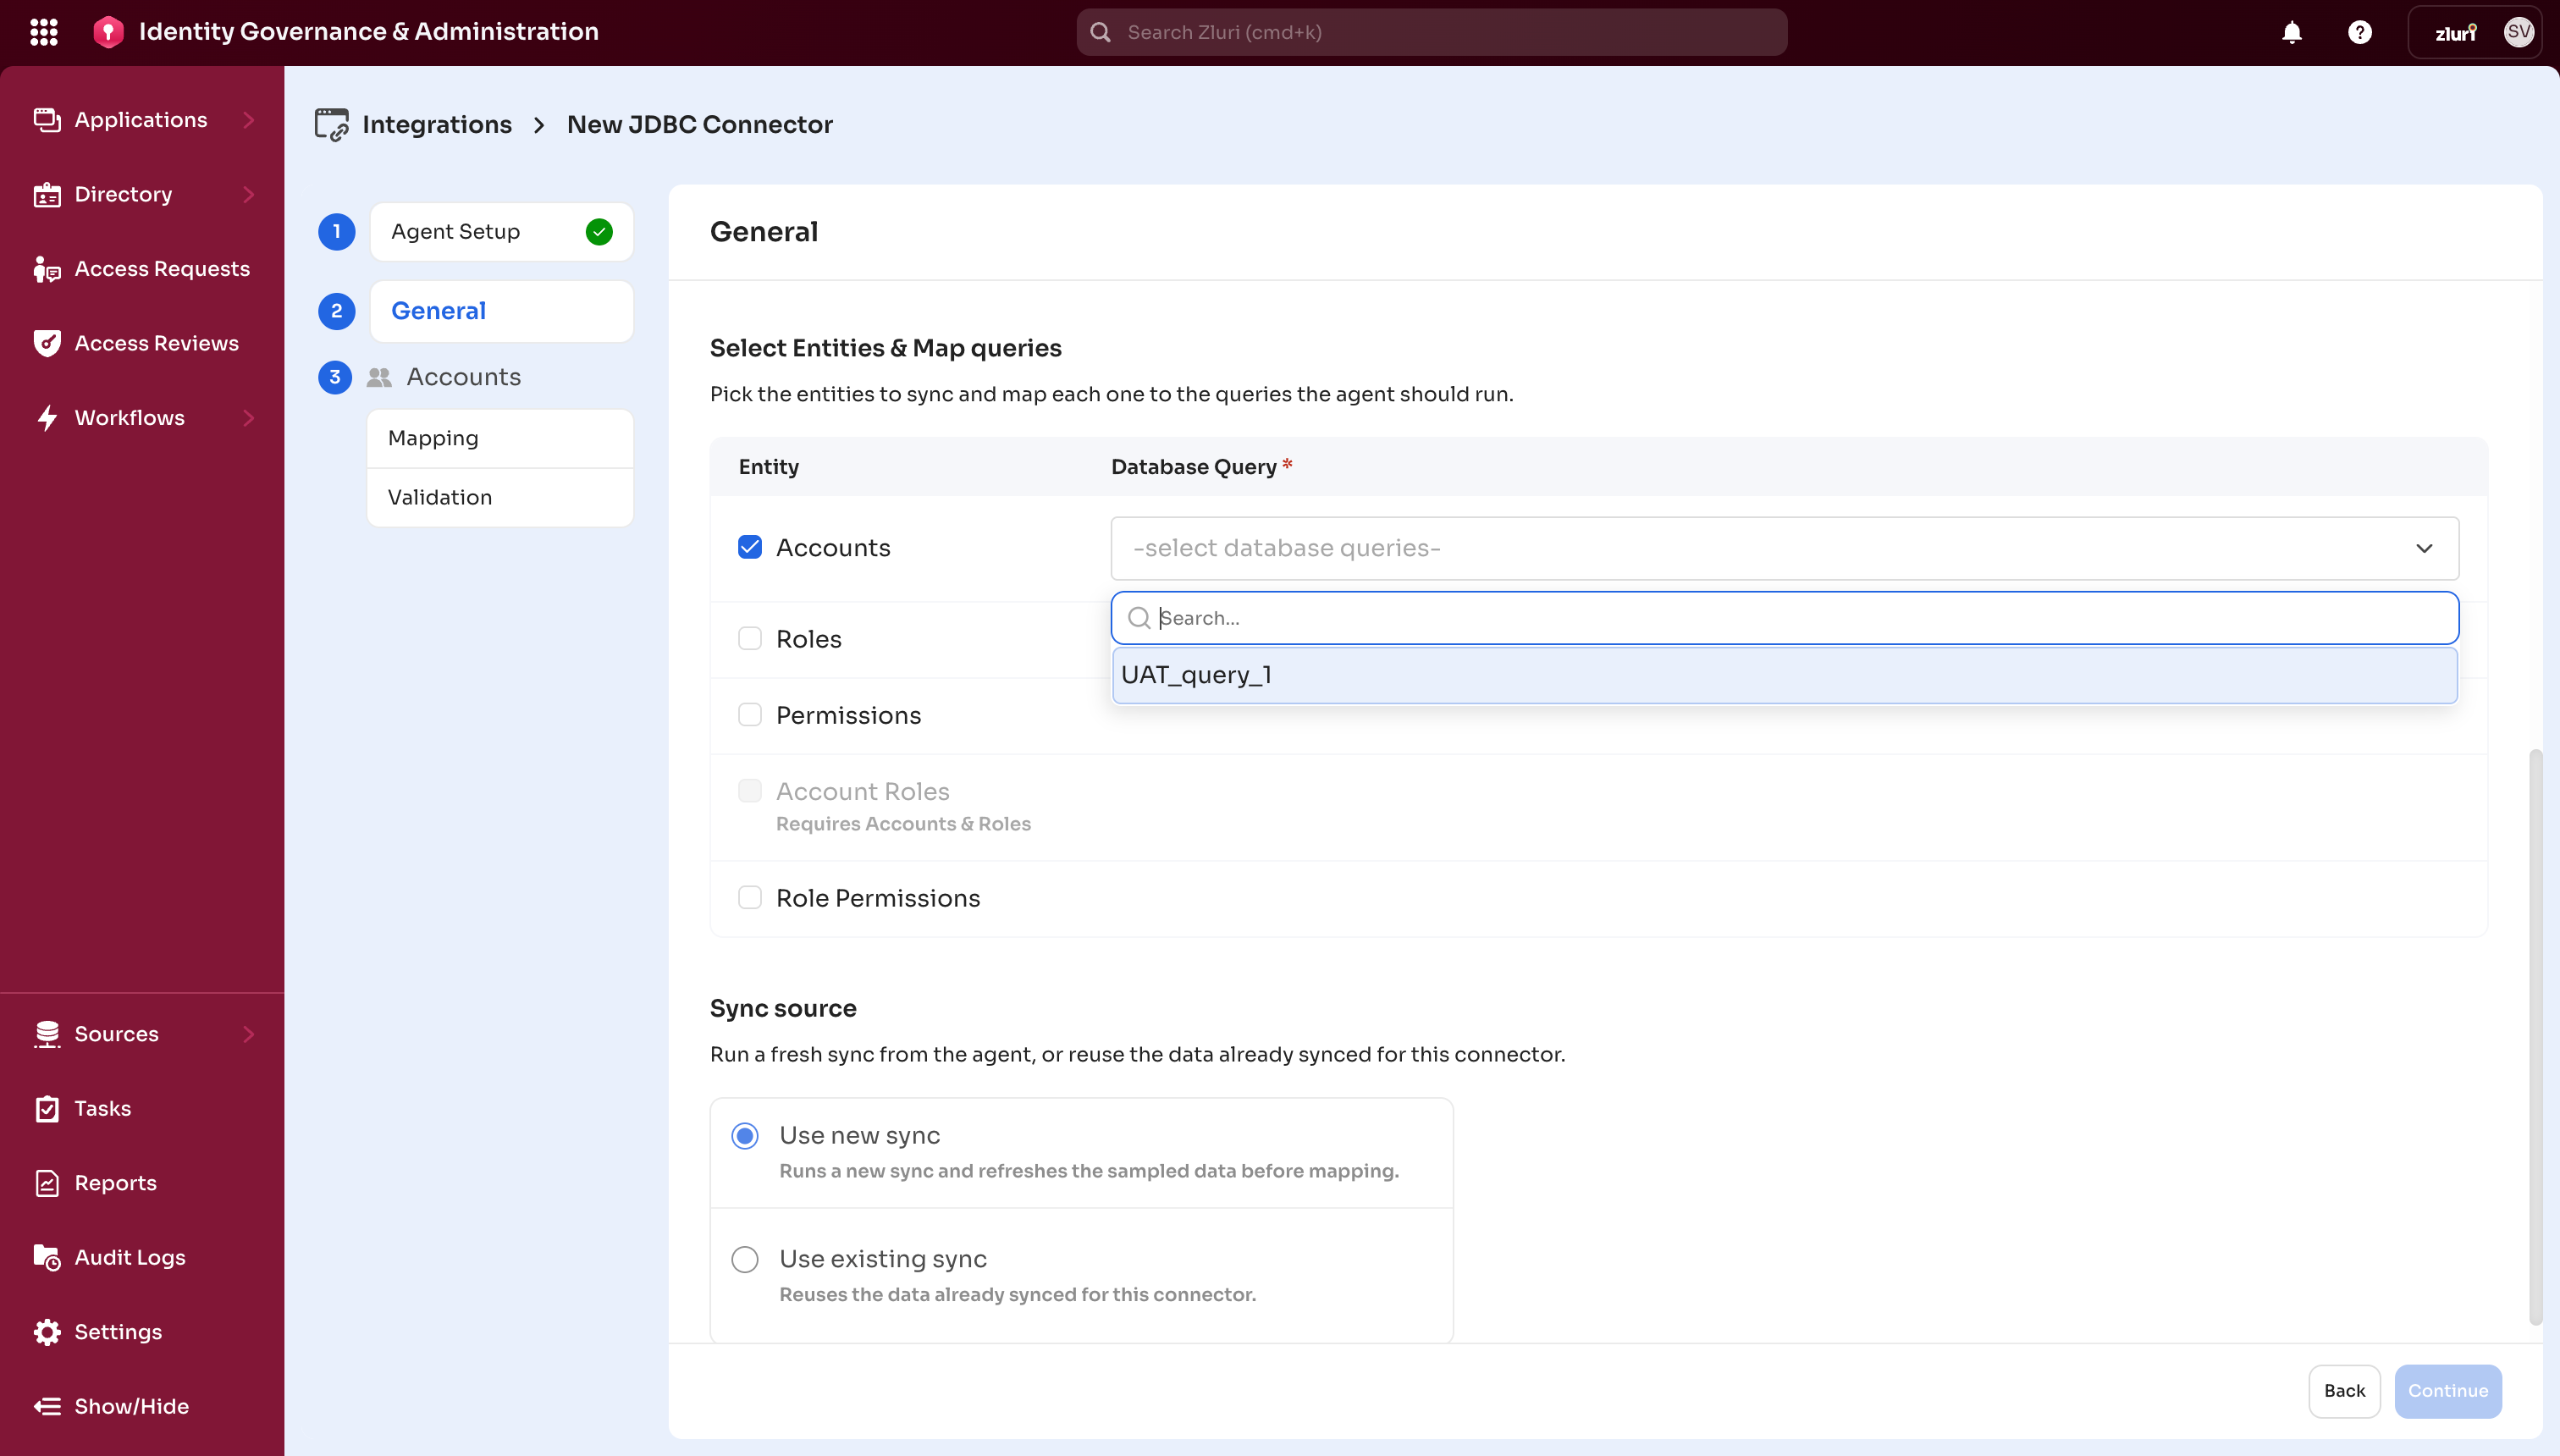
Under Select entities & map queries, choose the entities to sync and map each one to the query the agent should run.
Steps
- Select the entities you want to sync: Accounts, Roles, Permissions, Account Roles, or Role Permissions.
- For each selected entity, open the Database Query dropdown and select the query that feeds it. Search by query name to filter the list.
The query is defined and named on the agent (Part 4); here you map it to the Zluri entity it feeds.
Some entities depend on others. Account Roles requires both Accounts and Roles to be selected, and Role Permissions requires both Roles and Permissions. Dependent entities stay disabled until their prerequisites are selected.
Step 4 — Choose the source data
Under Source data, choose the data to map against.
The Use the current snapshot option maps against the snapshot captured on refresh in Step 2. This is the default and the fastest path — it runs no new fetch. Choose Fetch a new snapshot only if the database or queries changed since the last refresh; this pulls fresh data from the agent and can take a few minutes.
Select Continue to move to mapping.
Part 6: Map fields and validate
With entities mapped, configure the field mapping for each entity and validate the data before the connector goes live. Each entity has a Mapping step and a Validation step.
Step 1 — Map fields
On the Mapping step for an entity, map fields from your database to Zluri fields. Only selected and mapped fields are imported.
Each row pairs a Zluri field with a database field. Required Zluri fields are marked with an asterisk. For each field:
- Select the source type — a direct database column or an advanced expression.
- For a database column, open the dropdown and select the column to map.
- For an advanced expression, select the expand icon to open Edit advanced expression, enter the expression (for example,
$string(id)), select Preview to check the result, and select Save.
Where a Zluri field takes a fixed set of values, select Map values to map each database value to the corresponding Zluri value.
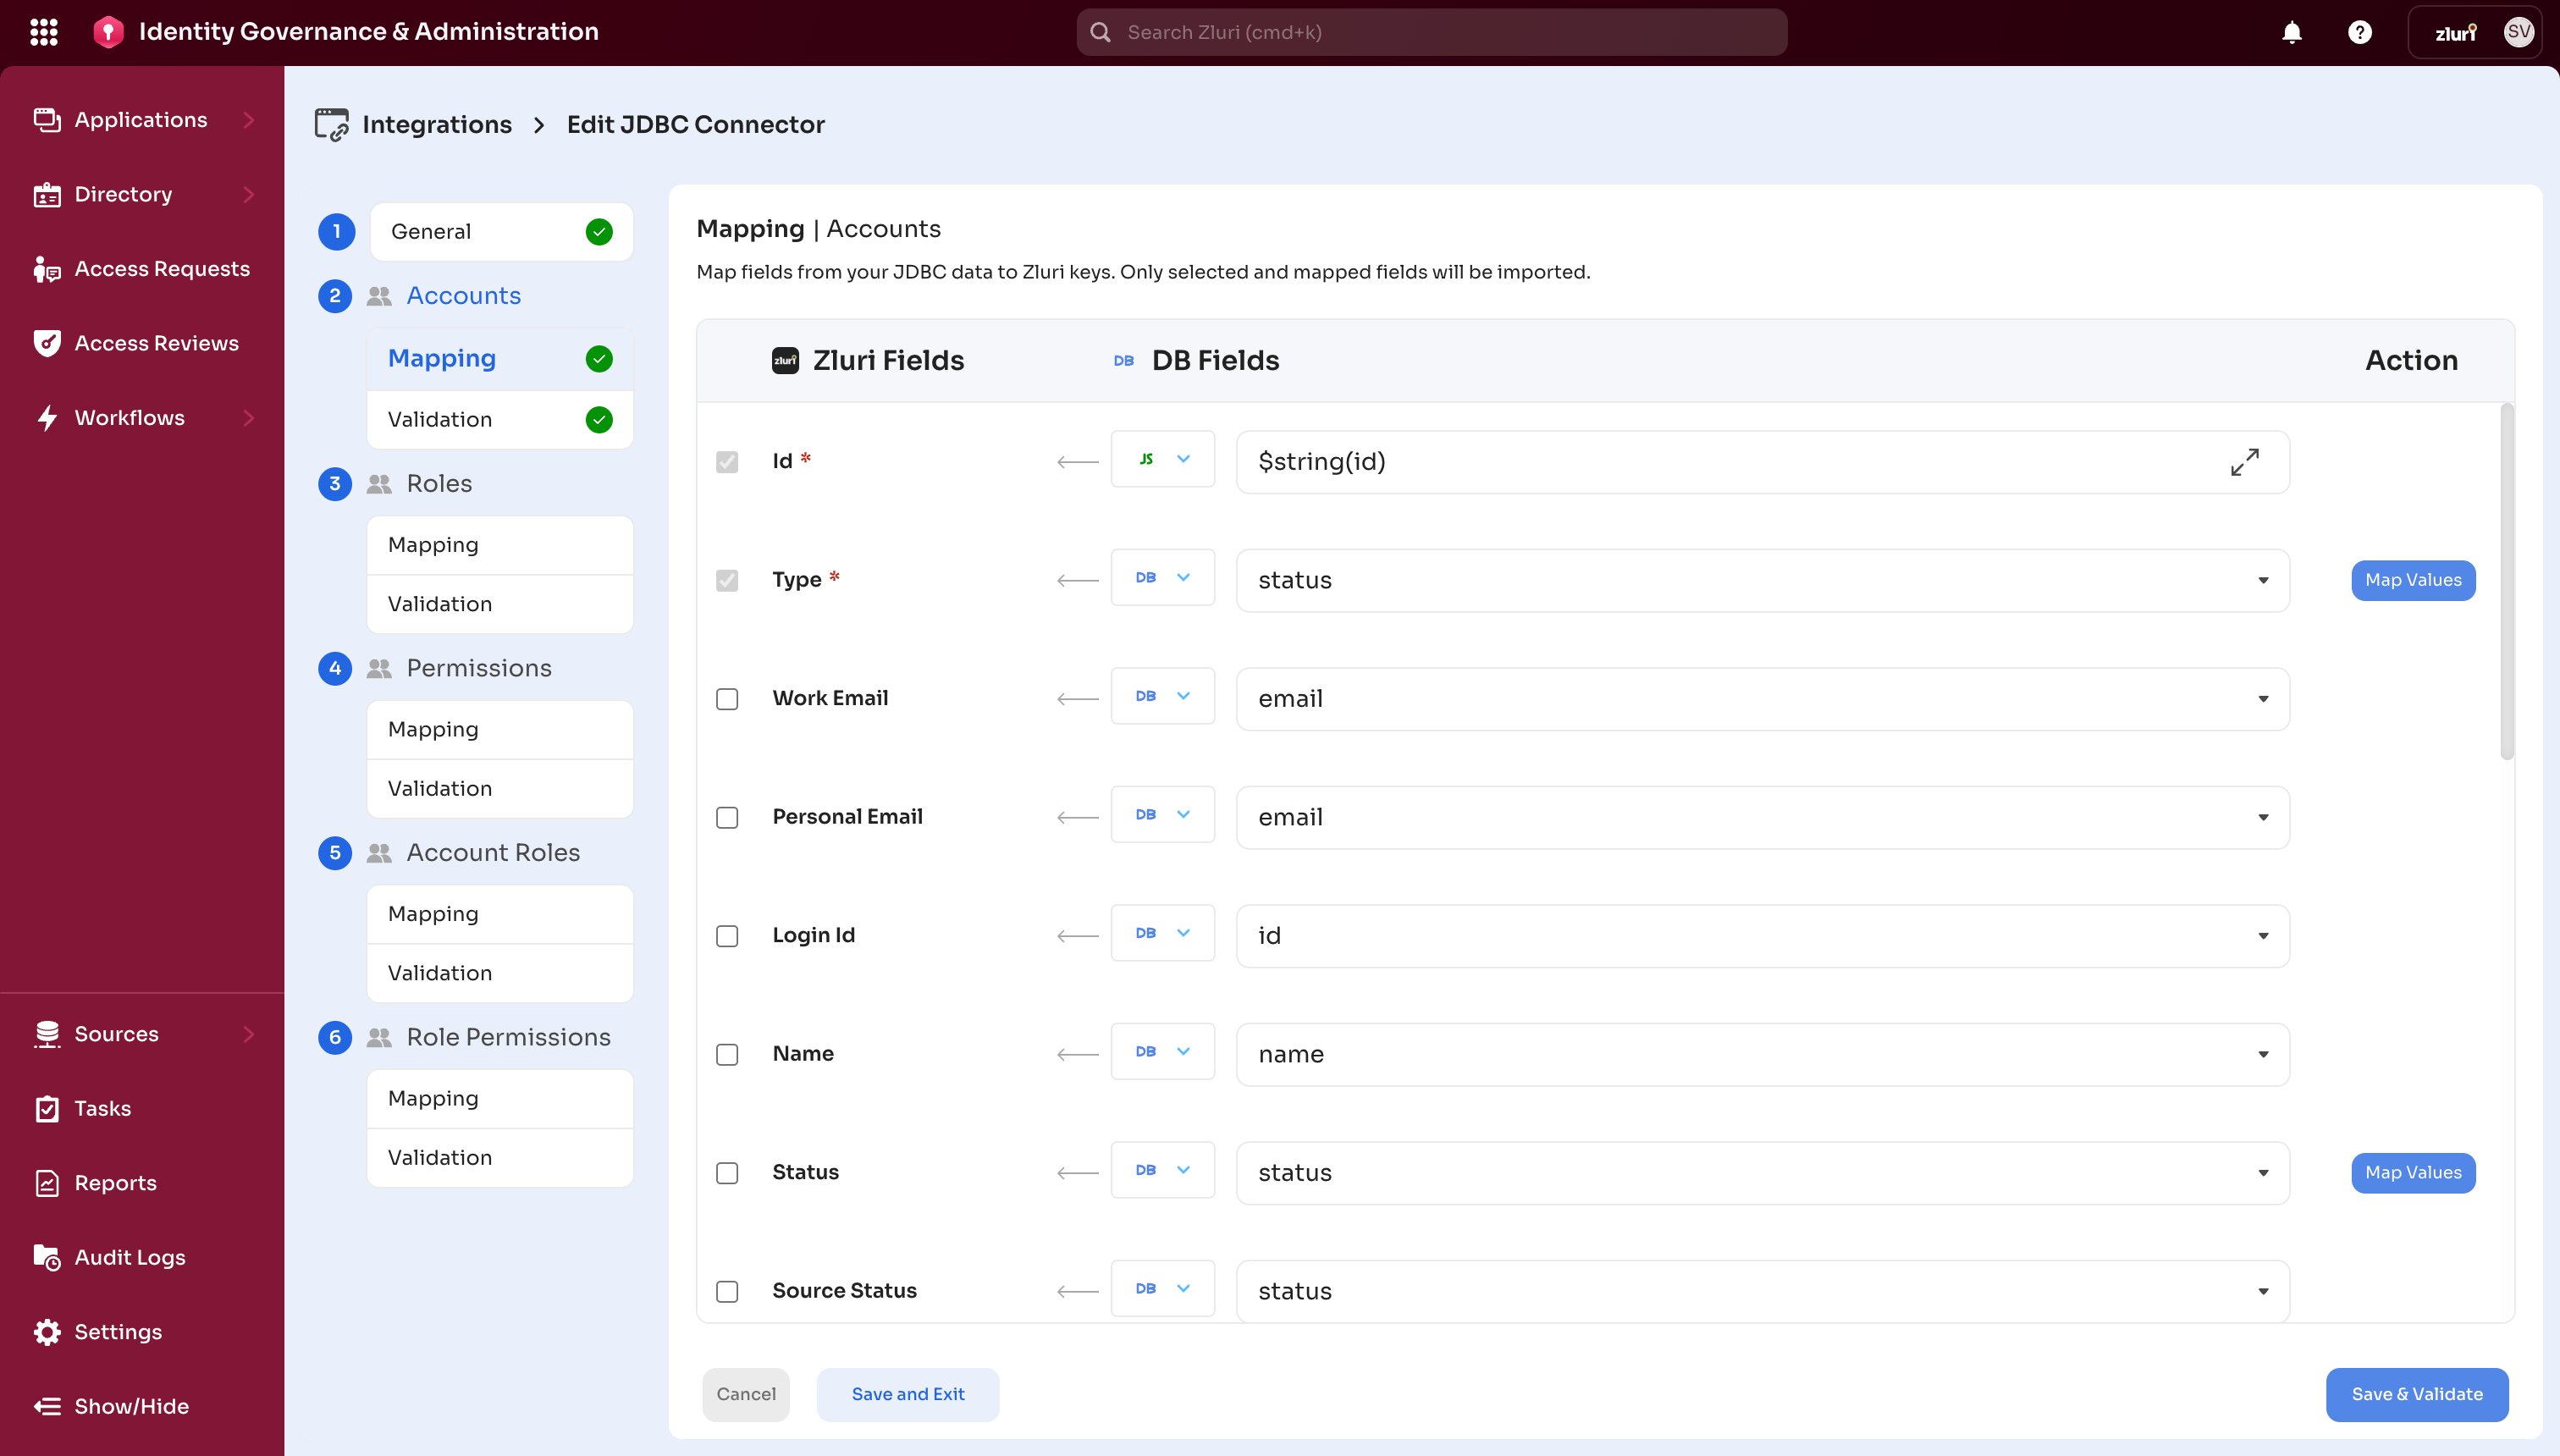
Select Save & Validate to continue.
Step 2 — Validate
The Validation step checks that your data is formatted correctly for import. The result grid shows your records with any per-cell errors highlighted; select a flagged cell to see the reason (for example, Field is required).
Resolve every flagged error, then select Save & Continue.
Repeat mapping and validation for each entity you selected (Accounts, Roles, Permissions, and any dependent entities). Select Save and Exit at any point to save progress and return later.
Part 7: Verify the connection
After you finish mapping and validation, the connector begins syncing on its schedule. Confirm the connection is healthy from two places:
- In the Zluri platform, the connector shows as connected and begins its first sync.
- On the agent, the Dashboard shows the agent as Active, and Logs records sync activity.
Your database is now connected to Zluri.
Reset the agent admin password
The agent allows exactly one admin account. If you lose the password, reset it from the agent host.
confirm the exact reset command and where it runs for the Docker build before publish. The agent UI references agent-core --reset-admin-password; confirm whether this runs on the host or inside the container, e.g. docker exec <container> agent-core --reset-admin-password.]
Security
- The agent admin password is stored hashed on the agent host and never leaves it.
- The agent connects to Zluri over an outbound-only, encrypted connection. No inbound ports need to be opened.
- Zluri recommends enforcing TLS on the database connection so data between the agent and your database is encrypted in transit.
Problems connecting? Submit a ticket or contact Zluri support.
Updated about 3 hours ago